
Declutter your workspace in style with this triangle DIY desk organizer!
Simple to make and endlessly versatile, it's a perfect solution for storing notes, pens, and loose desk items.
Personalize it to suit your style or create it as a thoughtful gift for teachers, students, or coworkers.

Jump to:
When it comes to staying organized, a DIY desk organizer can make all the difference.
This triangle-shaped organizer is not only functional but also a fun and creative craft project.
Whether you're using it to hold loose notes, pens, paper clips, or even small craft supplies, it's a chic addition to any workspace.
Its unique prism design gives it a modern look while being simple enough for anyone to make.
Made using A4 printer paper or cardstock for added durability, this organizer is a quick craft that's as practical as it is stylish.
Whether you're looking for a thoughtful teacher's gift, a back-to-school project, or a way to tidy up your desk, this step by step origami DIY desk organizer ticks all the boxes.
These triangle DIY desk organizers are compact enough to fit on any desk while still being roomy enough for your essentials.
And it's not just for desks! This versatile craft can be adapted for different uses, making it a lovely addition to craft rooms, home offices, or even kids' study areas.
Read on to learn how to create your own triangle desk organizer and add a personal touch to your workspace.
Other quick and easy desk organizers you might like to try include this super cute Hexagon DIY Pen Holder, DIY Mini Paper Drawers, or even these Paper Pencil Wraps.

Why You'll Love This Pattern
- Practical: Helps declutter and organize desk space effectively.
- Customizable: Choose your favorite paper colors and patterns.
- Versatile: Can be used for various items like notes, pens, or paper clips.
- Great gift idea: Perfect for teachers, coworkers, or students.
- Simple and fun: A quick and enjoyable project for all skill levels.
- No glue or scissors are required for this paper craft project.
Exclusive Content Just For You
Not sure what you want to make next, but feeling a bit creative? Or maybe you've been searching for a pattern that sparks something new. We've got a few ideas waiting for you.
The Fold Collective, Easy Foldable Creations' community, provides you with a library of exclusive ad-free video tutorials, printable PDF patterns, helpful tips, and more so you can improve your skills and enjoy crafting in your own time.
Skill Level
★☆☆☆☆ (Very Easy)
Materials Needed
- A4 printer paper, U.S. letter paper, or lightweight cardstock
Paper Size Options and Finished Dimensions
- A4: Makes an organizer approximately 4 inches x 3 inches (10.5 cm x 7.5 cm).
Paper Type & GSM
- Printer Paper: Lightweight and easy to fold.
- Lightweight Cardstock (120-160 GSM): Provides more durability for holding heavier items.
Instructions
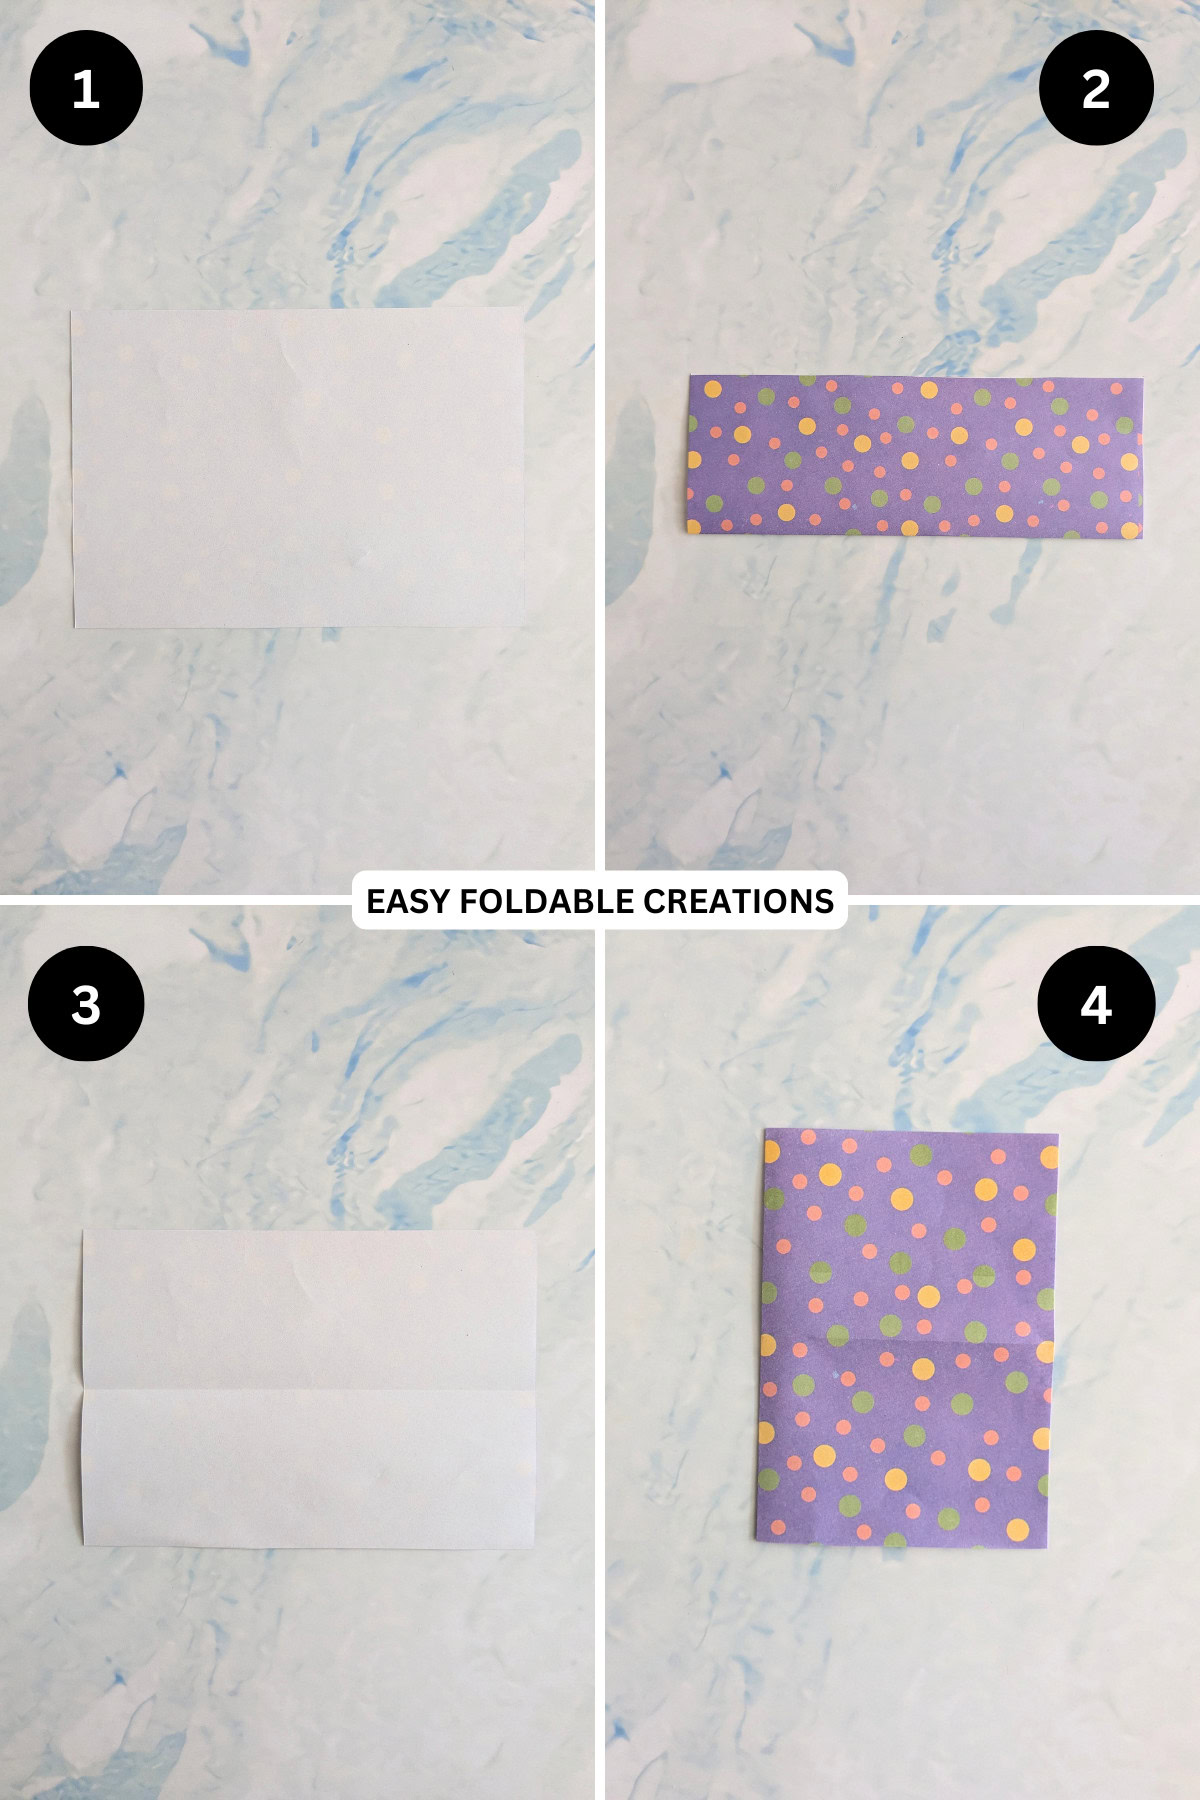
Step 1: Start with the color you want your triangle organizer to be facing down. Arrange your paper to sit horizontally.
Step 2: Fold the bottom edge to meet the top edge.
Step 3: Unfold previous step.
Step 4: Fold the left edge to meet the right edge.
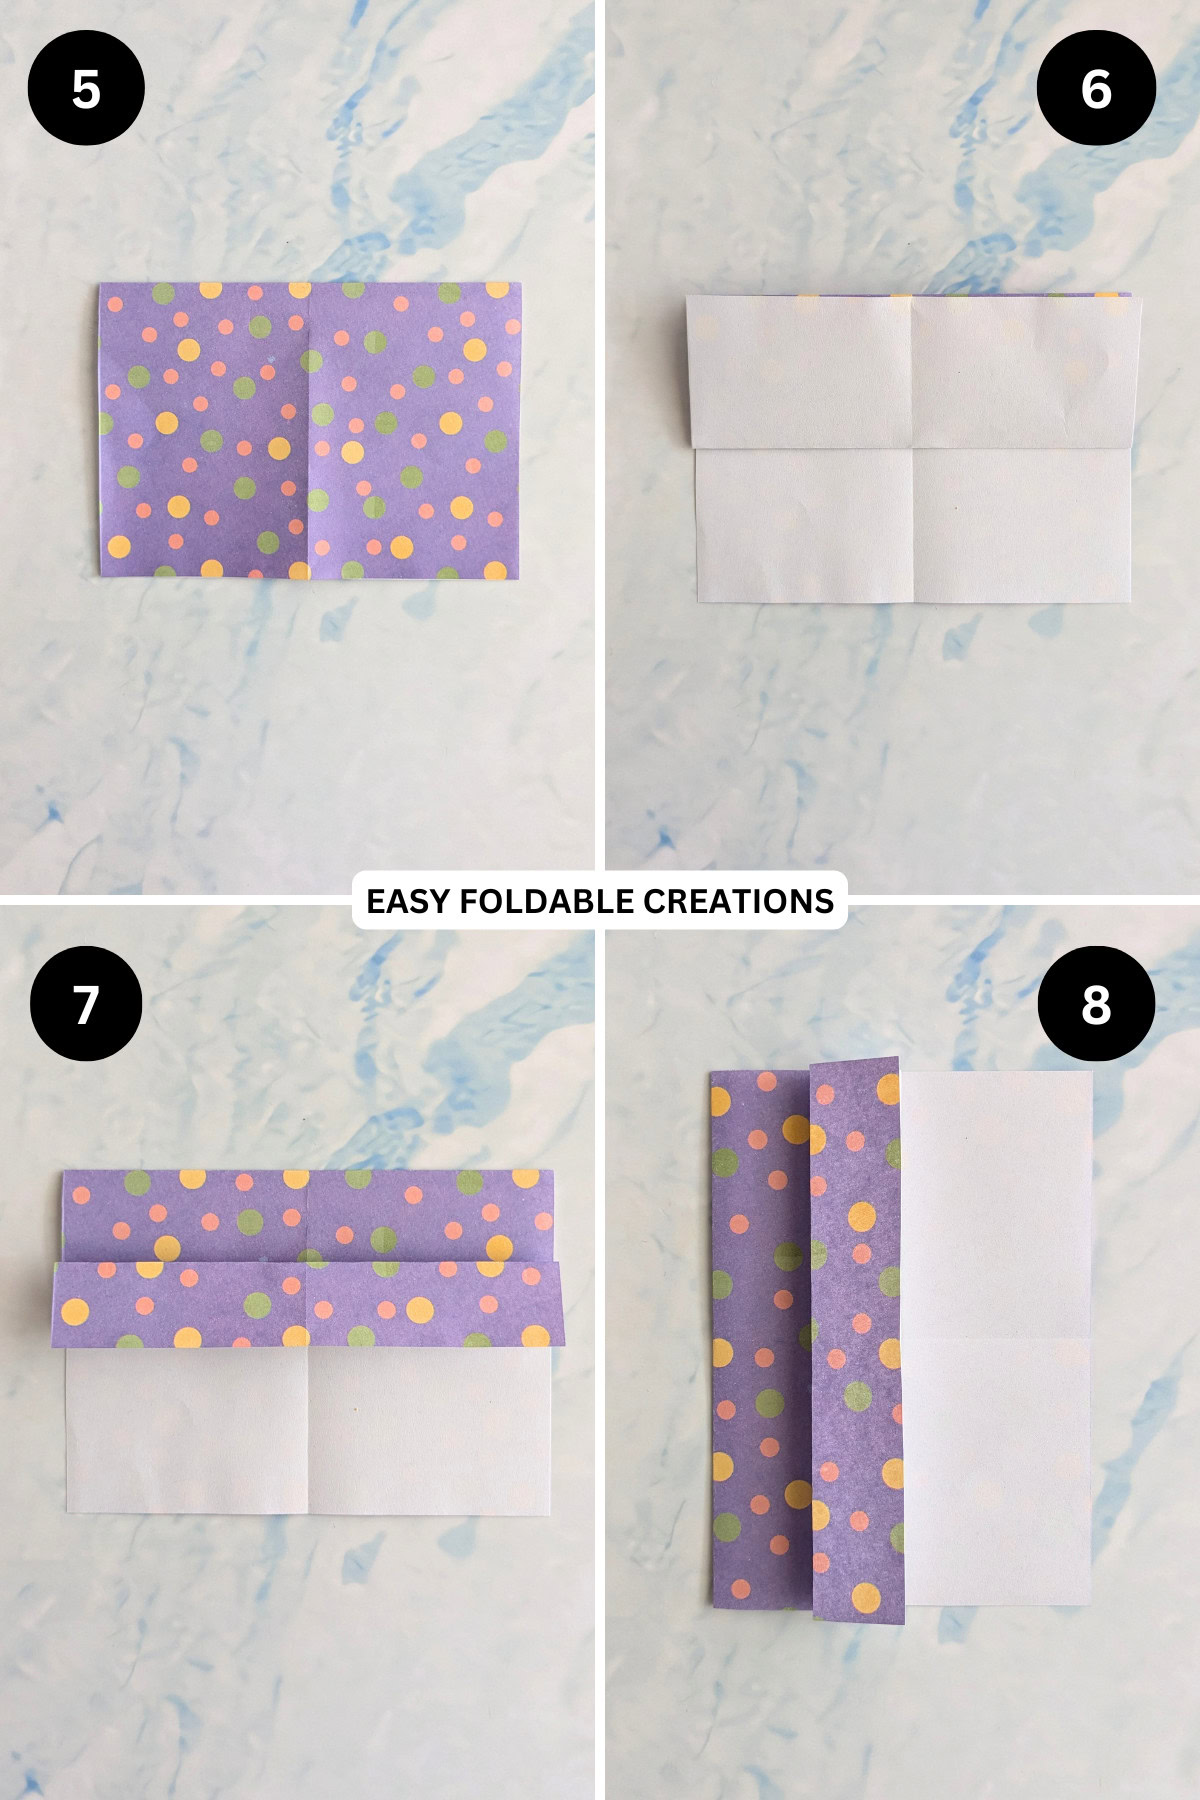
Step 5: Rotate your paper 90 degrees, keeping the open edge towards you.
Step 6: Fold the bottom edge (top layer only) to meet the top edge.
Step 7: Fold the top edge (top layer only) to meet the middle of the paper (the bottom edge of the top layer).
Step 8: Rotate your paper 90 degrees, keeping the fold you just made on the left.
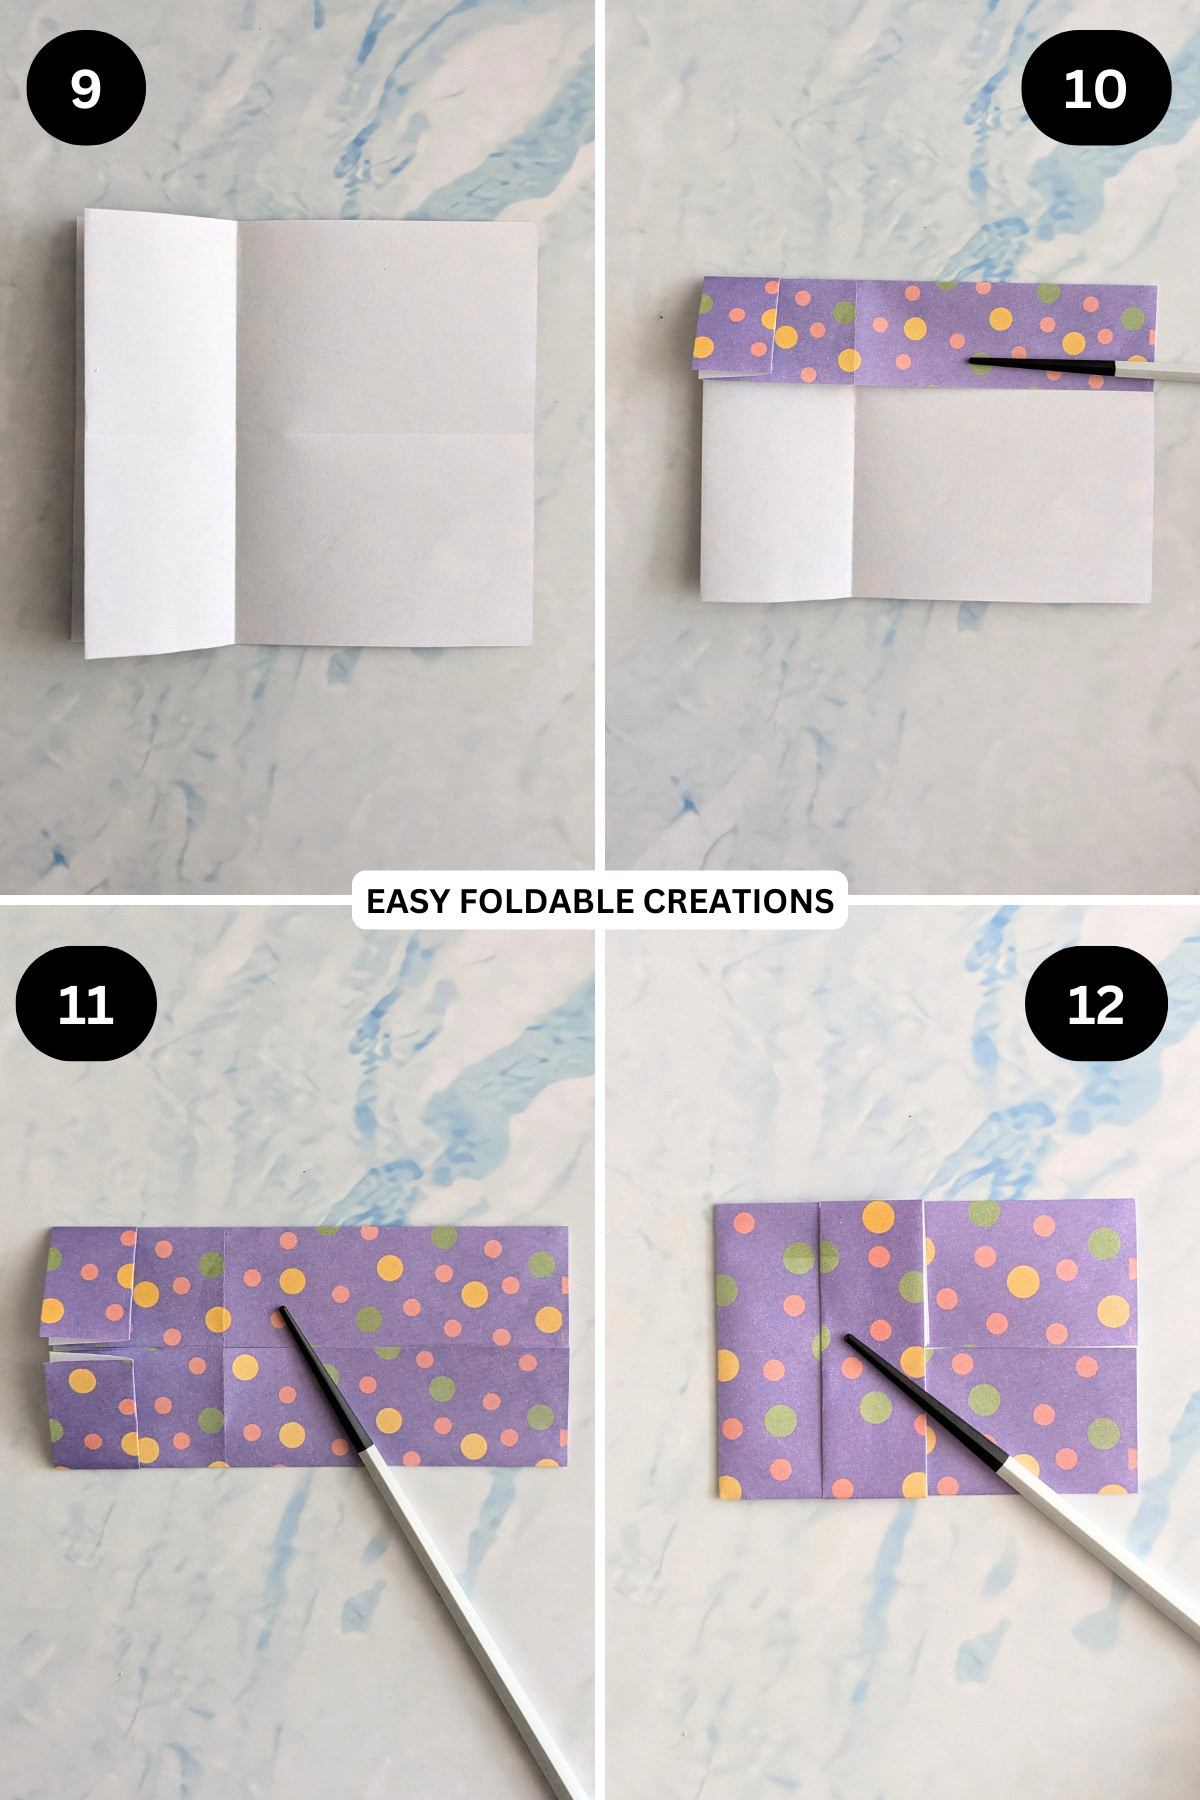
Step 9: Fold the upper right edge towards the left.
Step 10: Fold the top edge down to meet the middle crease.
Step 11: Fold the bottom edge up to meet the middle crease.
Step 12: Fold the left side of the paper towards the right, along the existing vertical crease (see picture).
Step 13: Rotate your paper 90 degrees, keeping the open edges towards you.
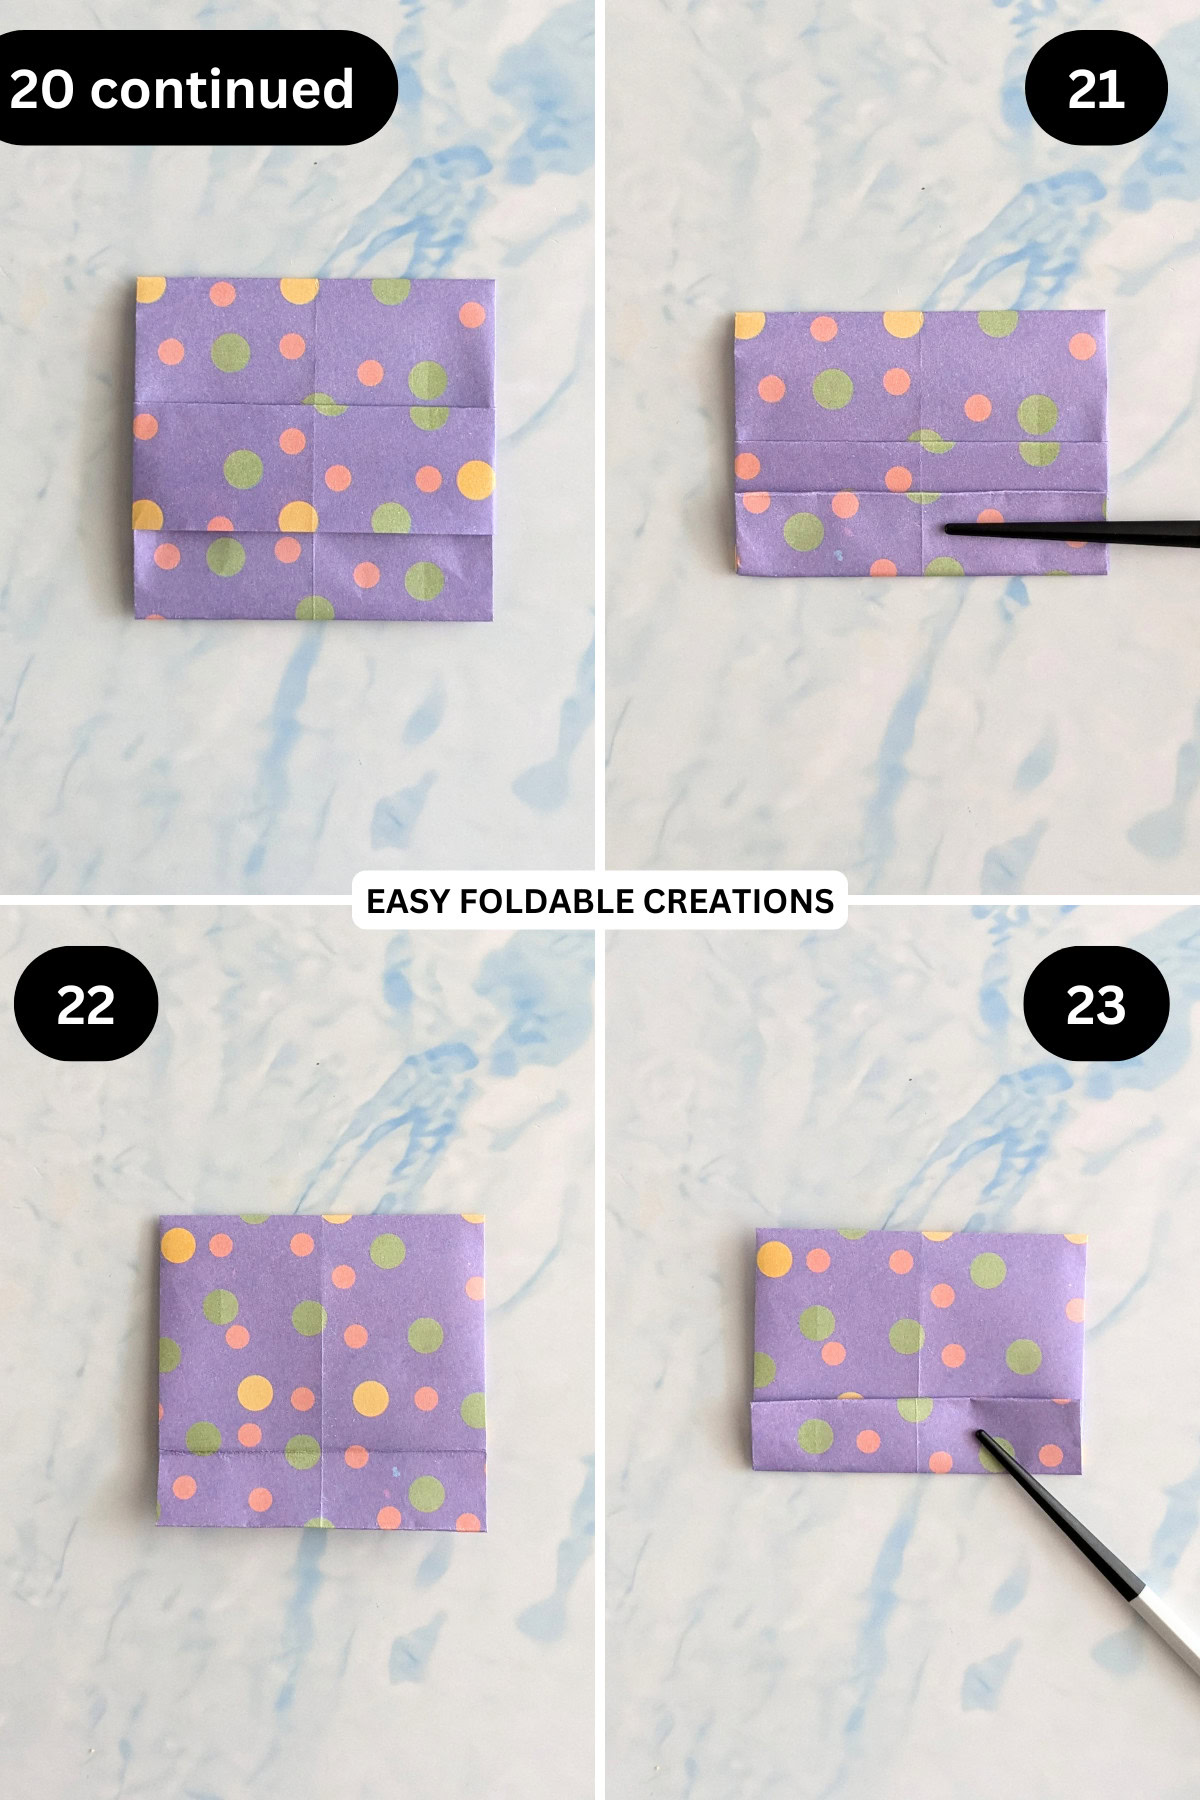
Step 14: Fold the bottom edge up to meet the middle of the lower rectangle found on the top (see picture).
Step 15: Unfold previous step.
Step 16: Flip your paper over from left to right.
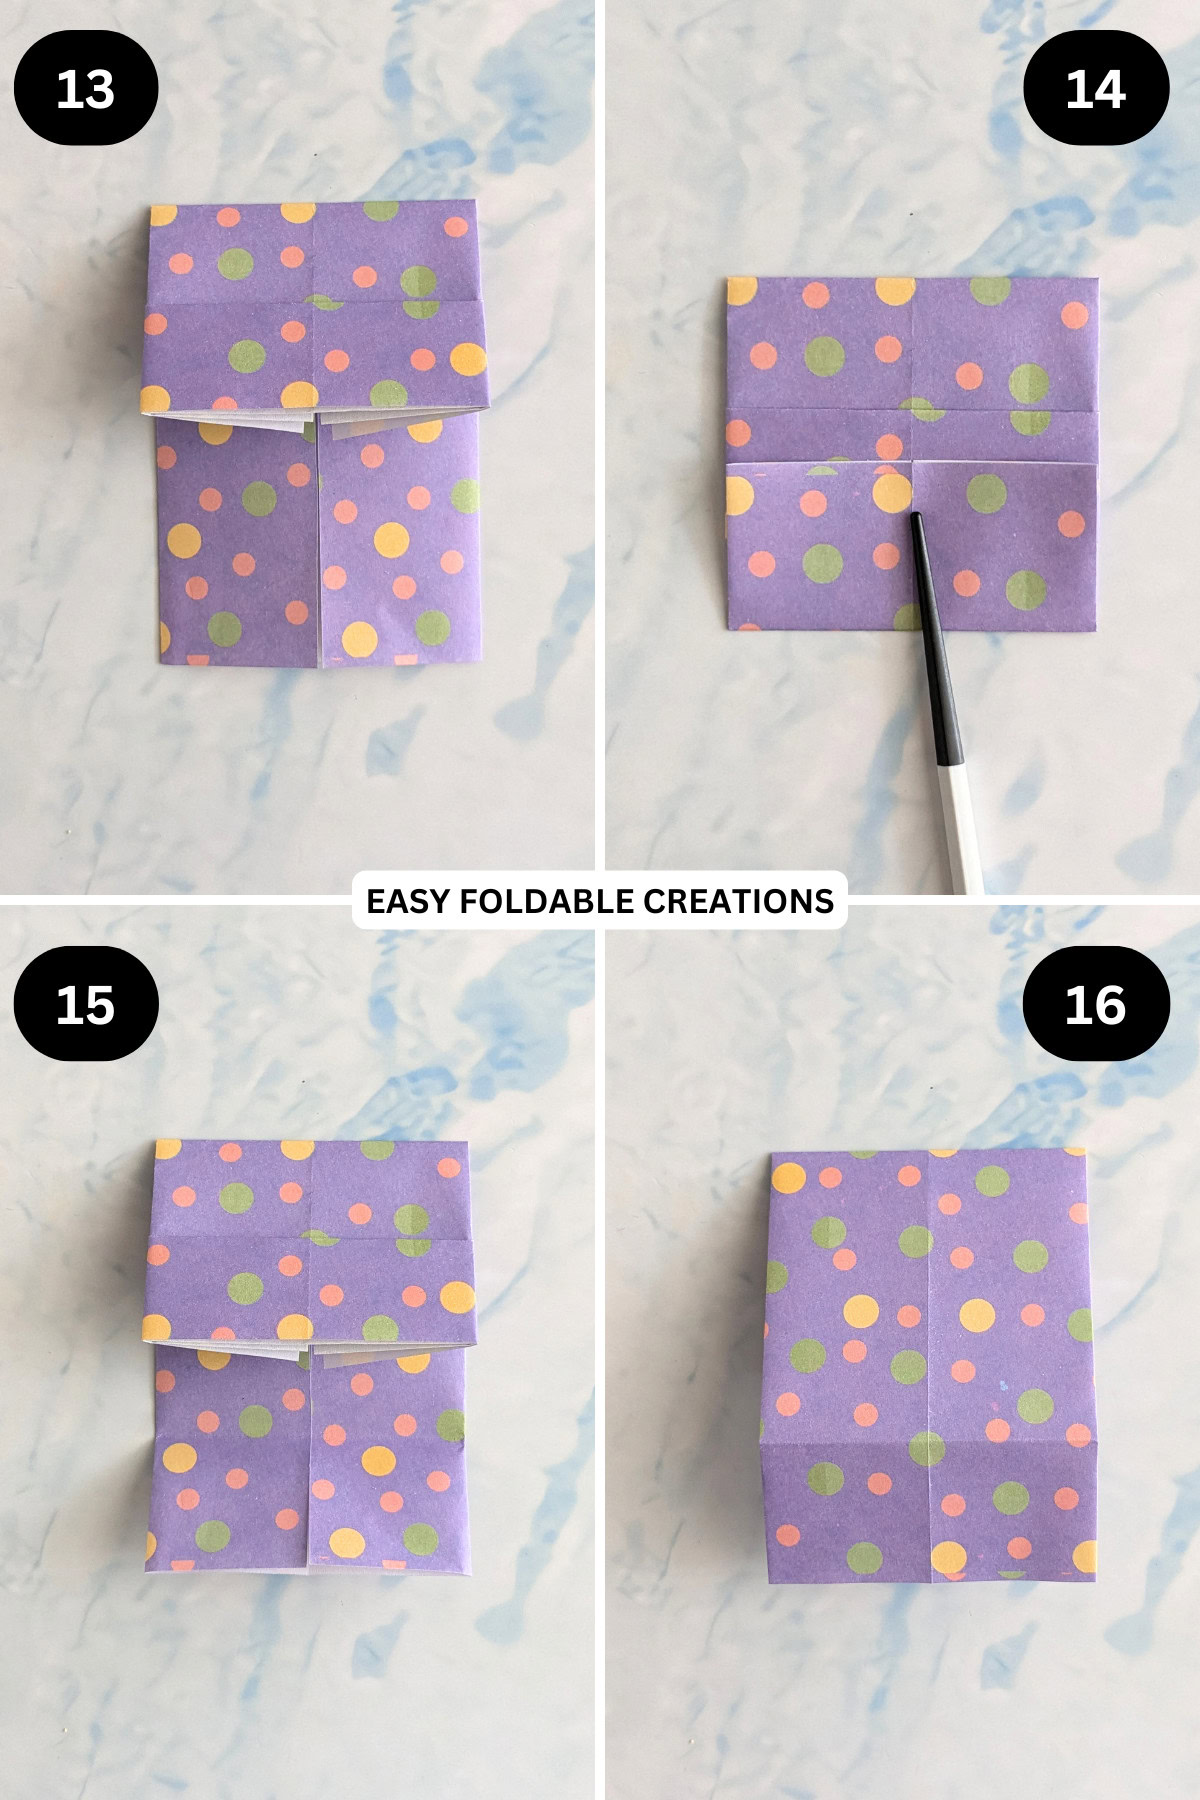
Step 17: Refold along the crease you made in step 14.
Step 18: Unfold previous step.
Step 19: Flip your paper over from left to right.
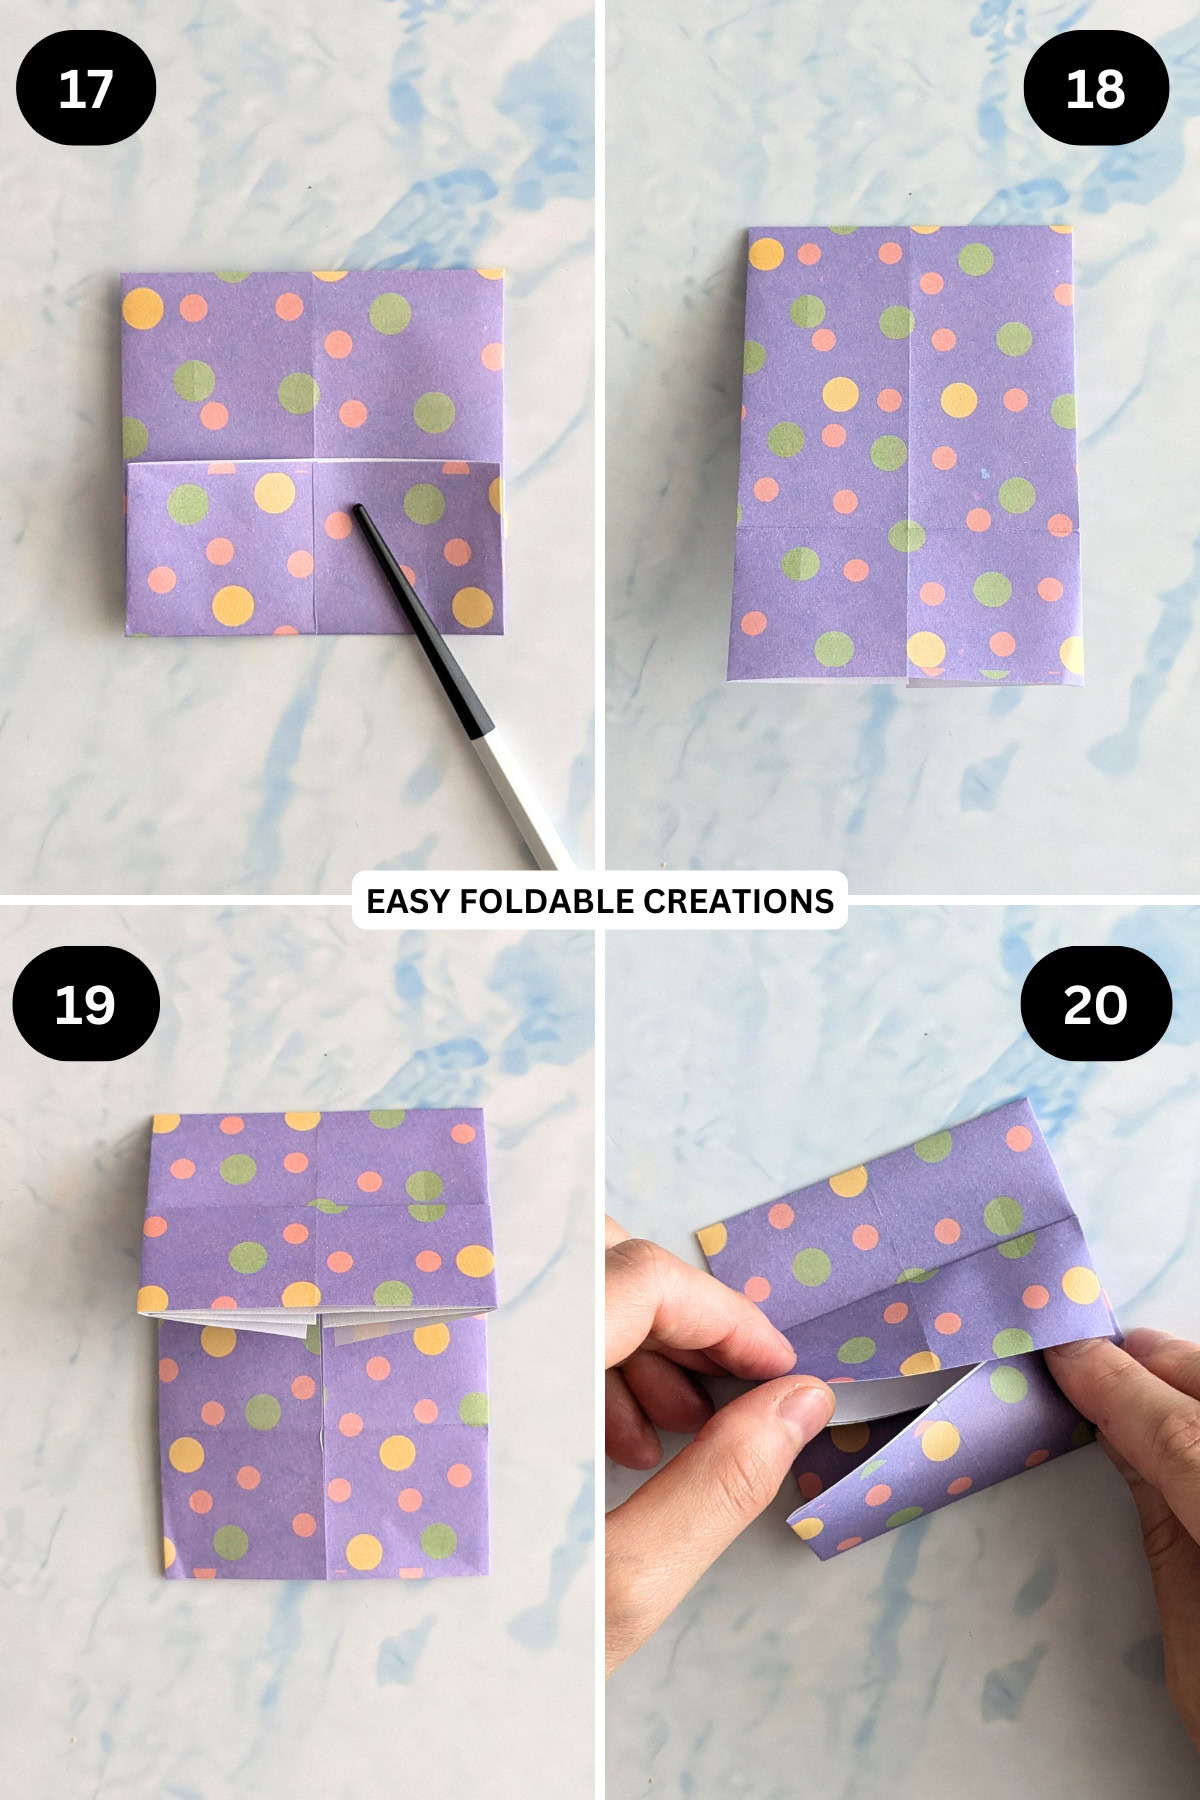
Step 20: Refold along the bottom horizontal crease, and tuck it's edge into the pocket found in the rectangle. Flatten.
✨ You're almost there! ✨
To unlock the final steps of the photo tutorial and complete your pattern, create a free account with Grow.me. below.
Make sure you tick the box to subscribe to our newsletter and stay up to date with the latest patterns, tips, and more!
Once you're signed up, you'll get instant access to finish your project with the photo tutorial and enjoy exclusive content in the future.
Already signed up? Hit the button below and select 'Switch to Log In' to pick up where you left off and finish your project!
Step 21: Fold the bottom edge up along the bottom edge of the rectangle. Crease well.
Step 22: Unfold previous step and flip your paper over from left to right.
Step 23: Refold along the crease you made in step 21.
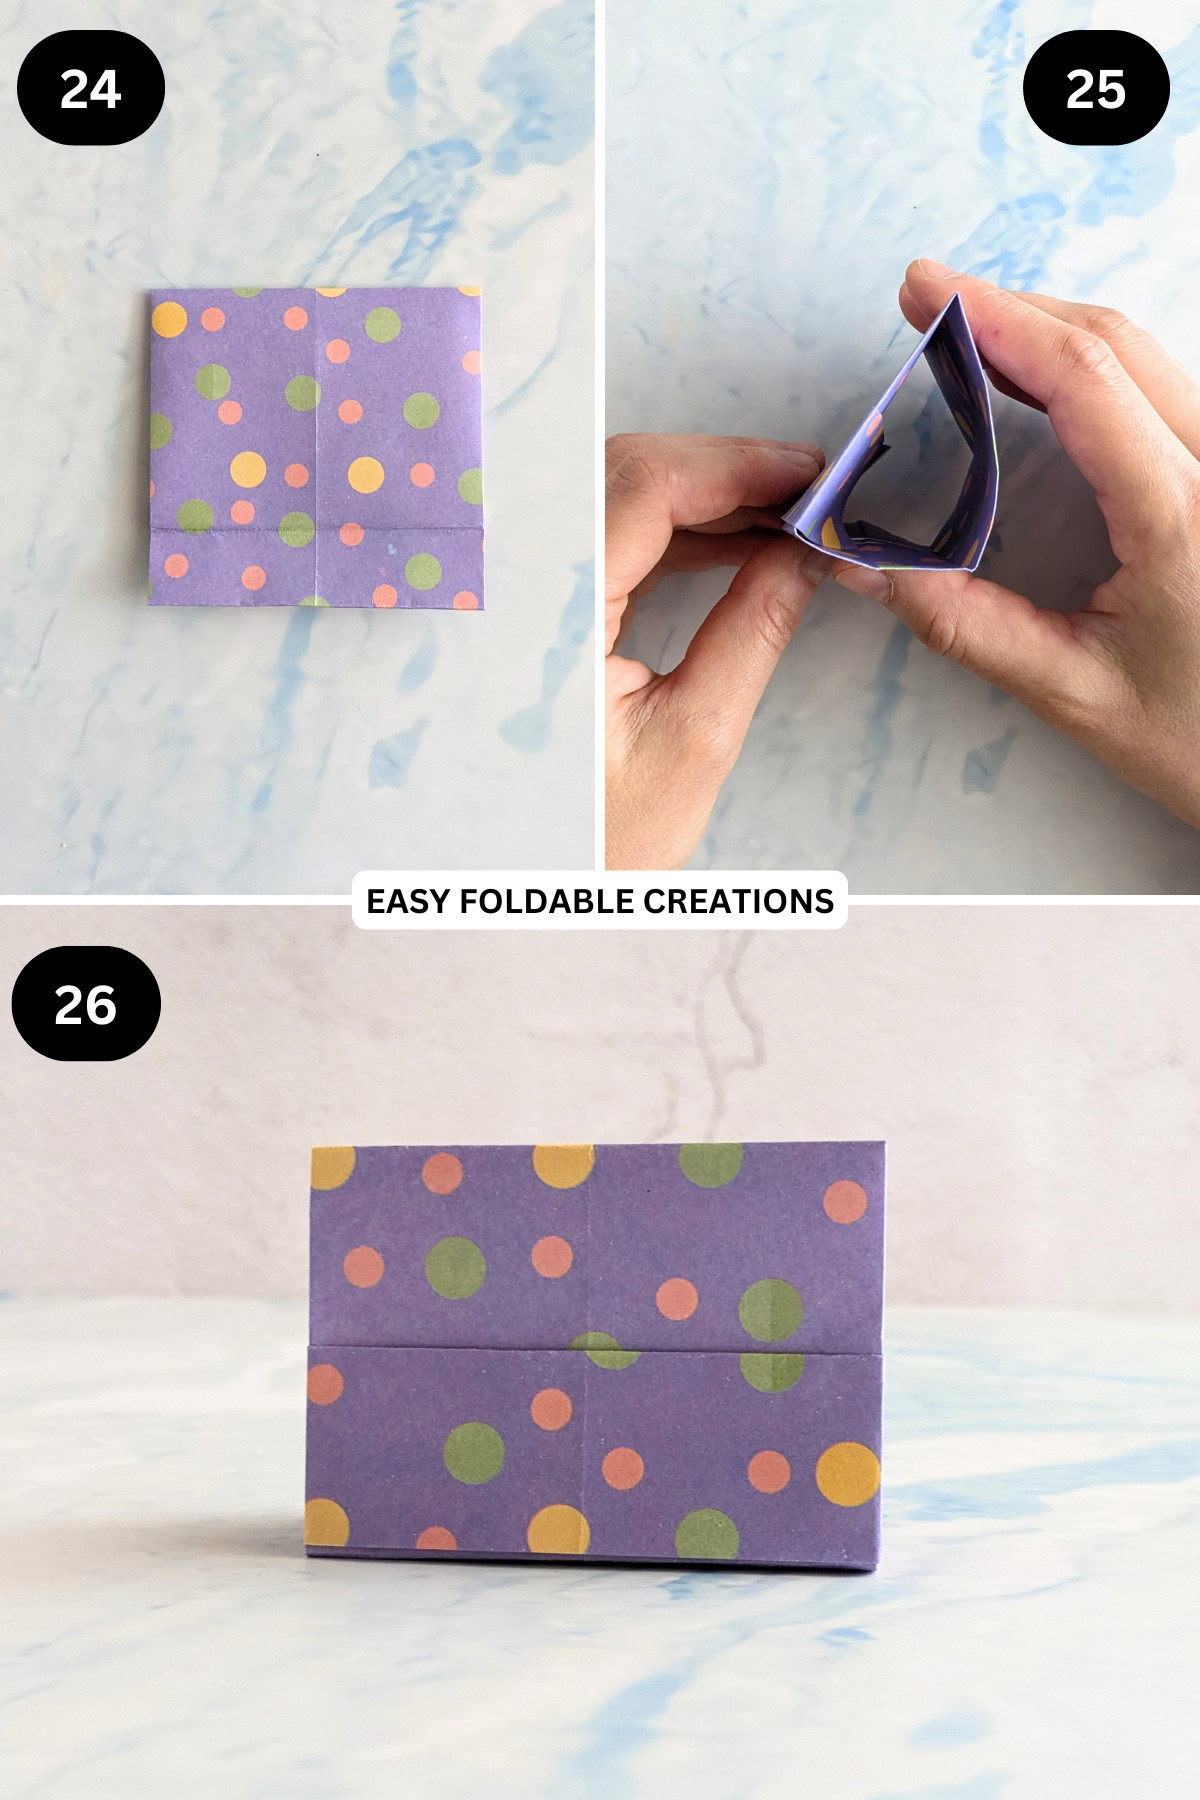
Step 24: Unfold previous step.
Step 25: Gently open out your paper and flatten the bottom.
Step 26: Completed triangle DIY desk organizer.
Tips For Success
- Crease your folds sharply using a bone folder or the edge of a ruler.
- Use cardstock for a sturdier organizer if you're storing heavier items.
- Test-fit all sections before gluing to ensure alignment.

Color, Paper Ideas, and Variations
- Opt for patterned paper to add visual interest and personality.
- Create multiple organizers in complementary colors for a cohesive desk setup.
- Decorate with washi tape or stickers for a playful touch.
FAQ
Absolutely! It's a simple paper craft project for kids.
Yes, you can! Use A5 sized paper for a smaller triangle DIY desk organizer.
Other Paper Crafts You Might Like To Try:
Helpful Origami Tips
If you're curious to learn more about origami, you might like to look at our basic guides on how to make some common origami folds.
Start with the valley fold and mountain fold-these are the foundation of most origami models.
Once you're comfortable, you might like to try the petal fold for 3D shapes, and explore the bird base and square base for more complex designs.
The water bomb base is also great for creating inflatable or geometric models, like this inflatable origami rabbit.
Useful Paper Craft Terms
Want to learn a little more about paper crafts and origami?
We've made this helpful printable just for you. It explains common terms and helpful tips you might come across when you are folding origami or making a paper craft project.
You can download the useful paper craft terms printable PDF here.
Stay Connected
Made this pattern? Let us know how it went in the comments below!
Pin this post - Pin now to take your paper crafting skills to the next level.
Share on Instagram or Facebook - Capture the beauty of your finished paper craft project and share it on Instagram or Facebook! Tag us @easyfoldablecreations so we can see your work!

On the hunt for more easy paper crafts.
Why not try these easy origami for beginners, pleated gift wrapping idea, fan gift wrapping idea, origami shield, origami wallet, paper photo frame, Santa gift tag, sliding origami rectangle box, 3D origami owl, origami penguin, bunny cake toppers, bunny gift box, mini paper gift bags, or rabbit face.
Other Patterns You Might Like To Try:
Looking for other easy patterns like this? Try these:


Comments
No Comments