
Create a cute and interactive inflatable origami rabbit with just one sheet of paper!
This fun and simple project is perfect for Easter, spring celebrations, or as a playful addition to your crafts collection.
Learn how to fold, inflate, and enjoy this adorable paper bunny!

Jump to:
This inflatable origami rabbit is a delightful and charming craft project that brings an extra dose of fun to your origami skills.
Whether you're a beginner or an experienced folder, this project is perfect for adding a bit of whimsy to your springtime or Easter celebrations.
Unlike some origami creations, this little bunny can be inflated-giving it a unique and interactive twist!
By blowing air into the small opening of the bunny, you can watch it puff up and take on a playful, 3D appearance.
This simple and engaging process will quickly become a favorite, whether you're making one for yourself, using it as a party favor, or creating a whole group of bunnies for an event.
The best part? It's incredibly easy to make.
All you need is a single square sheet of origami paper, and in no time, you'll have an adorable inflatable bunny that can be displayed on your desk, used as a decoration, or even given as a gift.
Perfect for a variety of occasions like Easter, birthdays, and springtime events, this inflatable rabbit adds an extra bit of fun to any occasion.
It's also great for kids, making it a perfect craft to teach little ones the basics of origami animals while giving them something fun to interact with after the project is complete.
Use it as a cute origami desk companion, party favor, or gift topper for birthdays or Easter. You could even turn it into a small ornament for your home during springtime.
Whether you're a seasoned paper artist or just getting started with origami, this step by step origami inflatable origami rabbit will make your crafting session both enjoyable and memorable.
To match this adorable origami bunny, you might like to make a 2D origami carrot and these easy bunny napkin folds.

Why You'll Love This Pattern
- Great for All Ages: This is an ideal craft for kids and beginners, offering an easy and enjoyable folding process.
- Interactive Fun: Inflate the rabbit to watch it come to life-perfect for playful moments!
- Versatile Decoration: Use it as a centerpiece for Easter, a fun addition to a birthday party, or a charming gift decoration.
- Perfect for Spring: The inflatable bunny fits seamlessly into your spring and Easter crafts collection, adding a pop of fun and personality.
- Easy to Make: With just one sheet of paper, this craft is quick to fold, making it an ideal option for short, enjoyable crafting sessions.
- Inexpensive and Reusable: All you need is a square sheet of paper-an affordable and eco-friendly project to make again and again.
Exclusive Content Just For You
Not sure what you want to make next, but feeling a bit creative? Or maybe you've been searching for a pattern that sparks something new. We've got a few ideas waiting for you.
The Fold Collective, Easy Foldable Creations' community, provides you with a library of exclusive ad-free video tutorials, printable PDF patterns, helpful tips, and more so you can improve your skills and enjoy crafting in your own time.
Skill Level
★★☆☆☆ (Easy)
Materials Needed
- 1 sheet of square paper.
- E.g. 6 inch x 6 inch (15cm x 15cm) origami paper. This will make a medium sized bunny rabbit.
Instructions
Step 1: Start with the color you want your rabbit to be facing up.
Step 2: Fold the paper in half from left to right.
Step 3: Unfold previous step.
Step 4: Fold the paper in half from top to bottom.
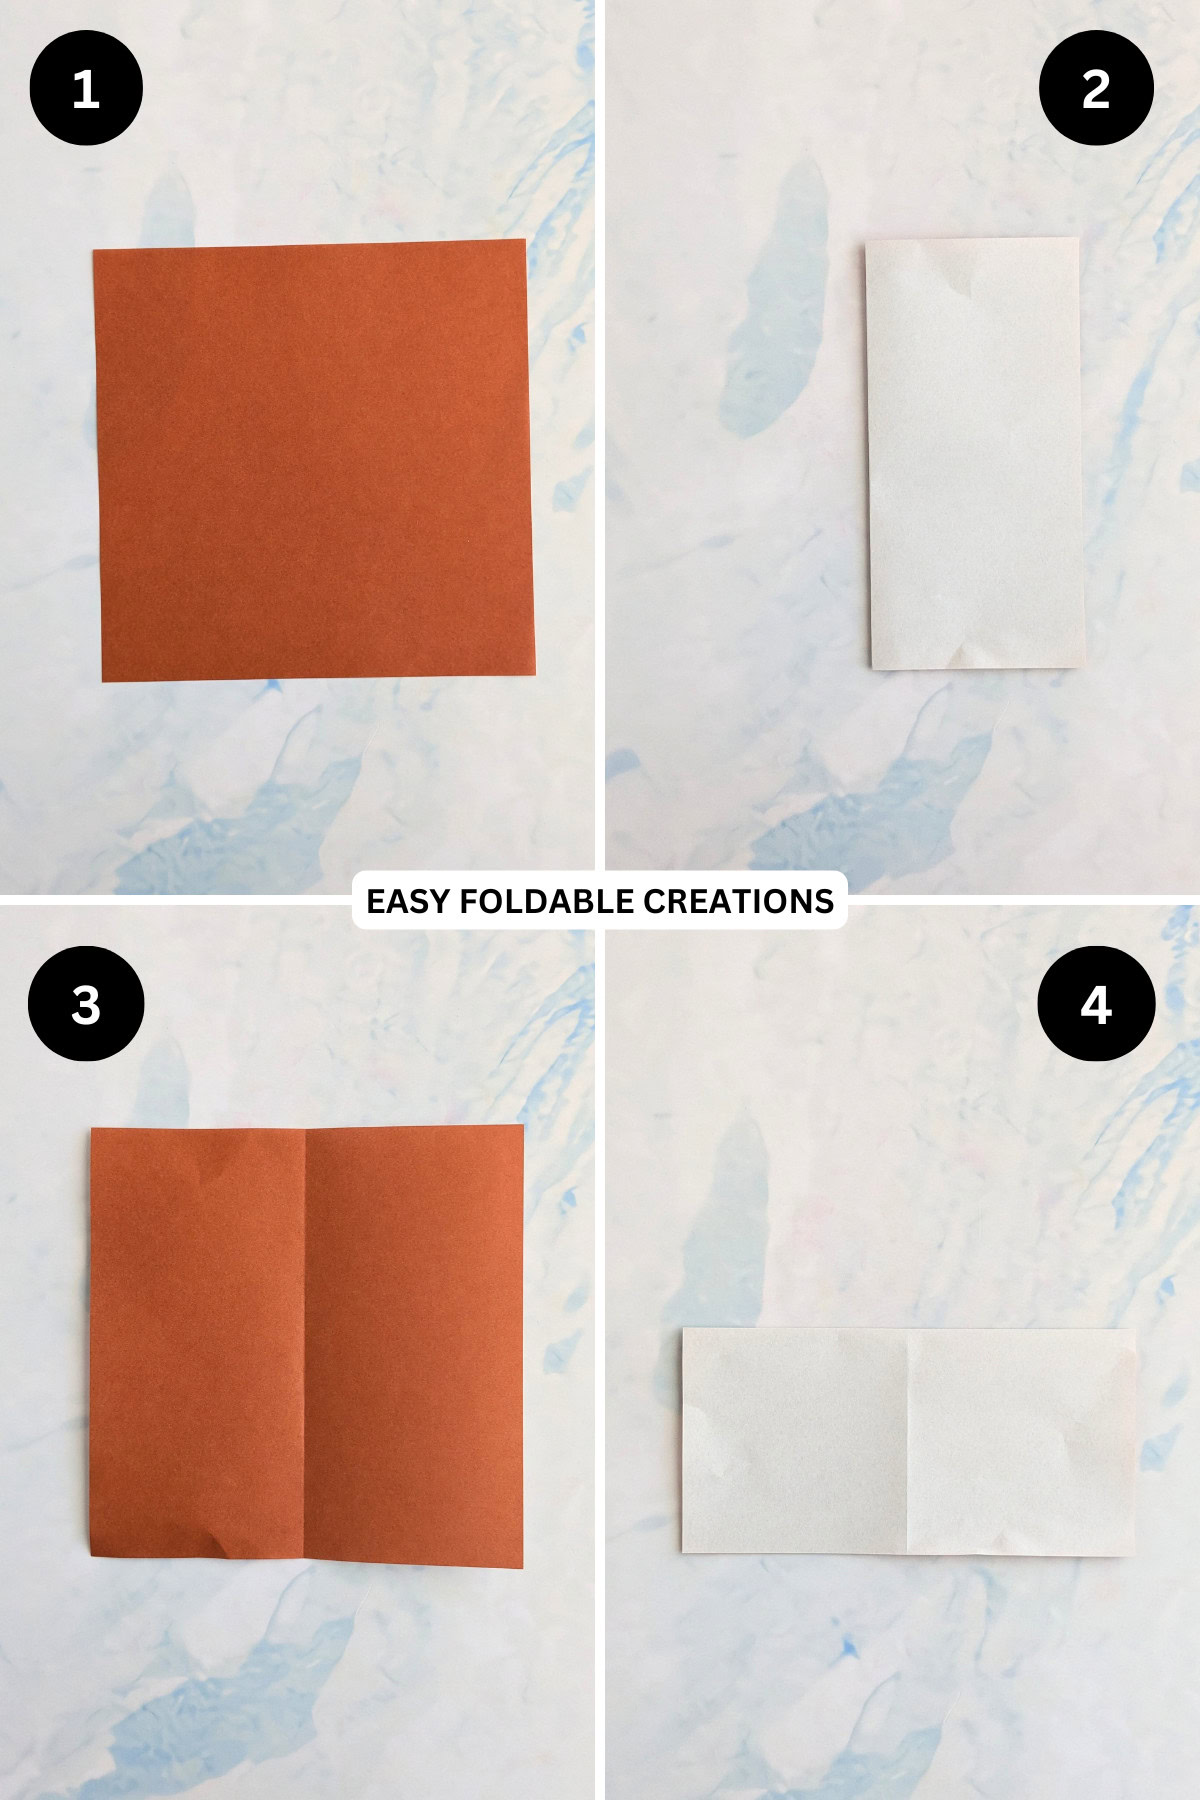
Step 5: Unfold previous step.
Step 6: Flip your paper over from left to right.
Step 7: Fold the bottom left corner to meet the top right corner.
Step 8: Unfold previous step.
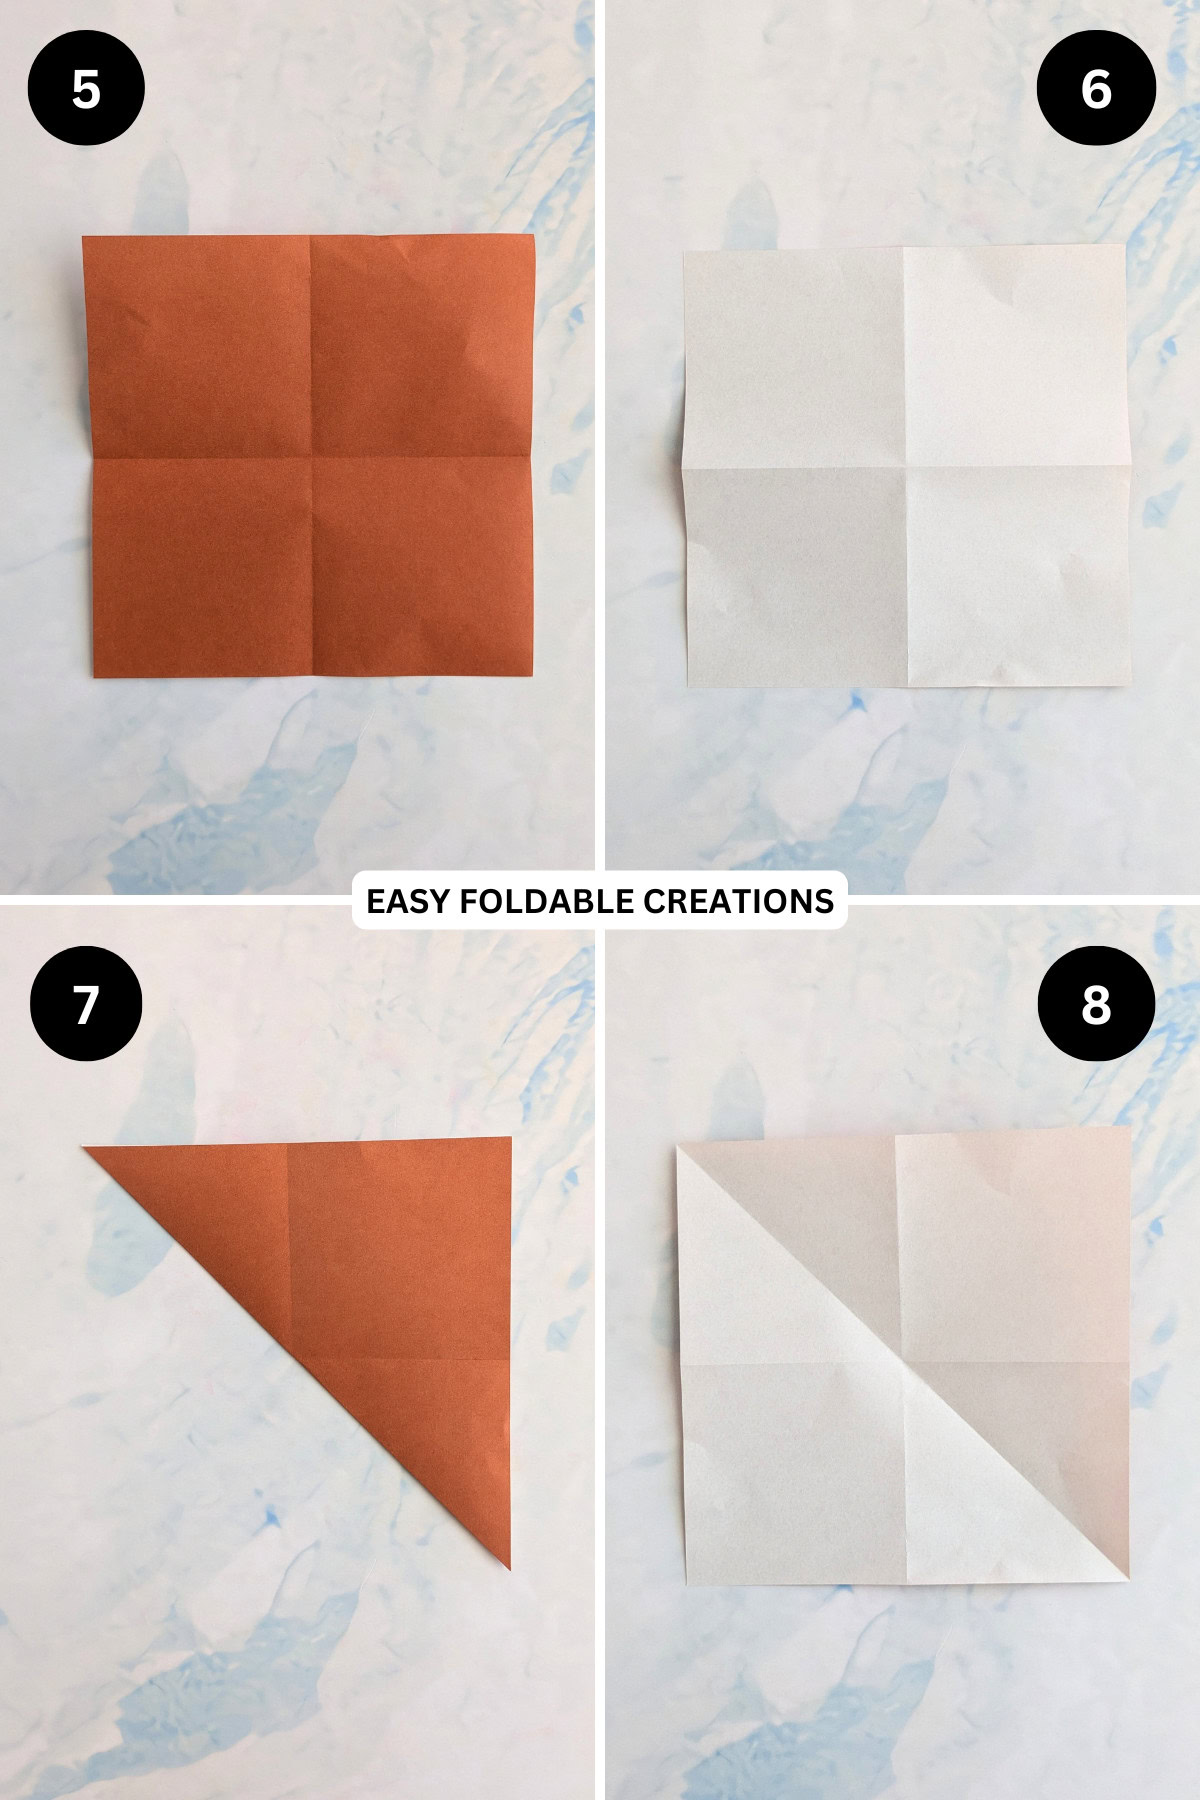
Step 9: Fold the bottom right corner up to meet the top left corner.
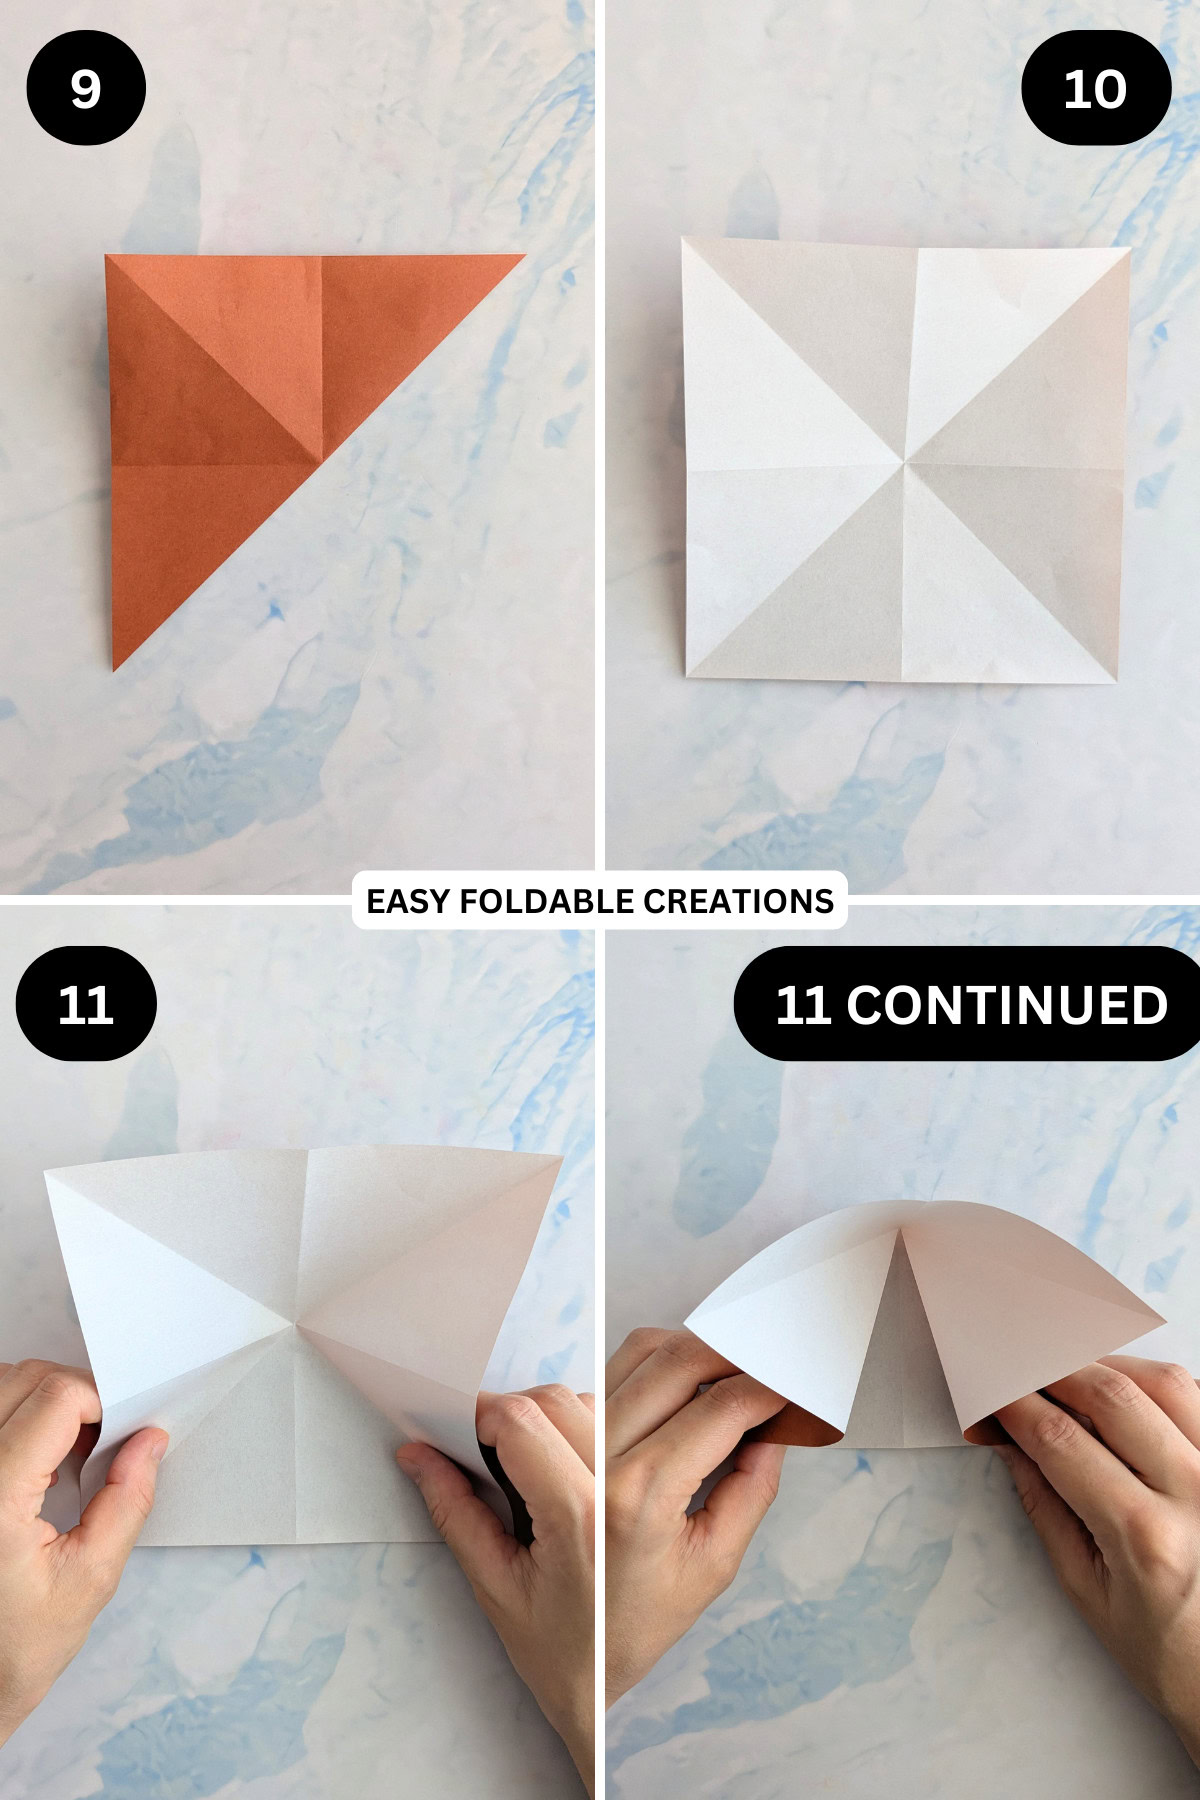
Step 10: Unfold previous step.
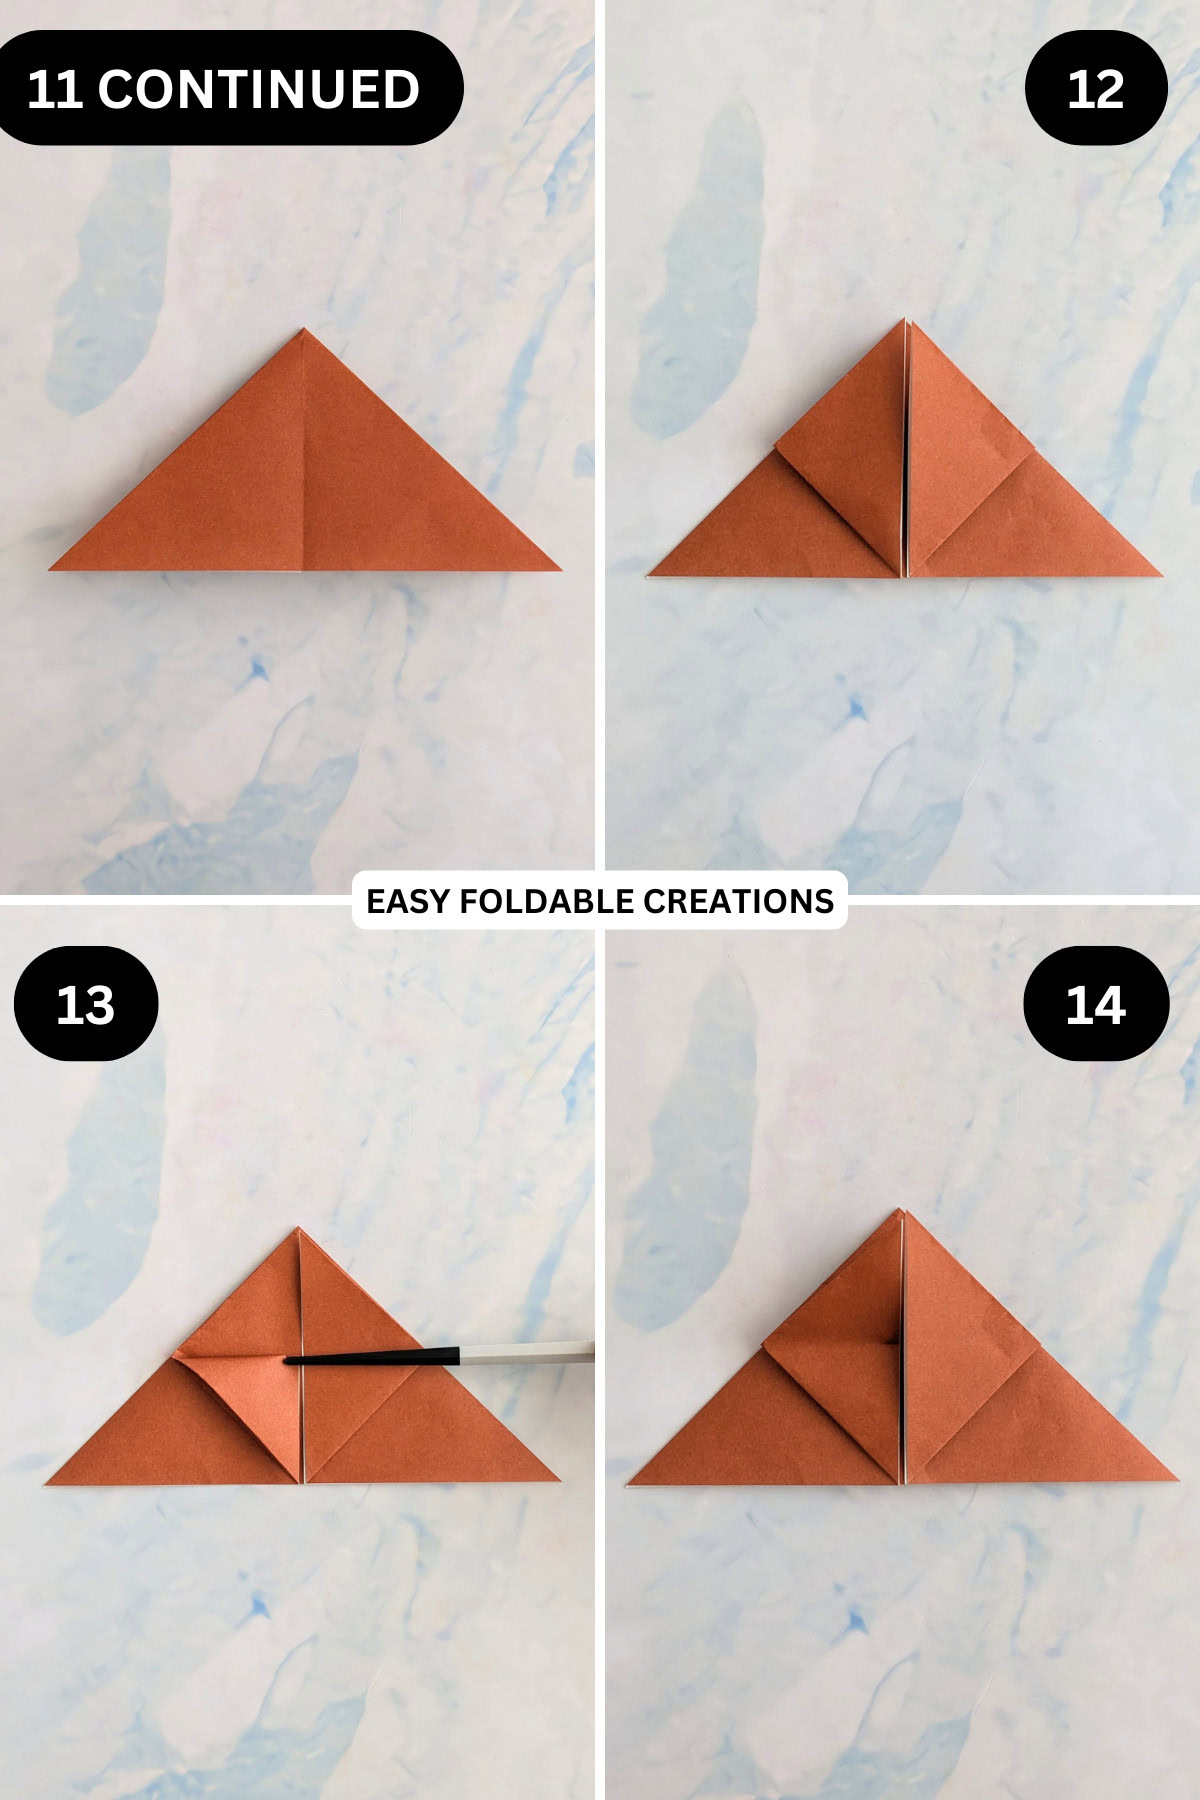
Step 11: Hold the left and right sides of the paper and bring the sides inwards and then down. Flatten the paper into a triangle shape. This is known as an origami water bomb base.
Step 12: Fold the bottom left and right corners (top layer only) up to meet the top point.
Step 13: Fold the top left flap down to meet the bottom edge, making a small crease only in the centre.
Step 14: Unfold previous step.
Step 15: Fold the left and right points of the inner flaps to meet the crease you made in step 13.
Step 16: Fold the top 2 points down to align with the flaps your made in the previous step.
Step 17: Fold the same flaps outward on a diagonal.
Step 18: Unfold previous step.

Step 19: Tuck the top left loose flap into the pocket of the left triangular flap.
Step 20: Repeat previous step for the top right flap.
Step 21: Flip your paper over from left to right.
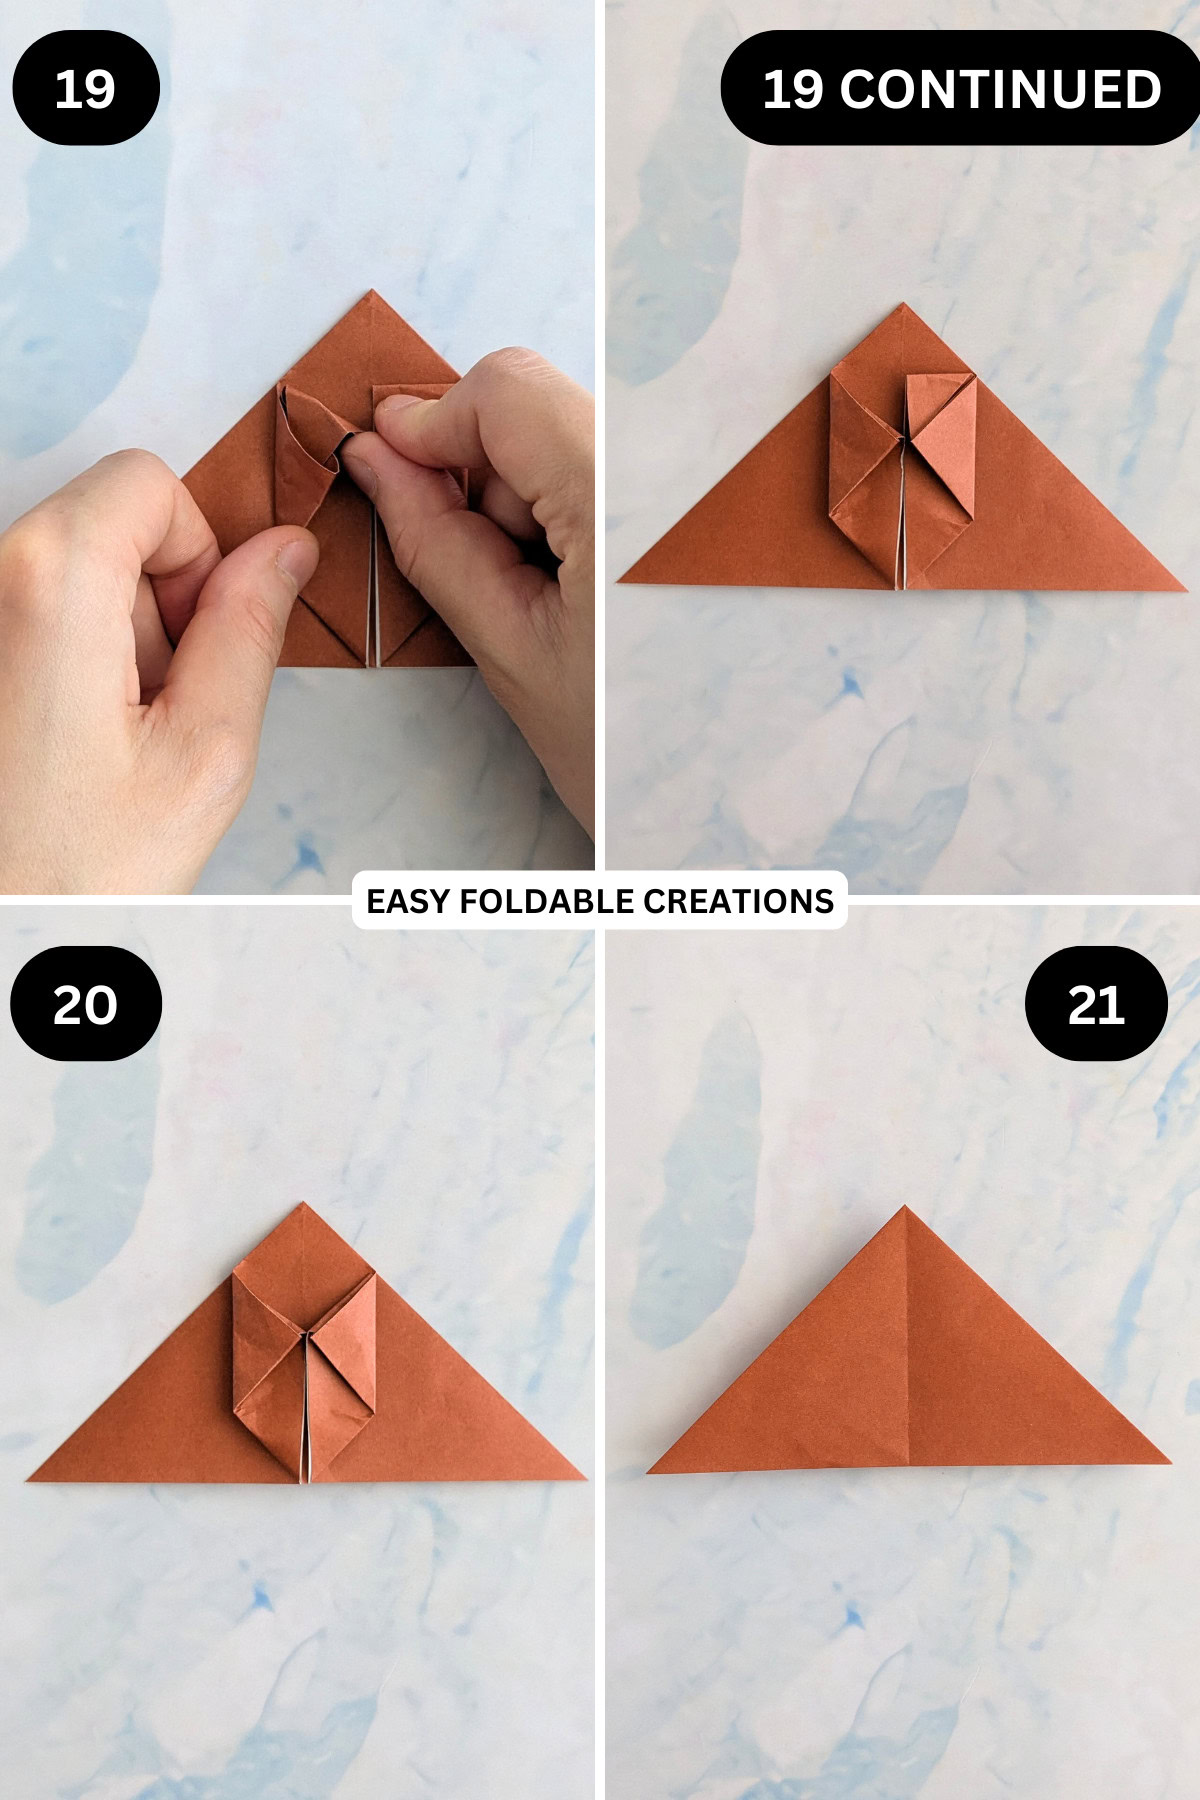
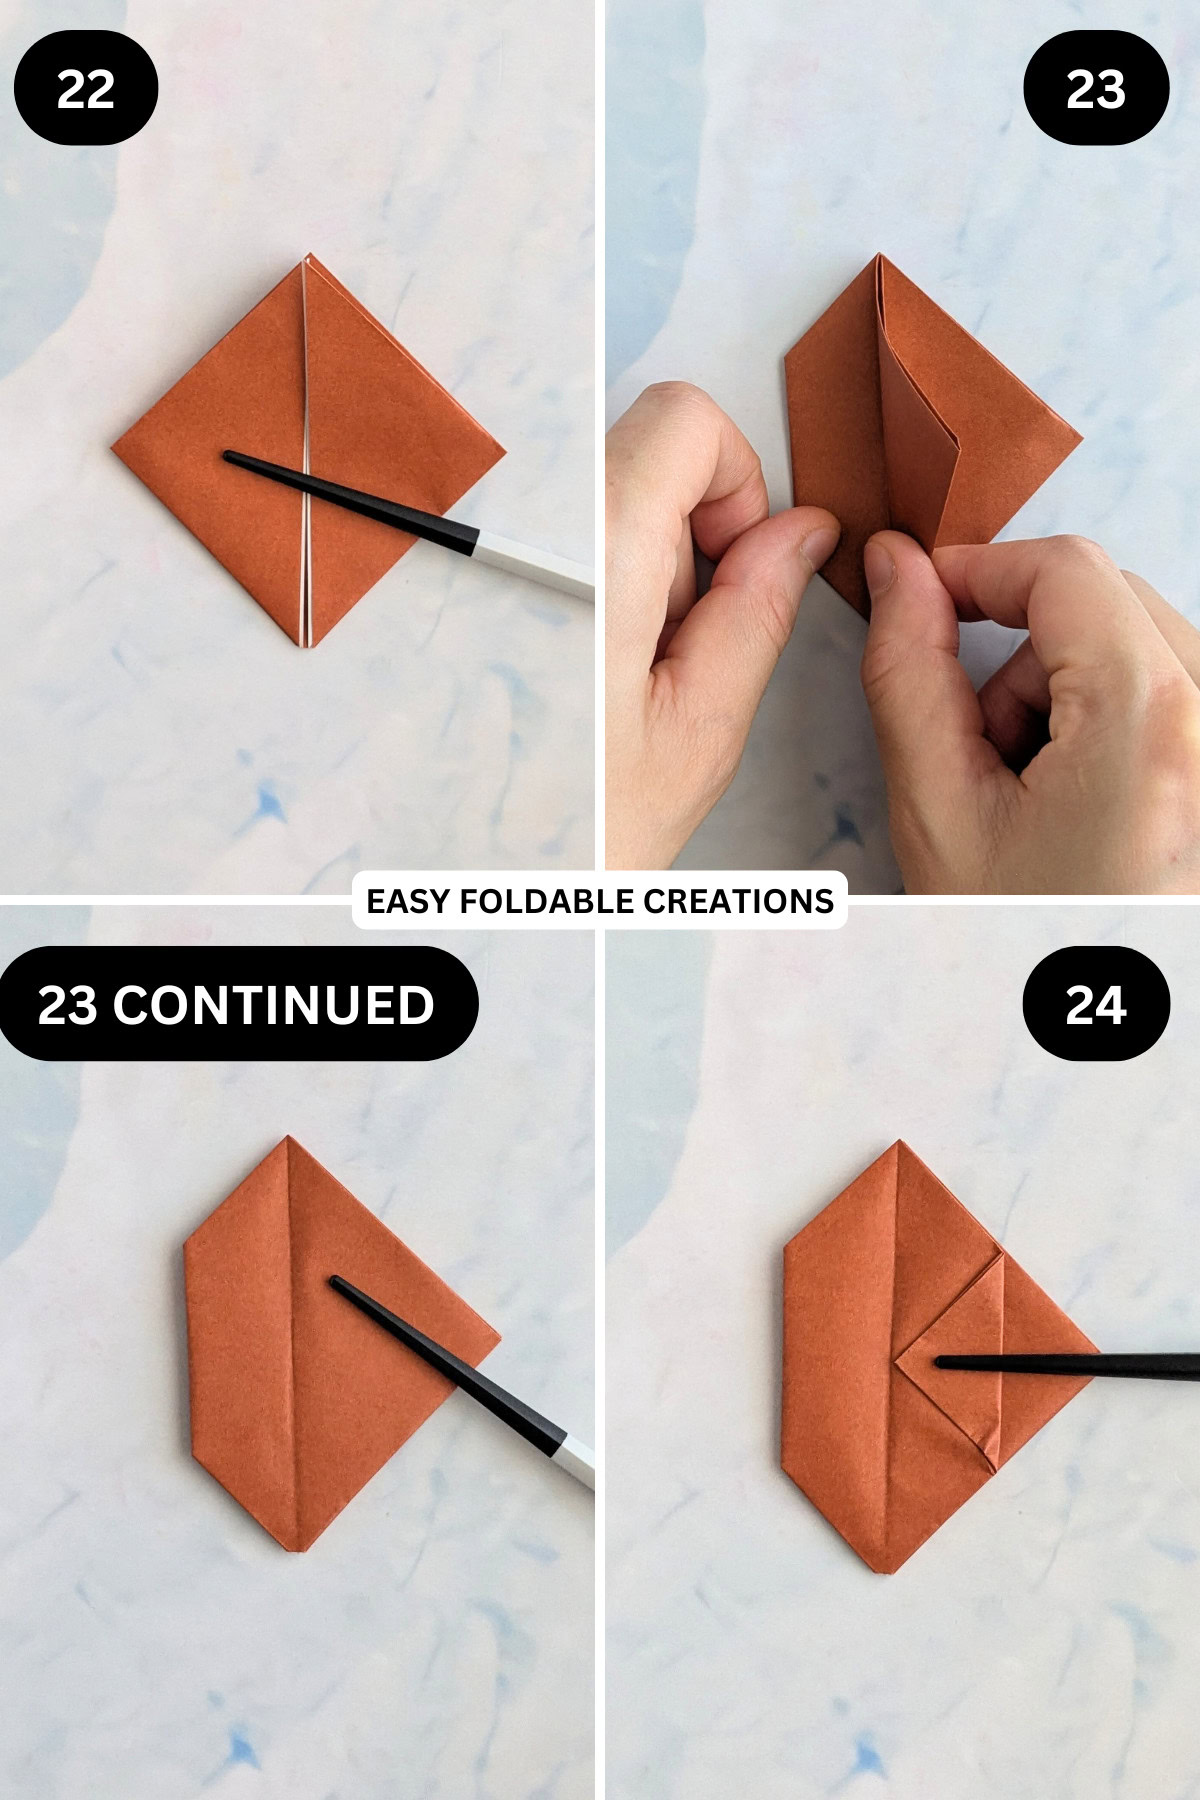
Step 22: Fold the bottom left and right corners up to meet the top point.
Step 23: Fold the top layer of the left section to the right.
Step 24: Fold the right point of the flap to the left, to meet the vertical crease.
Step 25: Fold the flap back to the left.
Step 26: Repeat steps 23 to 25 for the right side.
Step 27: Fold the top left and right points diagonally outwards from the bottom point. These will form the bunny's ears.
Step 28: Open out the ears.

✨ You're almost there! ✨
To unlock the final steps of the photo tutorial and complete your pattern, create a free account with Grow.me. below.
Make sure you tick the box to subscribe to our newsletter and stay up to date with the latest patterns, tips, and more!
Once you're signed up, you'll get instant access to finish your project with the photo tutorial and enjoy exclusive content in the future.
Already signed up? Hit the button below and select 'Switch to Log In' to pick up where you left off and finish your project!
Step 29: Optional: Fold the top points of the left and right ears down, aligning the point with the centre of the ear. Then unfold. This will give the ears a bit more shape.
Step 30: Pick the rabbit up. You will see a small hole where the 2 ears meet.
Step 31: Blow through the hole to inflate the bunny. It is best to use a straw to inflate the bunny.
If you don't have a straw, you can just use your mouth, but don't press the rabbit to your mouth as the paper can become soggy.

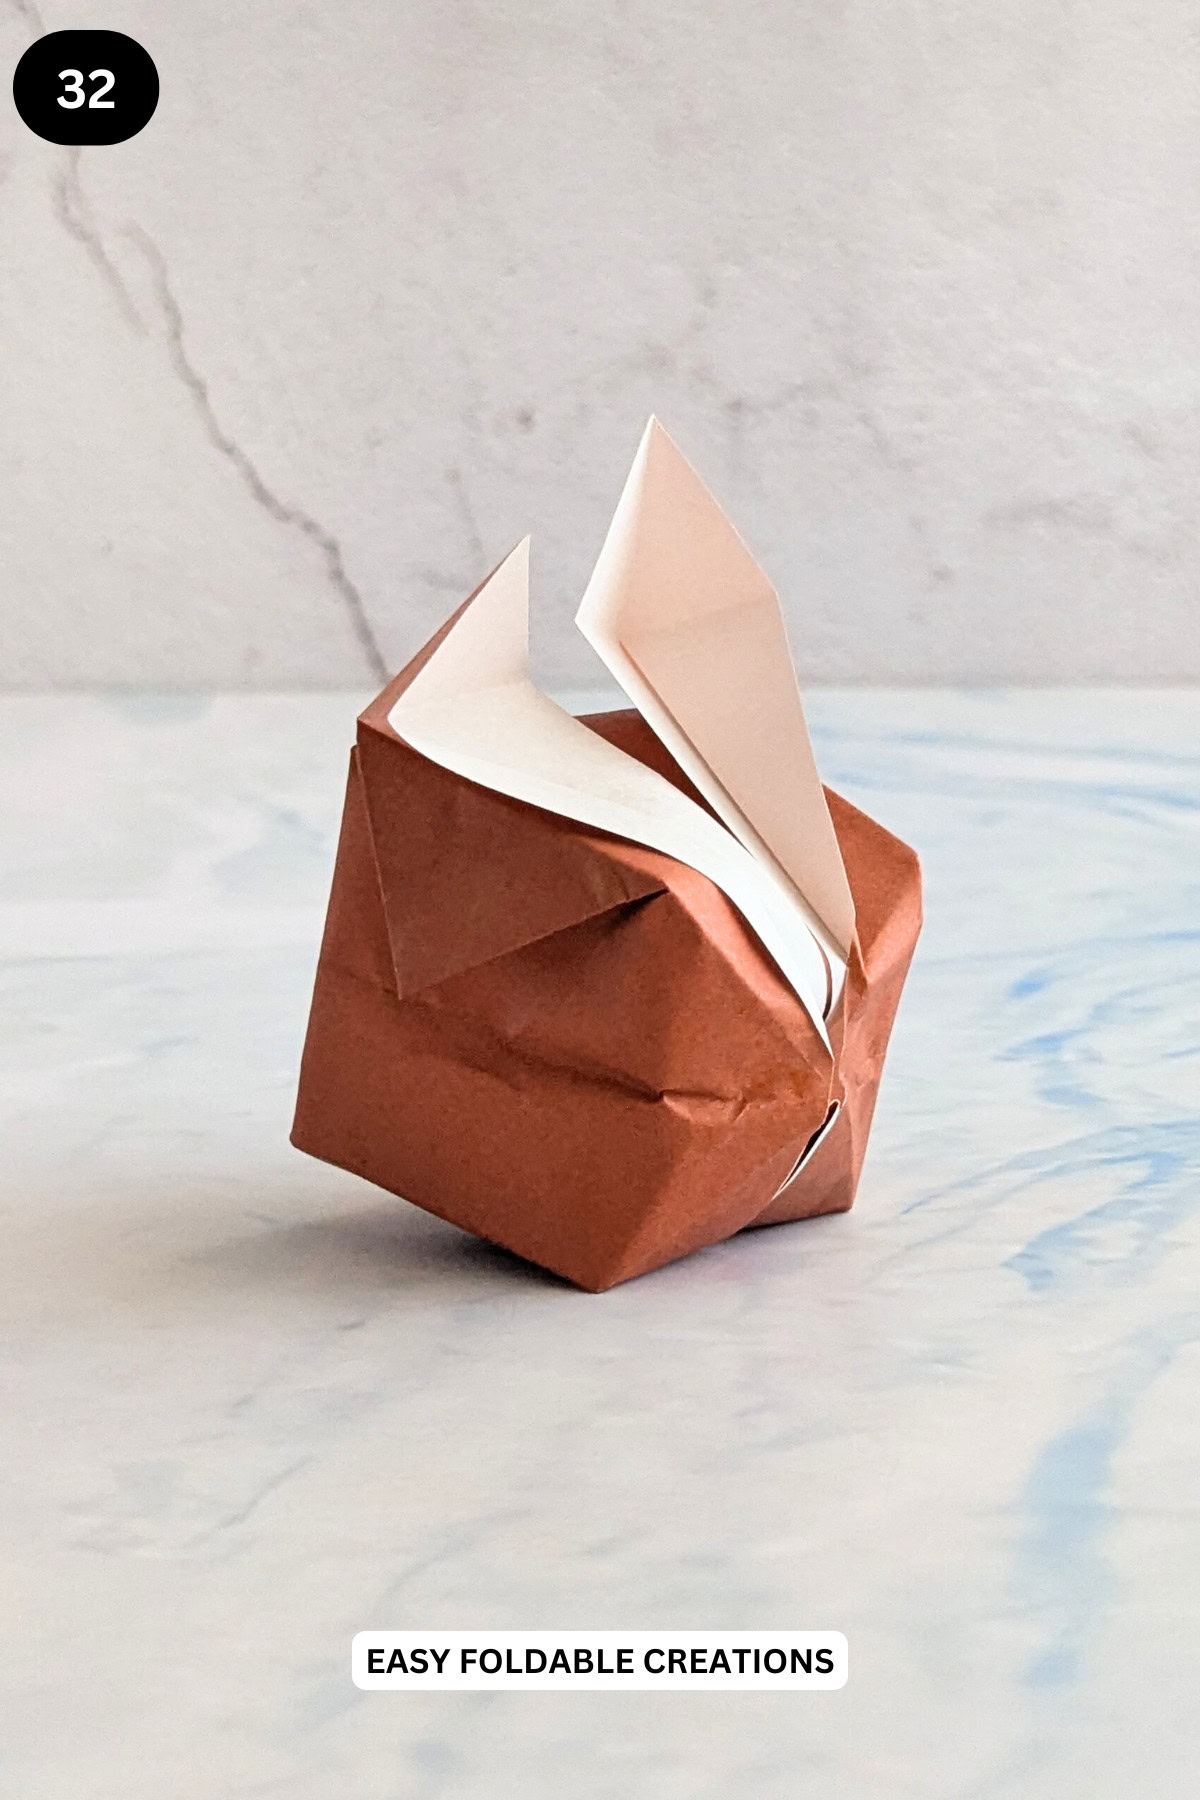
Step 32: Shape the rabbit as you like. Completed inflatable origami rabbit.
Tips For Success
- Take extra care with each fold, making sure that edges line up perfectly for a clean and crisp shape.
- Start by gently blowing into the opening of the rabbit to ensure that it inflates properly without over-inflating.
- Use lightweight origami paper for best results. Thick paper may not inflate well, while very thin paper might not hold its shape.
- You can decorate your inflatable origami bunny with stickers, googly eyes, or pom poms!

Color, Paper Ideas, and Variations
- Easter Fun: Use pastel-colored origami paper (think light pink, yellow, or mint green) to make your rabbit extra festive for Easter celebrations.
- Bold and Bright: If you're feeling a little playful, opt for bold colors like red, blue, or purple to give your inflatable rabbit a more vibrant look.
- Natural Tones: For a more earthy, rustic feel, try browns and whites for a bunny that feels closer to nature.
- Patterned Paper: Consider using origami paper with patterns or textures for a more unique and eye-catching bunny.
FAQ
While origami paper is the best choice due to its lightweight and square shape, you can use regular paper if you cut it to a square shape.
Yes! You can scale the design up by using larger sheets of paper. For a large origami rabbit, we recommend using 8 inch x 8 inch (20 cm x 20cm) paper.
Other Paper Crafts You Might Like To Try:
Helpful Origami Tips
If you're curious to learn more about origami, you might like to look at our basic guides on how to make some common origami folds.
Start with the valley fold and mountain fold-these are the foundation of most origami models.
Once you're comfortable, you might like to try the petal fold for 3D shapes, and explore the bird base and square base for more complex designs.
The water bomb base is also great for creating inflatable or geometric models, like this inflatable origami rabbit.
Useful Paper Craft Terms
Want to learn a little more about paper crafts and origami?
We've made this helpful printable just for you. It explains common terms and helpful tips you might come across when you are folding origami or making a paper craft project.
You can download the useful paper craft terms printable PDF here.
Stay Connected
Made this pattern? Let us know how it went in the comments below!
Pin this post - Pin now to take your paper crafting skills to the next level.
Share on Instagram or Facebook - Capture the beauty of your finished paper craft project and share it on Instagram or Facebook! Tag us @easyfoldablecreations so we can see your work!

On the hunt for more easy paper crafts.
Check out this easy paper heart, paper bag with drawstring, diamond paper garland, origami rose, rectangle origami box with lid, simple diamond pouch napkin fold, pleated origami envelope, origami heart with wings, heart paper napkin folding idea, easy origami lotus, DIY paper flower bouquet, water lily origami flower or simple pocket napkin fold.
Other Patterns You Might Like To Try:
Looking for other easy patterns like this? Try these:


Comments
No Comments