
Create a beautiful and functional origami masu box with a matching lid using just a single piece of paper for each.
Perfect for gifts, storage, or decorations, this traditional origami design is a timeless paper craft project that anyone can enjoy.

Jump to:
- Why You'll Love This Pattern
- Exclusive Content Just For You
- Skill Level
- Materials Needed
- Instructions
- Tips For Success
- Common Mistakes & How To Avoid Them
- Color, Paper Ideas, and Variations
- FAQ
- Other Crafts You Might Like To Try:
- Helpful Origami Tips
- Useful Paper Craft Terms
- Stay Connected
- Other Patterns You Might Like To Try:
- Comments
This easy origami masu box is a traditional origami design known for its practicality and simple elegance.
It's perfect for storing small trinkets, candies, or even as a stylish way to present a gift.
In this tutorial, you'll not only learn how to make a simple masu box but also learn how to create a matching lid, making this origami box even more functional and versatile.
This masu box can be used for a variety of celebrations, making it a thoughtful addition to any special occasion.
You can customize the box for holidays like Christmas, Valentine's Day, or birthdays by using themed paper or adding personalized decorations.
These little boxes are ideal for gifting small items like jewelry, candies, or keepsakes, giving your presents a personal, handmade touch. Additionally, they make charming favor boxes for weddings, baby showers, and other gatherings.
The versatility of this masu box extends beyond just special occasions.
They are perfect for practical uses like storing office supplies, organizing small items around the house, or as a decorative element on a desk.
They're also ideal for teacher gifts, holding small tokens of appreciation such as candies, stationery, or even homemade treats.
Whether it's for a celebration or a thoughtful everyday use, this masu box offers both style and function.
With its clean lines and sturdy construction, this masu box is a great project for both beginners and experienced paper crafters.
You can make it in various sizes depending on the paper you use, and with a range of colors or patterns, you can tailor it to suit any occasion or decor.
This origami project also makes a charming addition to any desk or tabletop.
So, grab your favorite paper and follow along as we walk you through how to make a masu box with a lid step by step with pictures, giving you everything you need to bring this traditional paper craft to life!
Other easy origami boxes you just have to make include this rectangle origami box with lid, square origami box with interlocking lid, tall rectangle origami box, and this cute standing cat origami box!

Why You'll Love This Pattern
- Easy to create, even for beginners, and provides quick results.
- Versatile: Use it as a gift box, storage container, or decorative piece.
- Customizable for any holiday or celebration with themed paper or patterns.
- Adds a personal, handmade touch to gifts and celebrations.
- The matching lid makes it both functional and aesthetically pleasing.
Exclusive Content Just For You
Not sure what you want to make next, but feeling a bit creative? Or maybe you've been searching for a pattern that sparks something new. We've got a few ideas waiting for you.
The Fold Collective, Easy Foldable Creations' community, provides you with a library of exclusive ad-free video tutorials, printable PDF patterns, helpful tips, and more so you can improve your skills and enjoy crafting in your own time.
Skill Level
Difficulty: ★★☆☆☆ (Easy)
Materials Needed
Square paper for the base (we recommend starting with 6x6-inch paper, but you can adjust the size for a larger or smaller box).
Square paper for the lid (we recommend starting with 6x6-inch paper, but you can adjust the size for a larger or smaller box).
Make sure you use the same size paper for both the lid and the base.
- Bone folder (optional): This tool helps create crisp, clean folds and makes your finished box look more polished. If you don't have one, the edge of a ruler or your fingernail works as a good substitute.
- Type of paper: For a sturdy box, consider using lightweight cardstock (around 160-200 gsm). Thicker paper will give the box more structure, which is useful if you're planning to store small but heavier items like jewelry or office supplies. For decorative purposes or lighter uses, origami paper or patterned craft paper works well and adds a decorative flair.
Note: You can also experiment with recycled paper or wrapping paper for a more eco-friendly option. Use double-sided paper if you want the inside of your box to have a contrasting or matching pattern.
Instructions
FOR THE BOX
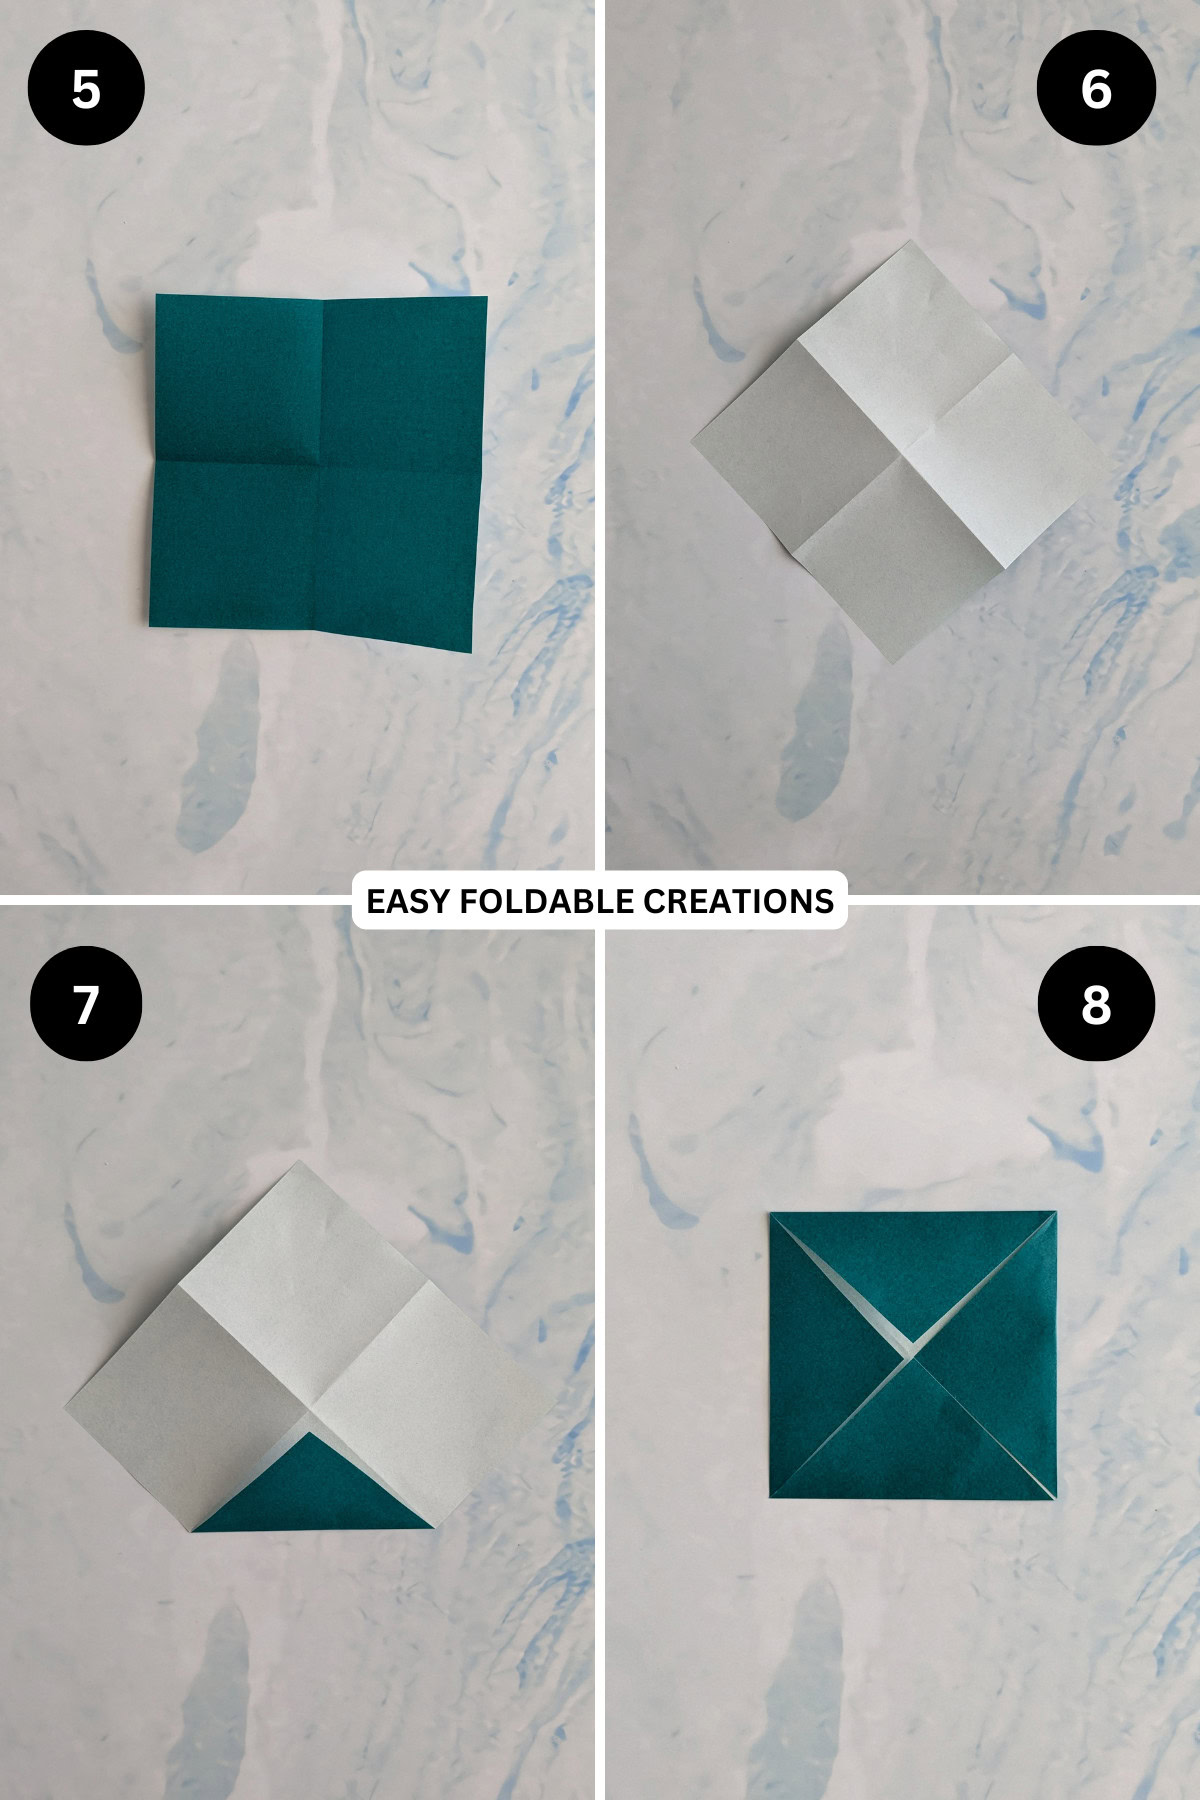
Step One: Start with the color you want on the outside of the box facing up.
Step Two: Fold the bottom edge to the top edge.
Step Three: Unfold the previous step.
Step Four: Fold the right edge to the left edge.

Step Five: Unfold previous step.
Step Six: Flip the paper over and arrange it so it sits like a diamond.
Step Seven: Fold the bottom corner up to meet the centre point.
Step Eight: Repeat previous step on the remaining corners.

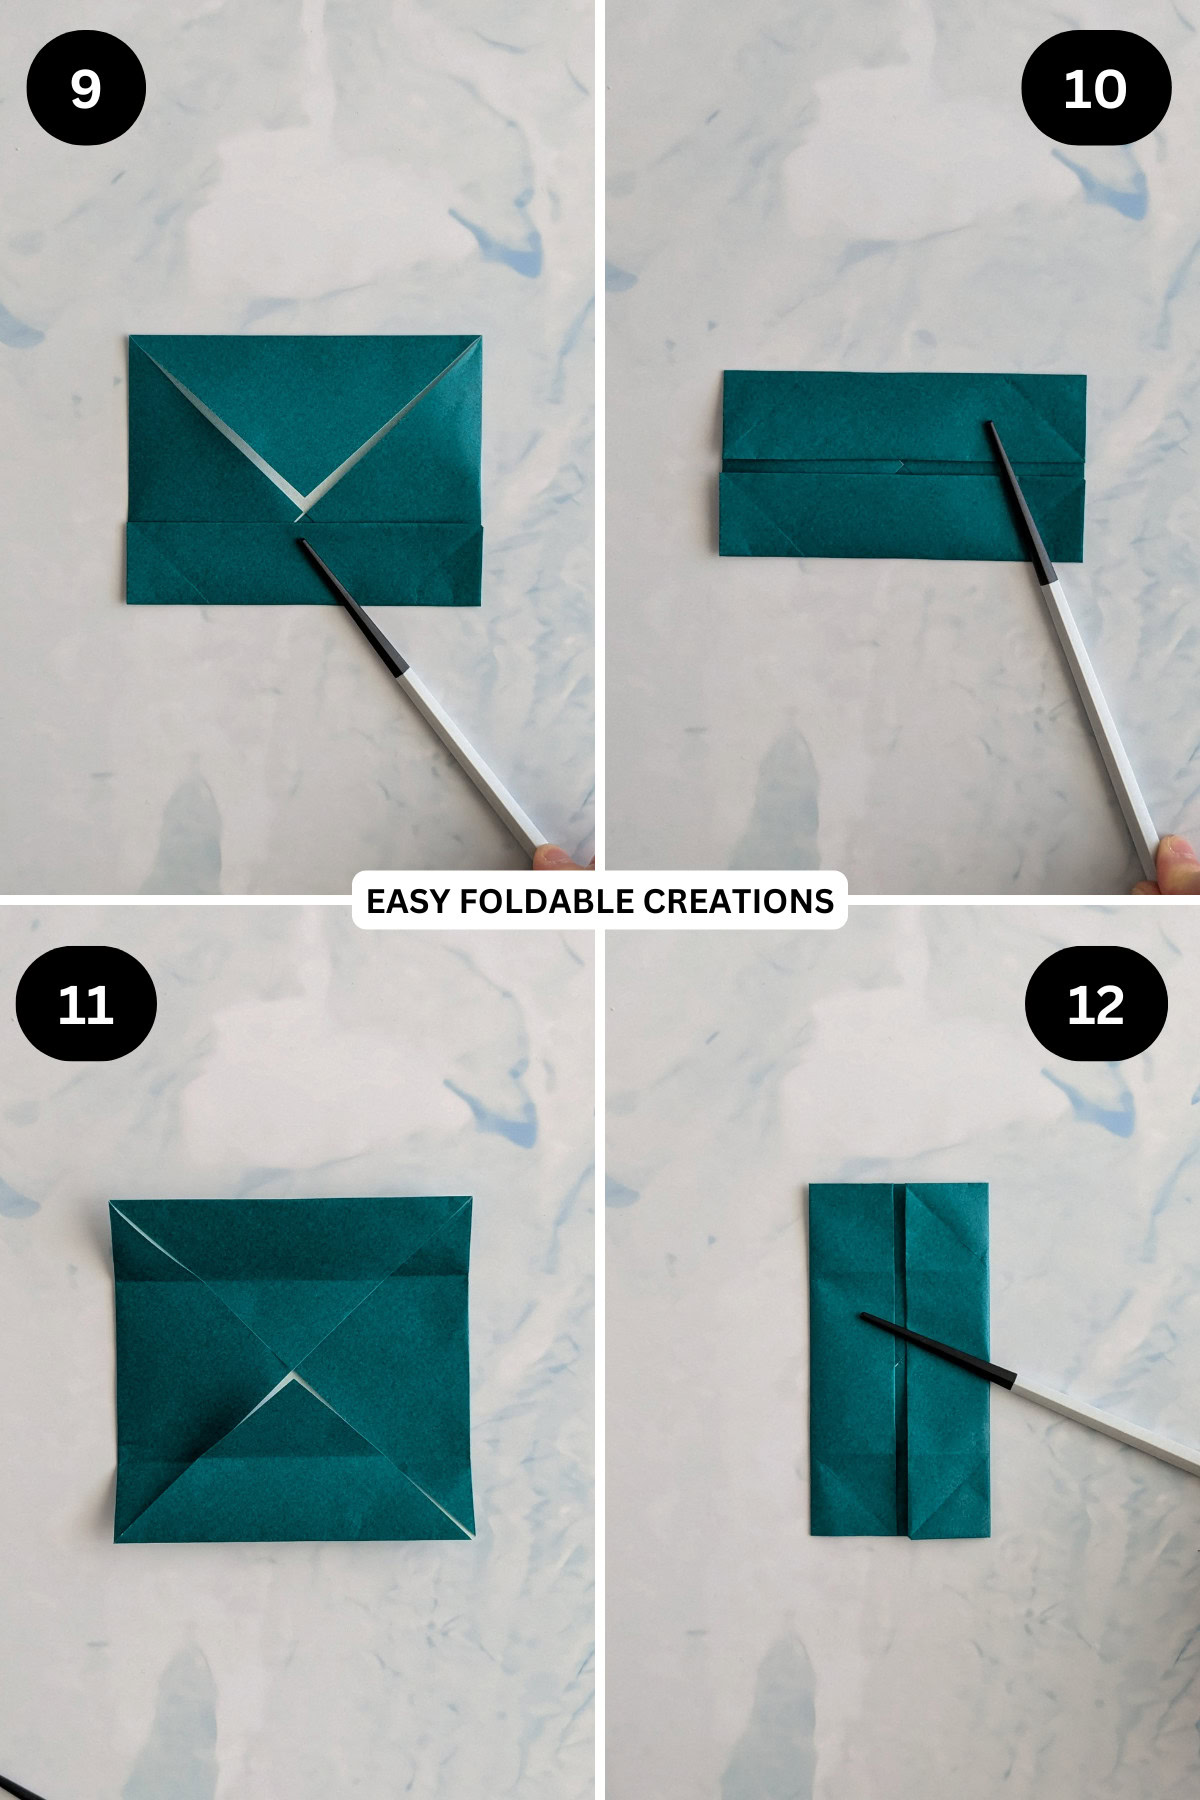
Step Nine: Fold the bottom edge to the middle point.
Step Ten: Fold the top edge to meet the middle point.
Step Eleven: Unfold the previous two (2) steps.
Step Twelve: Fold the right and left edges to the middle point.

Step Thirteen: Unfold previous step.
Step Fourteen: Unfold the right and left sections completely.
Step Fifteen: Once more, fold the top and bottom edges to the middle (use the creases that already exist).
Step Sixteen: Lift the edges you just folded inwards up 90 degrees.

Step Seventeen: To make the sides of the box, lift the left most point upwards, you will find that the existing sides will naturally collapse to points.
Step Eighteen: Fold the point down into the box and match the point with the centre.
Step Nineteen: Repeat steps 17 and 18 for the other side.

FOR THE LID
Making the lid of the masu box is very similar to making the box itself.
Step One: Start with the color you want on the outside of the box facing up.
Step Two: Fold the bottom edge to the top edge.
Step Three: Unfold the previous step.
Step Four: Fold the right edge to the left edge.

Step Five: Unfold previous step.
Step Six: Flip the paper over and arrange it so it sits like a diamond.
Step Seven: Fold the bottom corner up to meet the centre point.
Step Eight: Repeat previous step on the remaining corners.
✨ You're almost there! ✨
To unlock the final steps of the photo tutorial and complete your pattern, create a free account with Grow.me. below.
Make sure you tick the box to subscribe to our newsletter and stay up to date with the latest patterns, tips, and more!
Once you're signed up, you'll get instant access to finish your project with the photo tutorial and enjoy exclusive content in the future.
Already signed up? Hit the button below and select 'Switch to Log In' to pick up where you left off and finish your project!
Step Nine: This time when you fold the bottom edge to the middle point leave a small gap of about 1-2mm.
Step Ten: Repeat previous step for the top edge.
Step Eleven: Unfold the previous two (2) steps.
Step Twleve: Fold the right and left edges to the middle point, leaving a small gap of about 1-2mm on each side.
Step Thirteen: Unfold previous step.
Step Fourteen: Unfold the right and right sections completely.
Step Fifteen: Once more, fold the top and bottom edges to the middle (use the creases that already exist).
Step Sixteen: Lift the edges you just folded inwards up 90 degrees.

Step Seventeen: To make the sides of the lid, lift the left most point upwards, you will find that the existing sides will naturally collapse to points.
Step Eighteen: Fold the point down into the lid and match the point with the centre.
Step Nineteen: Repeat steps 17 and 18 for the other side.

Tips For Success
- Use a bone folder to create crisp, clean folds, giving the box a more professional look.
- For a more decorative touch, add embellishments like stickers, washi tape, or ribbons.
- Try using patterned or double-sided paper for a unique look inside and out.
- Experiment with Paper: Try using textured paper, metallic paper, or even wrapping paper to make your box stand out for special occasions like weddings or parties.

Common Mistakes & How To Avoid Them
- Uneven folds: Make sure your folds are precise and aligned, as uneven folds can affect the final shape of the box.
- Using paper that's too thick: While cardstock is great for structure, paper that's too thick can be difficult to fold cleanly. Especially for smaller boxes.
Color, Paper Ideas, and Variations
You might like to make these origami masu boxes for special occasions. Here are some color ideas you might like for:
- Valentine's Day: Red lid with pink box, red lid and red box, heart patterned paper lid with red or pink box.
- Christmas: A variation of red, green, yellow, blue, or festive paper. You might like to use Christmas themed wrapping paper.
- Birthdays: You could use birthday themed wrapping paper.
FAQ
You may not have given enough of a gap when folding the edges of your lid to the middle.
Helpful Origami Tips
If you're curious to learn more about origami, you might like to look at our basic guides on how to make some common origami folds.
Start with the valley fold and mountain fold-these are the foundation of most origami models.
Once you're comfortable, you might like to try the petal fold for 3D shapes, and explore the bird base and square base for more complex designs.
The water bomb base is also great for creating inflatable or geometric models, like this inflatable origami rabbit.
Useful Paper Craft Terms
Want to learn a little more about paper crafts and origami?
We've made this helpful printable just for you. It explains common terms and helpful tips you might come across when you are folding origami or making a paper craft project.
You can download the useful paper craft terms printable PDF here.
Stay Connected
Made this pattern? Let us know how it went in the comments below!
Pin this post - Pin now to take your paper crafting skills to the next level.
Share on Instagram or Facebook - Capture the beauty of your finished paper craft project and share it on Instagram or Facebook! Tag us @easyfoldablecreations so we can see your work!

After your next easy craft project?
You might like to try these Christmas paper crafts, carrot box, easy paper star, napkin folding ideas for Easter, 3D origami pumpkin, or samurai hat.
Other Patterns You Might Like To Try:
Looking for other easy patterns like this? Try these:


Rita says
Easy to follow, thanks for the pattern
Avril says
Made these to gift and my friend loved them! Thanks for such an easy pattern.