
Bring a touch of fun to your crafting with this easy origami talking fish!
Perfect for kids and adults alike, these playful creations can be used as decorations, toys, or gifts.

Jump to:
- Why You'll Love This Pattern
- Exclusive Content Just For You
- Skill Level
- Materials Needed
- Instructions
- Tips For Success
- Common Mistakes & How To Avoid Them
- Color, Paper Ideas, and Variations
- FAQ
- Other Paper Crafts You Might Like To Try:
- Helpful Origami Tips
- Useful Paper Craft Terms
- Stay Connected
- Other Patterns You Might Like To Try:
- Comments
This talking fish origami is a cute and interactive project that brings creativity to life with every fold.
Perfect for both children and adults, these delightful fish not only serve as a fun crafting activity but also engage the imagination.
Once completed, they can be used as playful decorations for your workspace or home, making them great conversation starters.
Picture a colorful school of fish hanging from the ceiling or swimming along a wall, these vibrant creations can brighten any space!
These origami fish are also excellent as gifts. You can create personalized fish for friends, family, or teachers, adding a unique touch that shows you care.
They make fantastic party favors for children's birthday parties or fun classroom activities that introduce kids to the art of origami.
You can even incorporate them into educational lessons about marine life, sparking curiosity and creativity in young minds.
What's great about this origami talking fish pattern is its simplicity. With just a single square of paper, you can create a charming fish that adds a splash of color and personality.
Not only is this project straightforward, but it also encourages personalization, feel free to decorate your fish with drawings, stickers, or glitter to make each one truly unique! This way you can make your talking fish extra cute.
In this guide, you'll learn how to make a talking fish origami step by step with pictures, making it accessible for everyone.
So, grab your paper, and let's dive into this fun crafting adventure that promises to delight all ages!

Why You'll Love This Pattern
This origami talking fish is not only fun to make but also versatile.
Once completed, these fish can serve multiple purposes: use them as toys, decorations for a themed party, or even as part of educational activities to teach kids about marine life.
They are simple enough for beginners yet engaging enough to keep seasoned folders interested.
You can customize the colors and patterns of your fish, using different types of paper to create a whole school of vibrant origami fish!
Don't be put off by the number of steps in these instructions! We have broken down the steps to make it easier for you to understand.
Exclusive Content Just For You
Not sure what you want to make next, but feeling a bit creative? Or maybe you've been searching for a pattern that sparks something new. We've got a few ideas waiting for you.
The Fold Collective, Easy Foldable Creations' community, provides you with a library of exclusive ad-free video tutorials, printable PDF patterns, helpful tips, and more so you can improve your skills and enjoy crafting in your own time.
Skill Level
Difficulty: ★★★☆☆ (Moderate)
Materials Needed
You can use any size square paper; larger sizes will yield bigger fish.
Paper Type & GSM:
Lightweight origami paper (around 60-80 GSM) works best for this project. This weight is easy to fold and holds its shape well, making for crisp, clear designs.
Thicker paper may be used, but is only recommended for making really big fish.
Instructions
Step 1: Start with the color you want your fish to be facing down.
Step 2: Fold the bottom edge to the top edge.
Step 3: Unfold previous step.
Step 4: Fold the bottom edge to the middle crease you made in step 2.
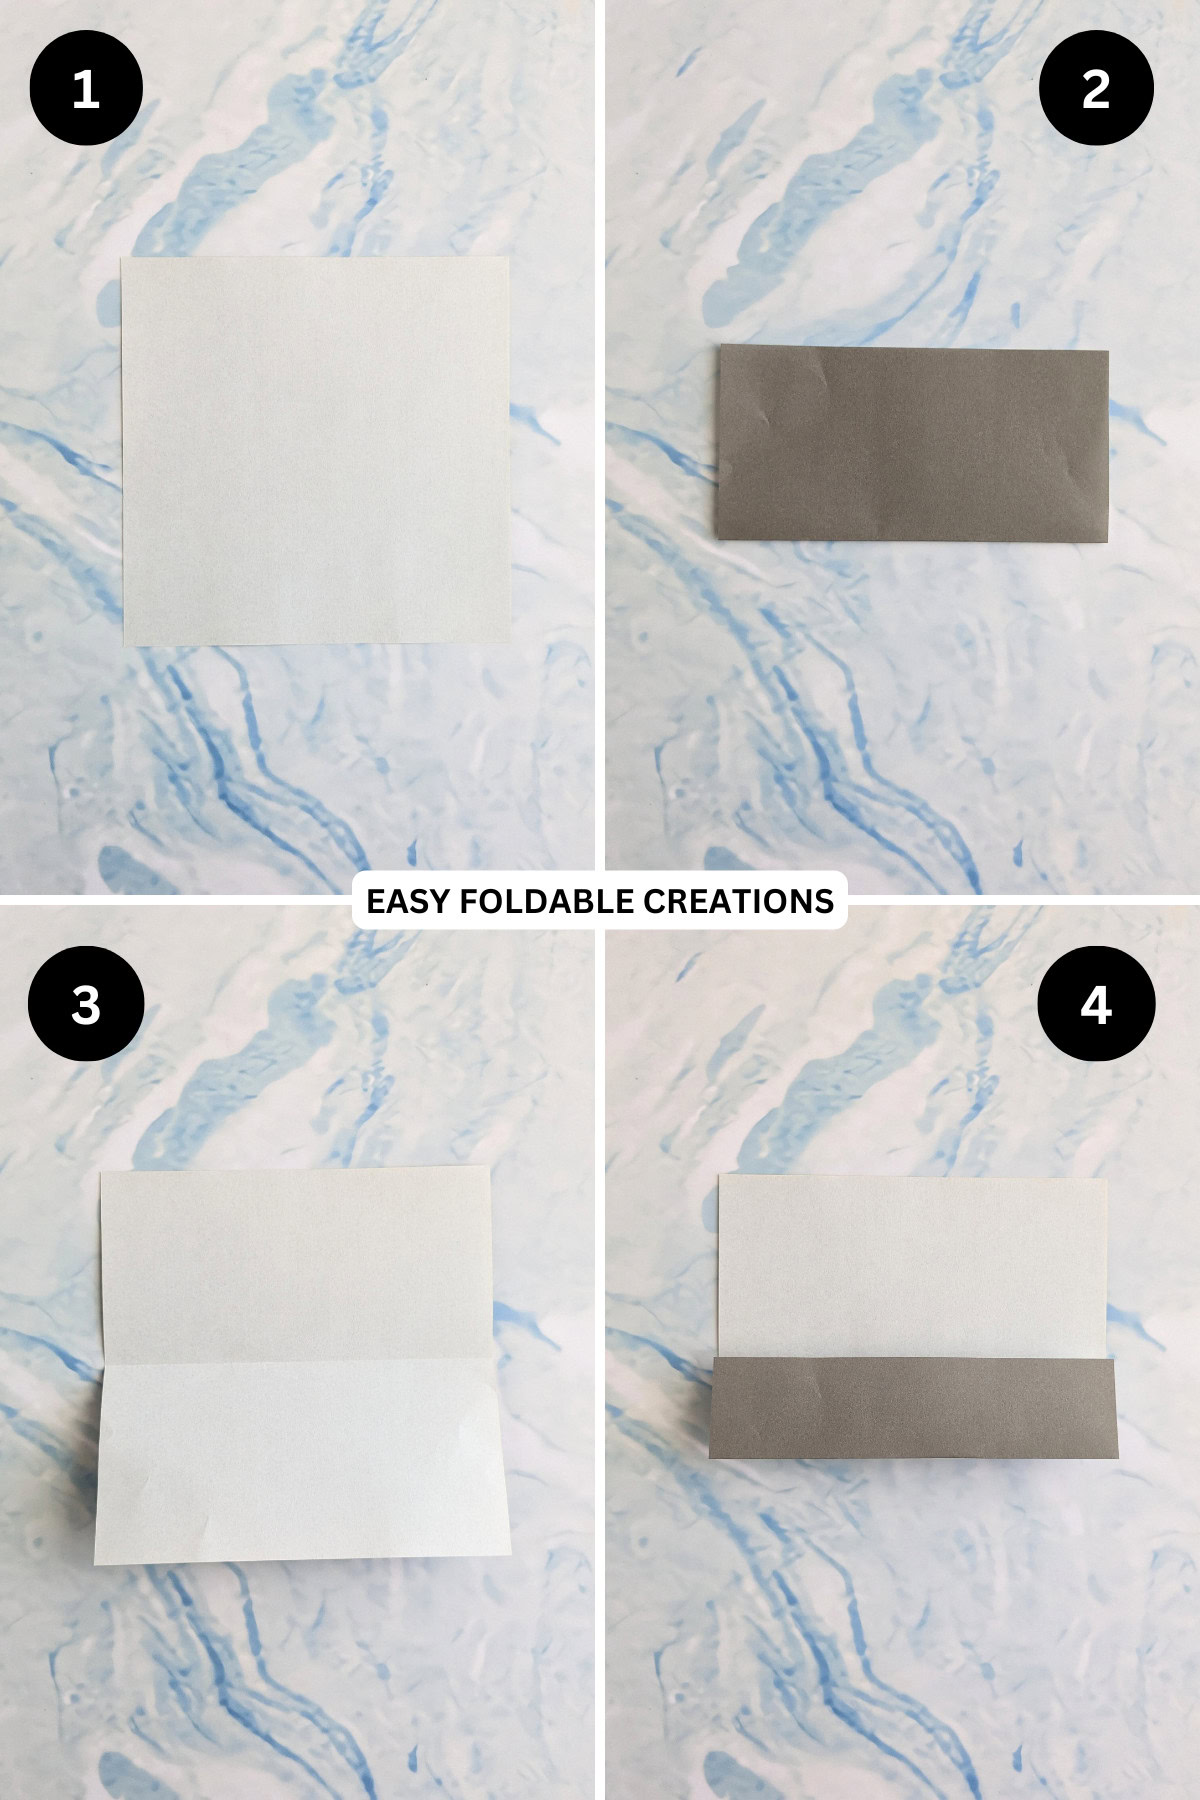
Step 5: Fold the top edge to the middle crease.
Step 6: Unfold the paper so it sits flat.
Step 7: Rotate the paper so the crease you just made are vertical.
Step 8: Fold the bottom edge of the paper to the top edge.
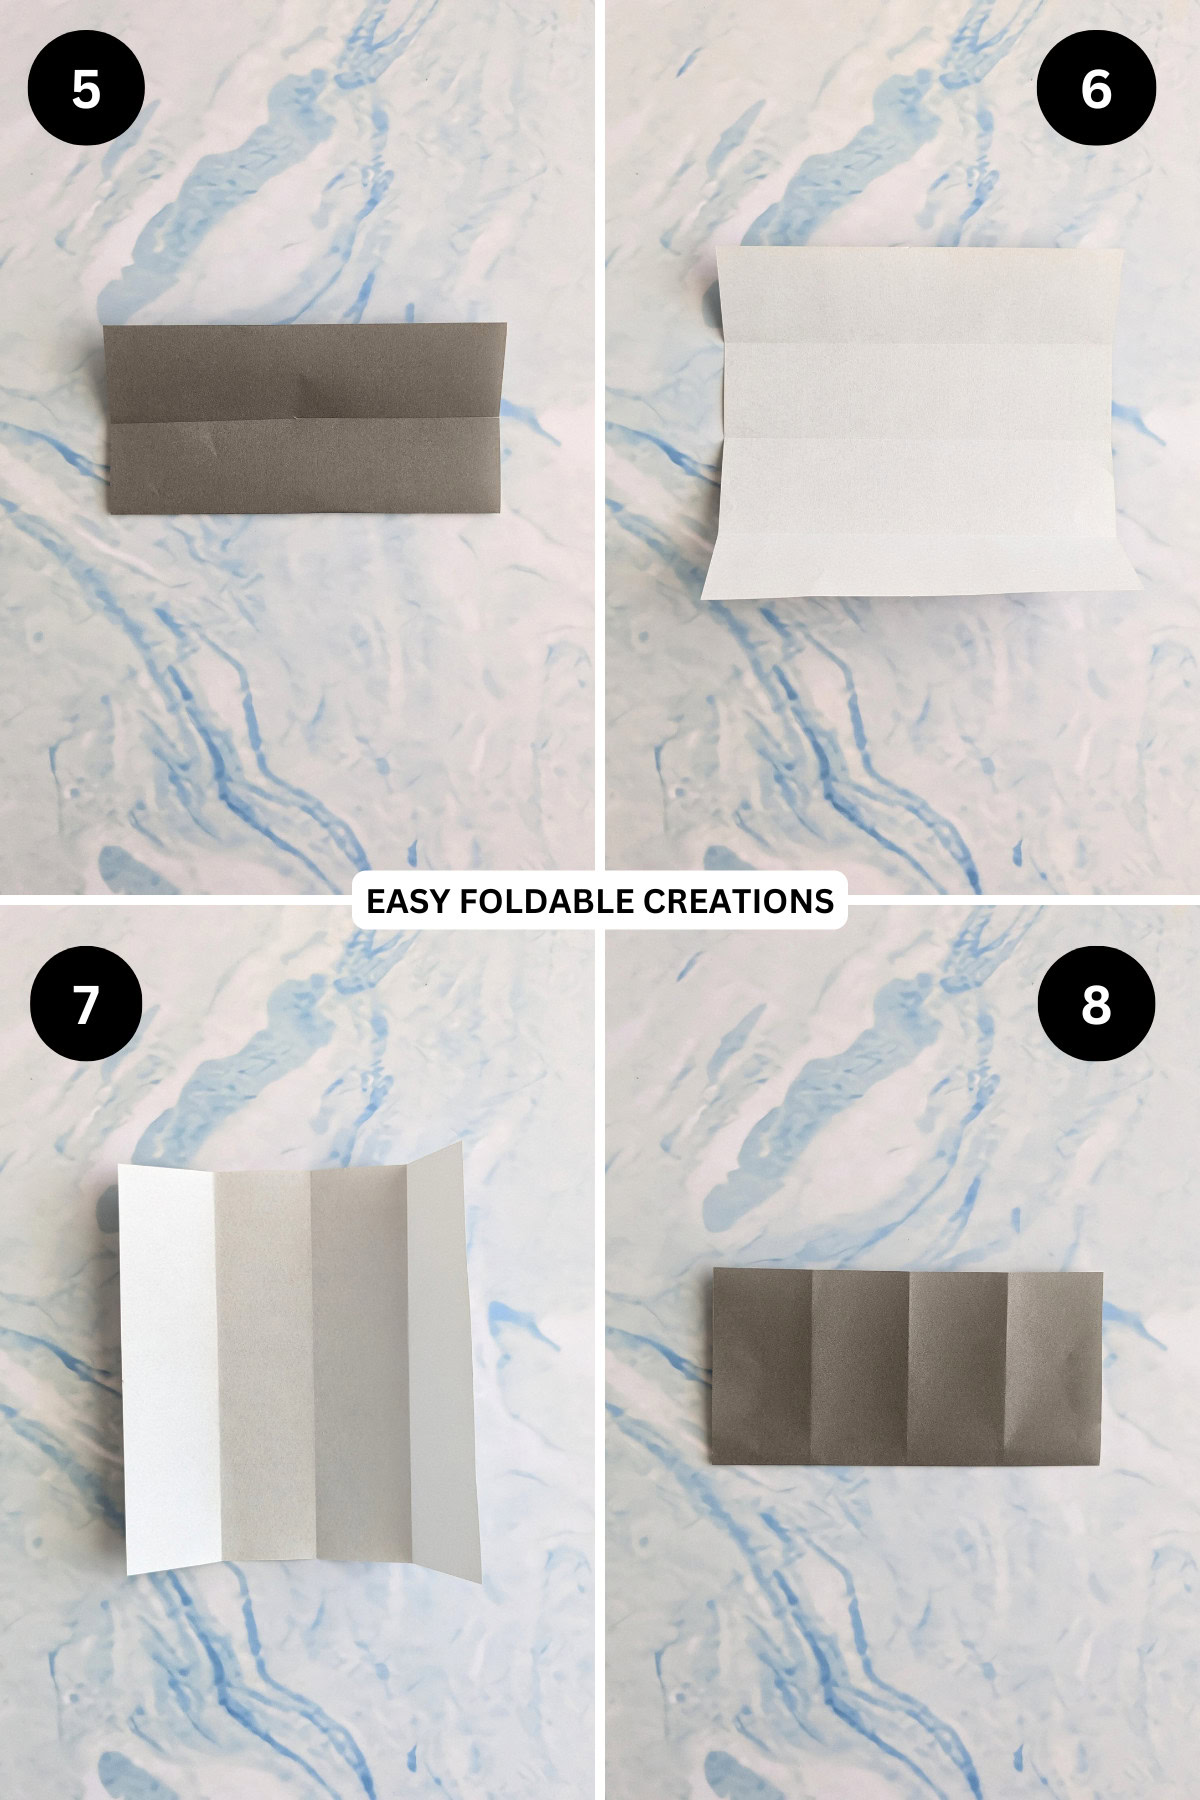
Step 9: Unfold previous step.
Step 10: Fold the bottom edge to the middle crease.
Step 11: Fold the top edge to the middle crease.
Step 12: Unfold the paper so it sits flat.
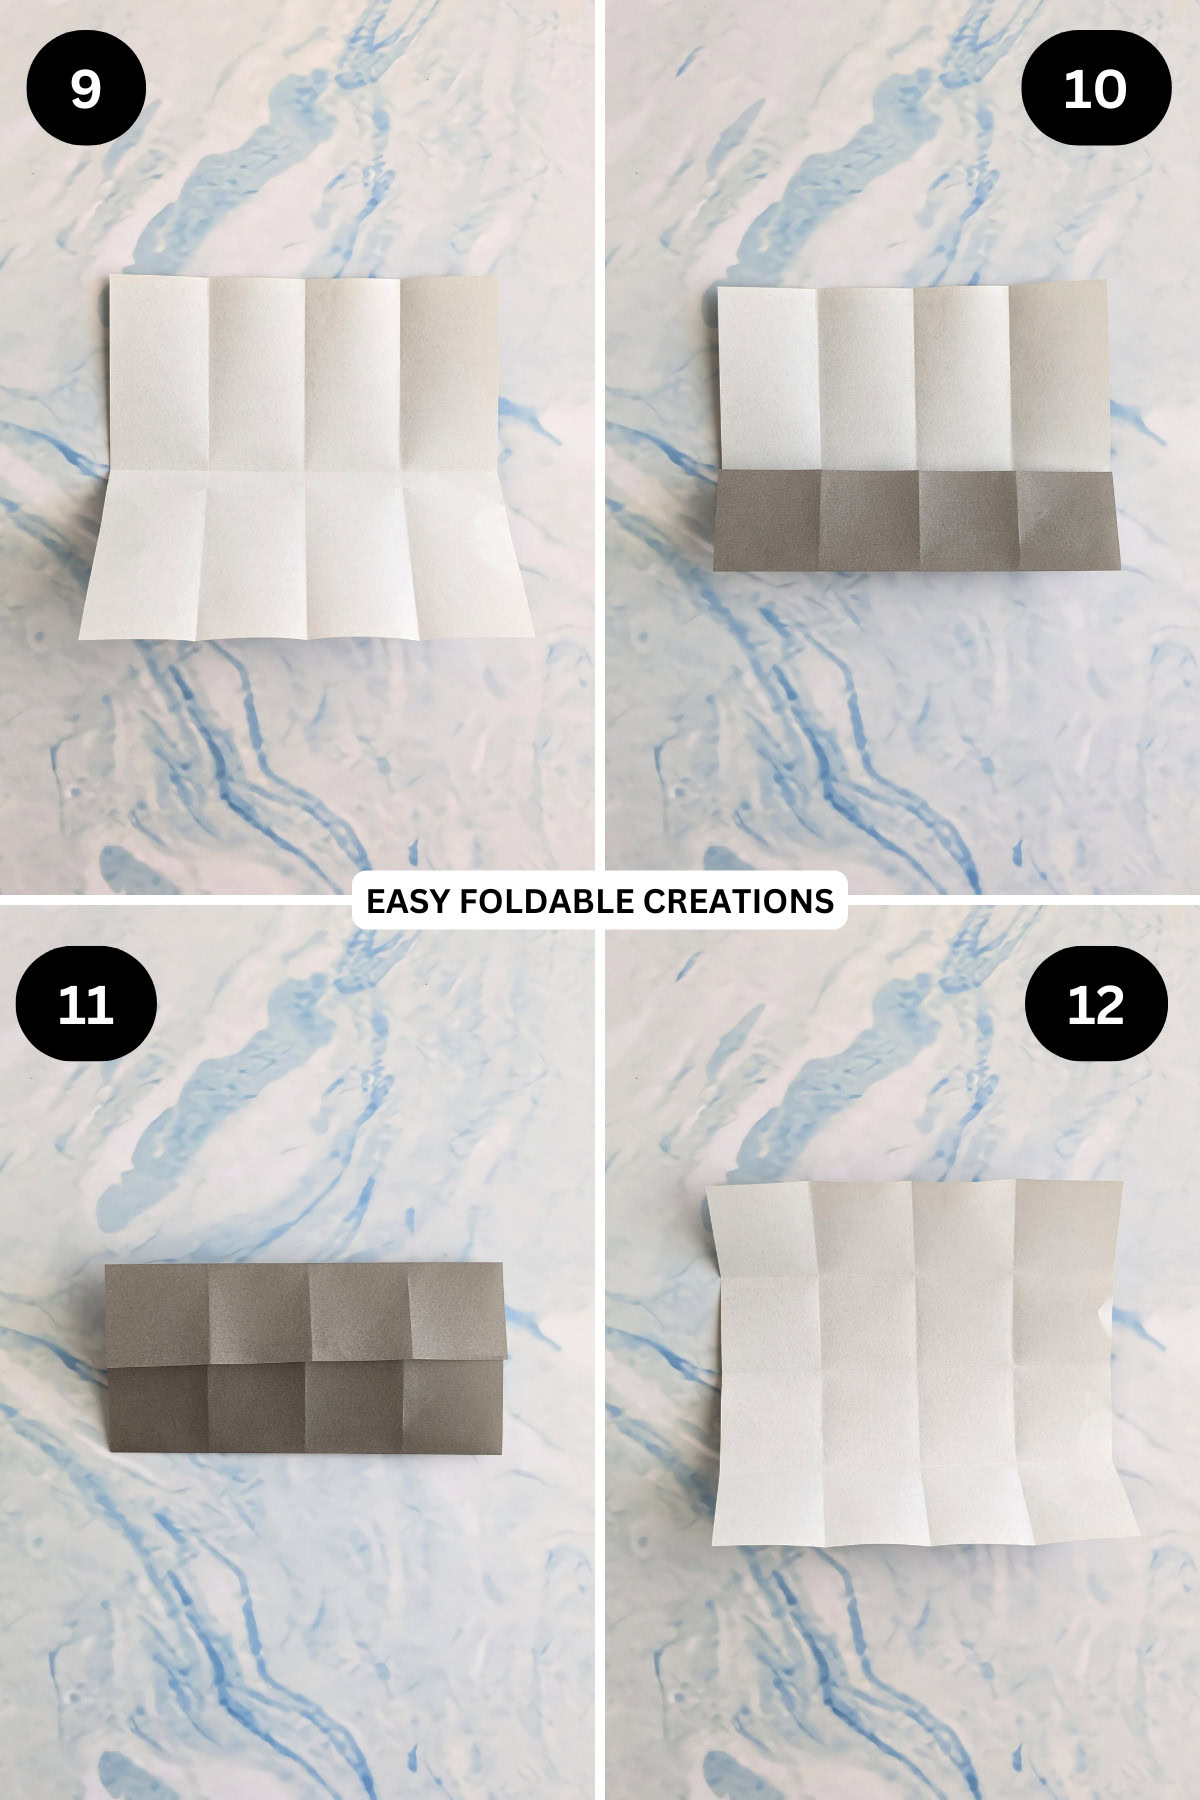
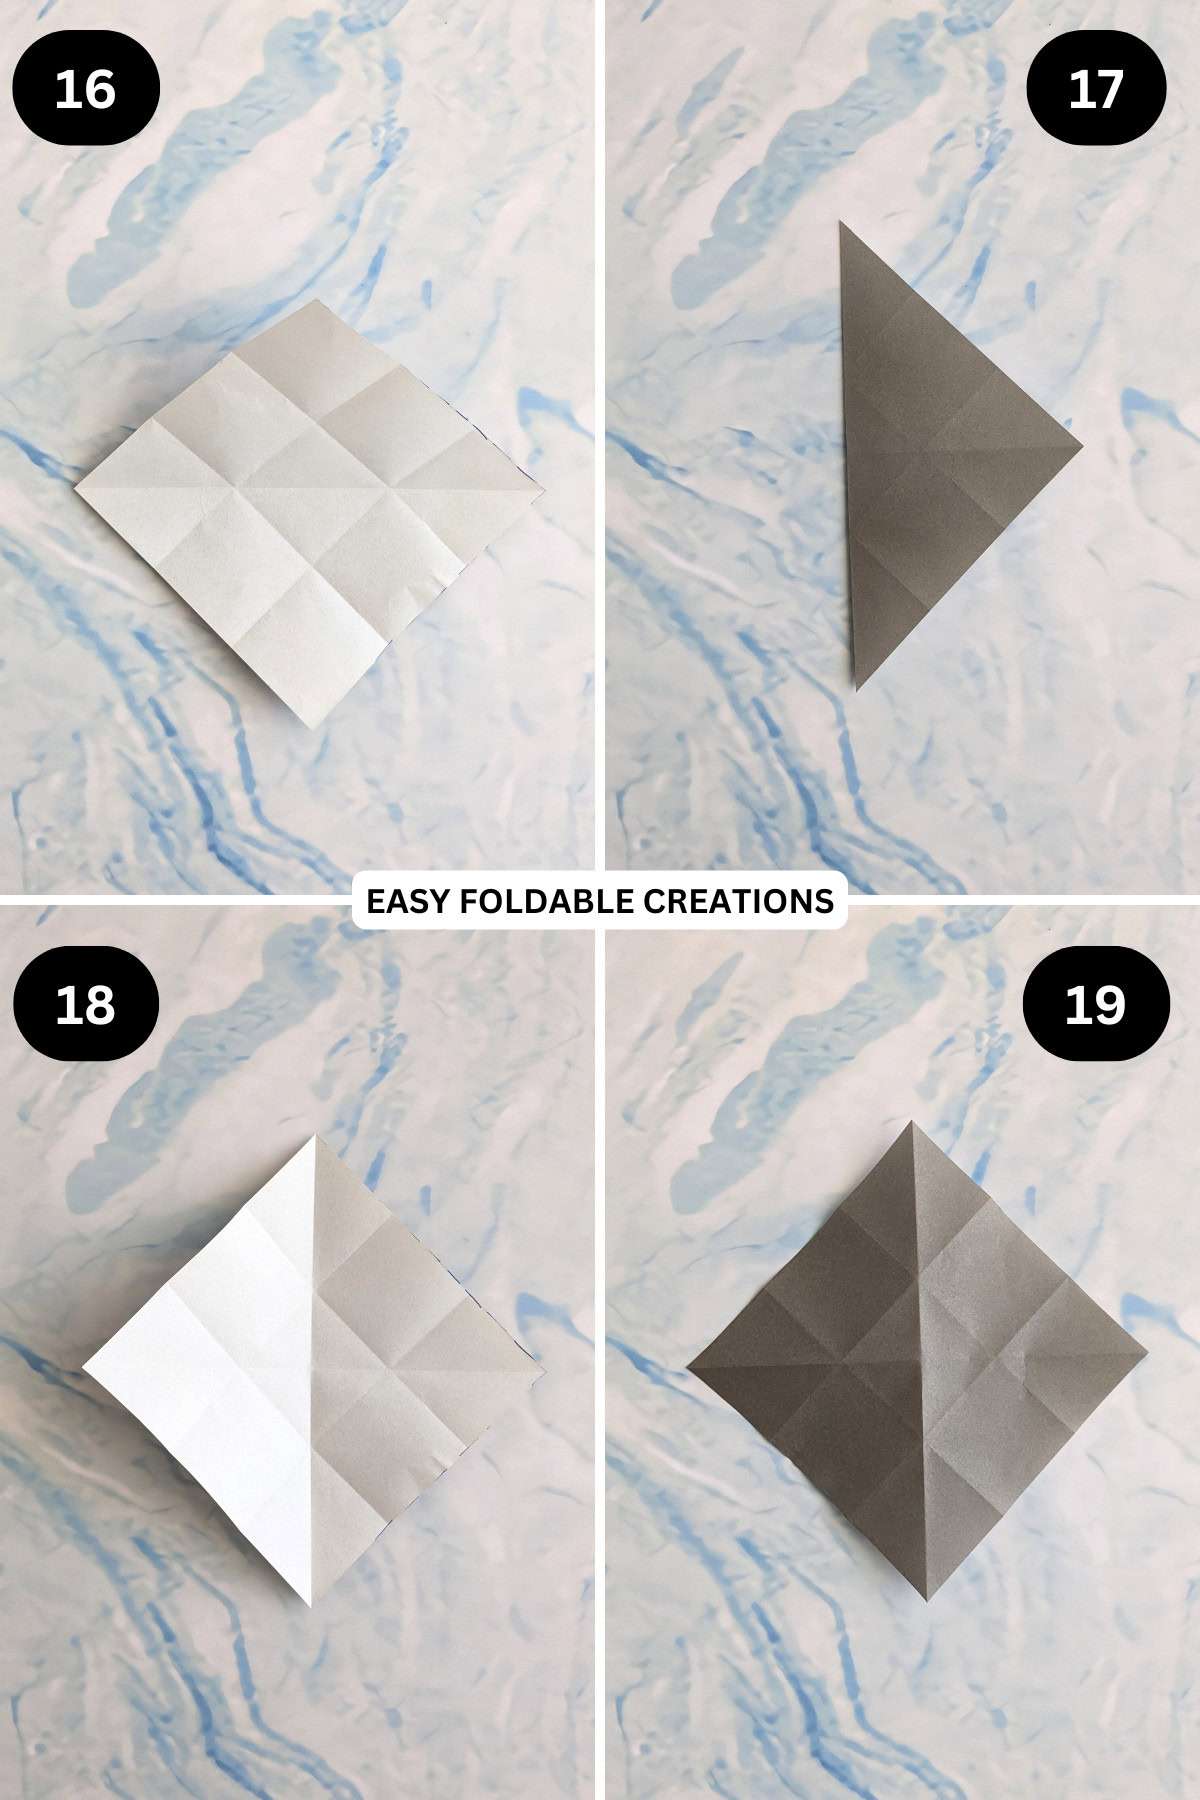
Step 13: Cut the paper along the top crease and the 3rd crease from the left of the paper (see image). You should end up with a square that has only six (6) smaller squares made from the creases.
Step 14: Working with the square cut off, rotate the paper so it sits like a diamond.
Step 15: Fold the bottom point to the top point. This will form a triangle.
Step 16: Unfold previous step.
Step 17: Fold the left point to the right point.
Step 18: Unfold previous step.
Step 19: Flip the paper over from left to right.
Step 20: Fold only the centre line in half. This is found in the square in the middle of the paper (see picture). It is easier if you bring the bottom point of the paper to the top point, and only crease along the centre line of the middle square. Then unfold.
Step 21: Crease along the diagonals in the outer squares (see picture).
Step 22: Holding the left and right sides of the paper (on the points), gently press the paper together.
Step 23: Gently press the center inward.
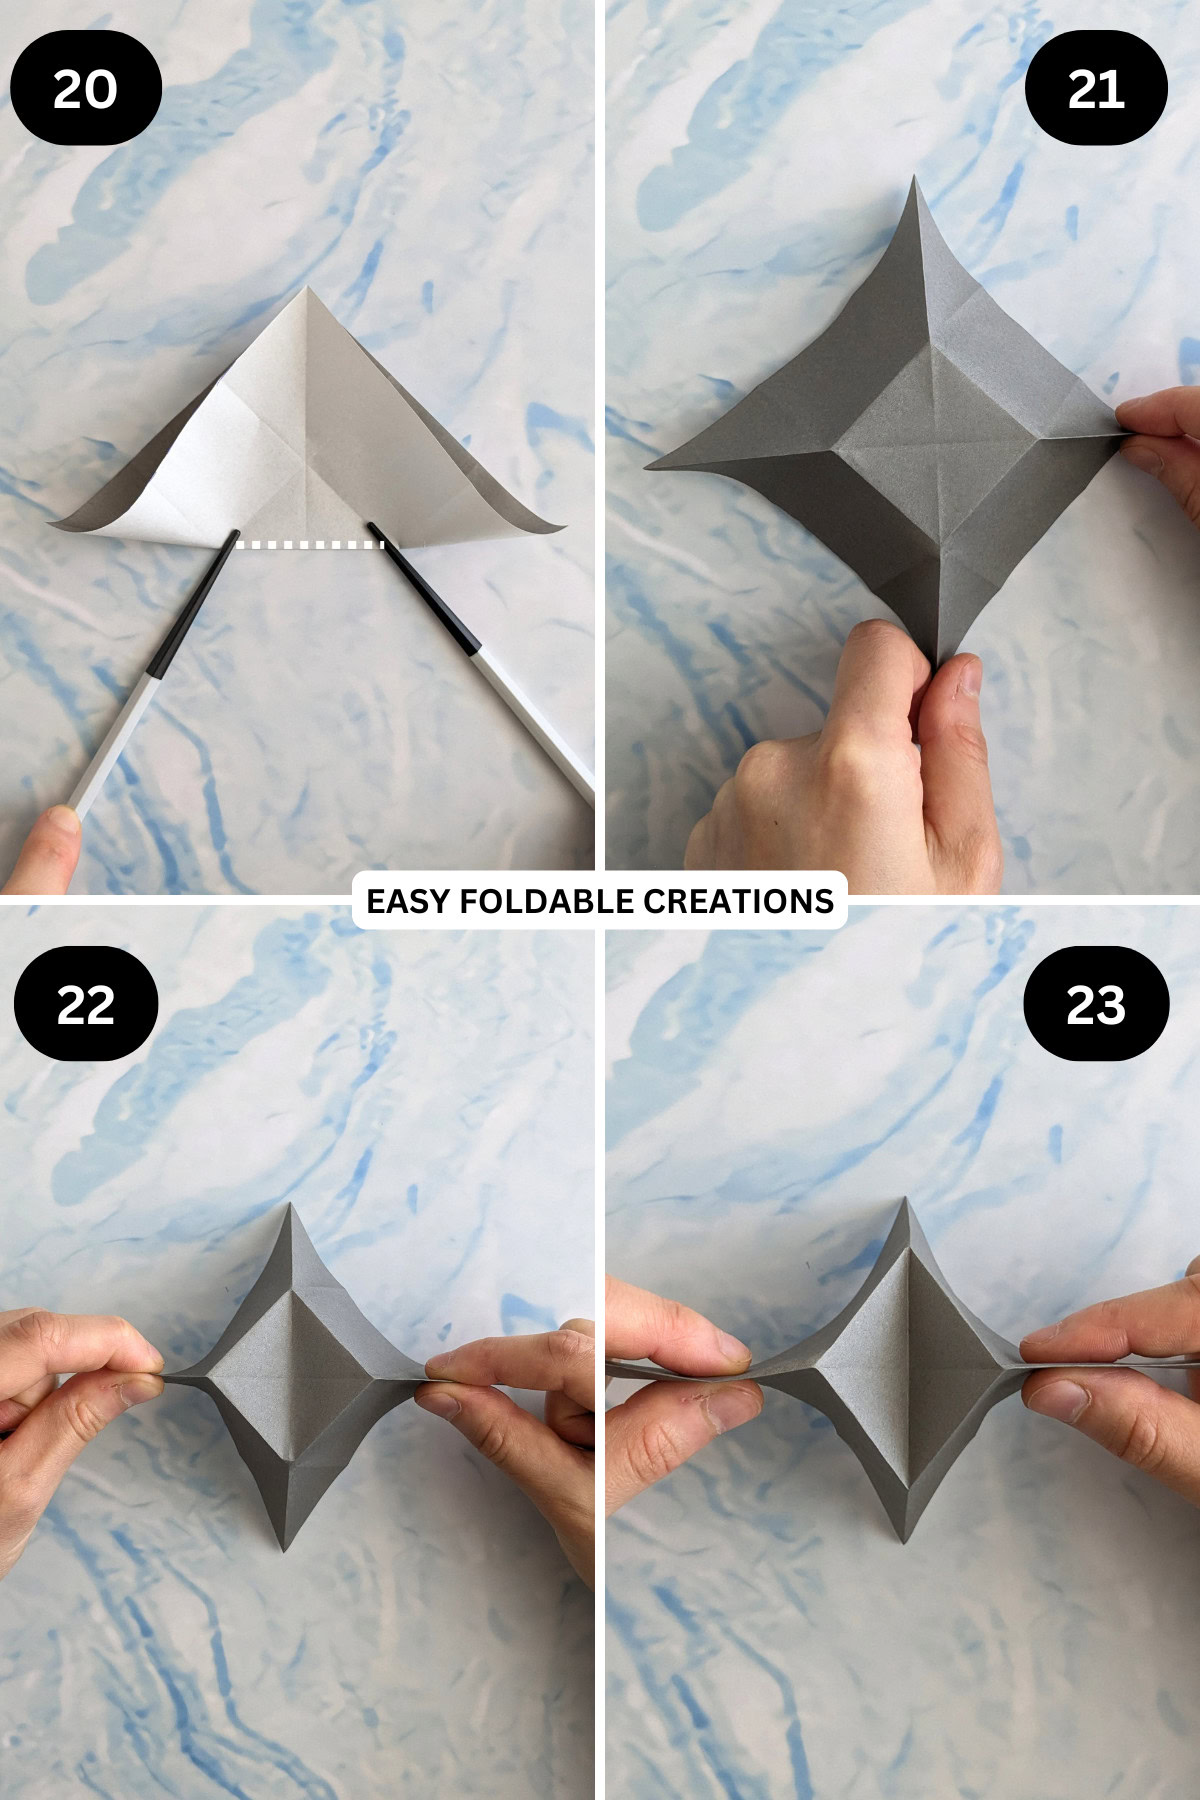
Step 24: Lay the paper flat.
Step 25: Fold the top point to meet the point of the nearest crease below it.
Step 26: Unfold previous step.
Step 27: Fold the left edge of the top point down to meet the crease you made in step 25.
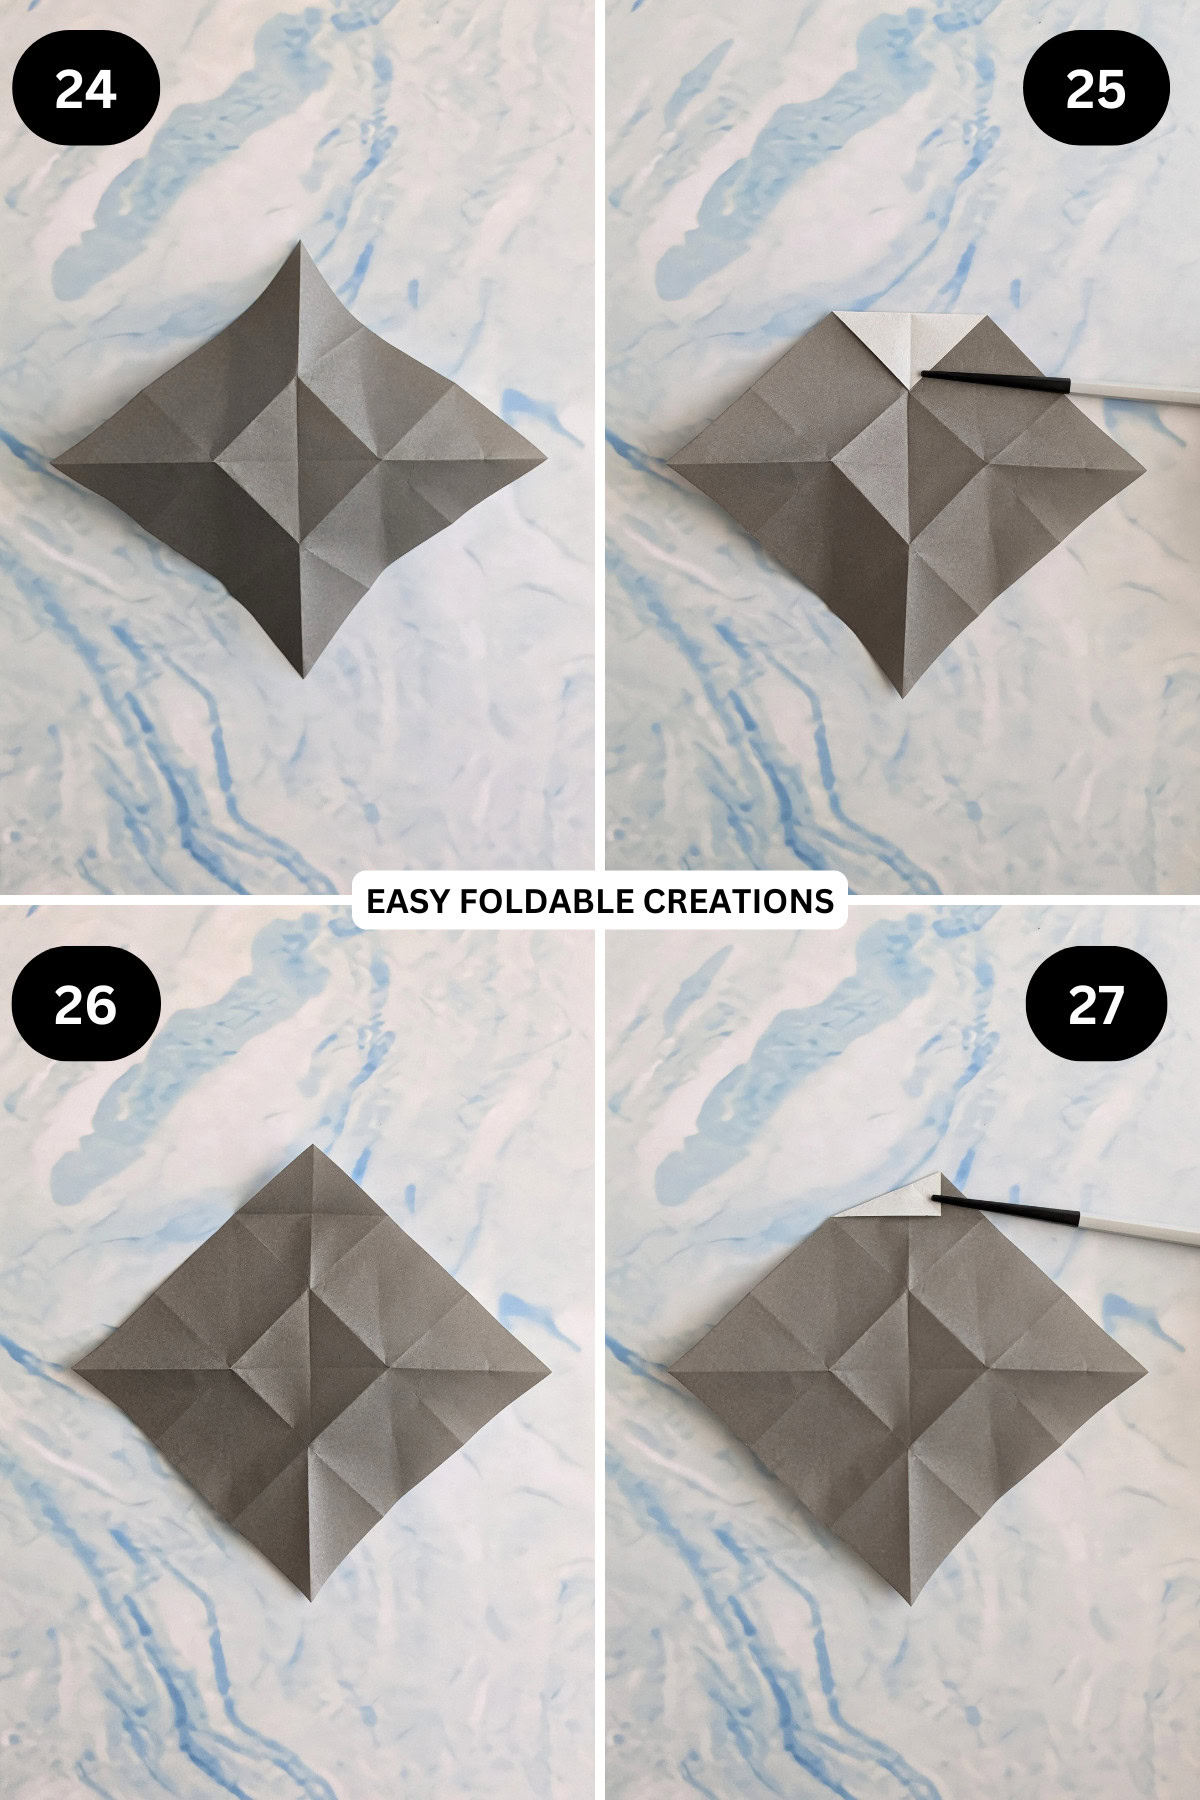
Step 28: Unfold previous step.
Step 29: Fold the right edge of the top point down to meet the crease you made in step 25.
Step 30: Unfold previous step.
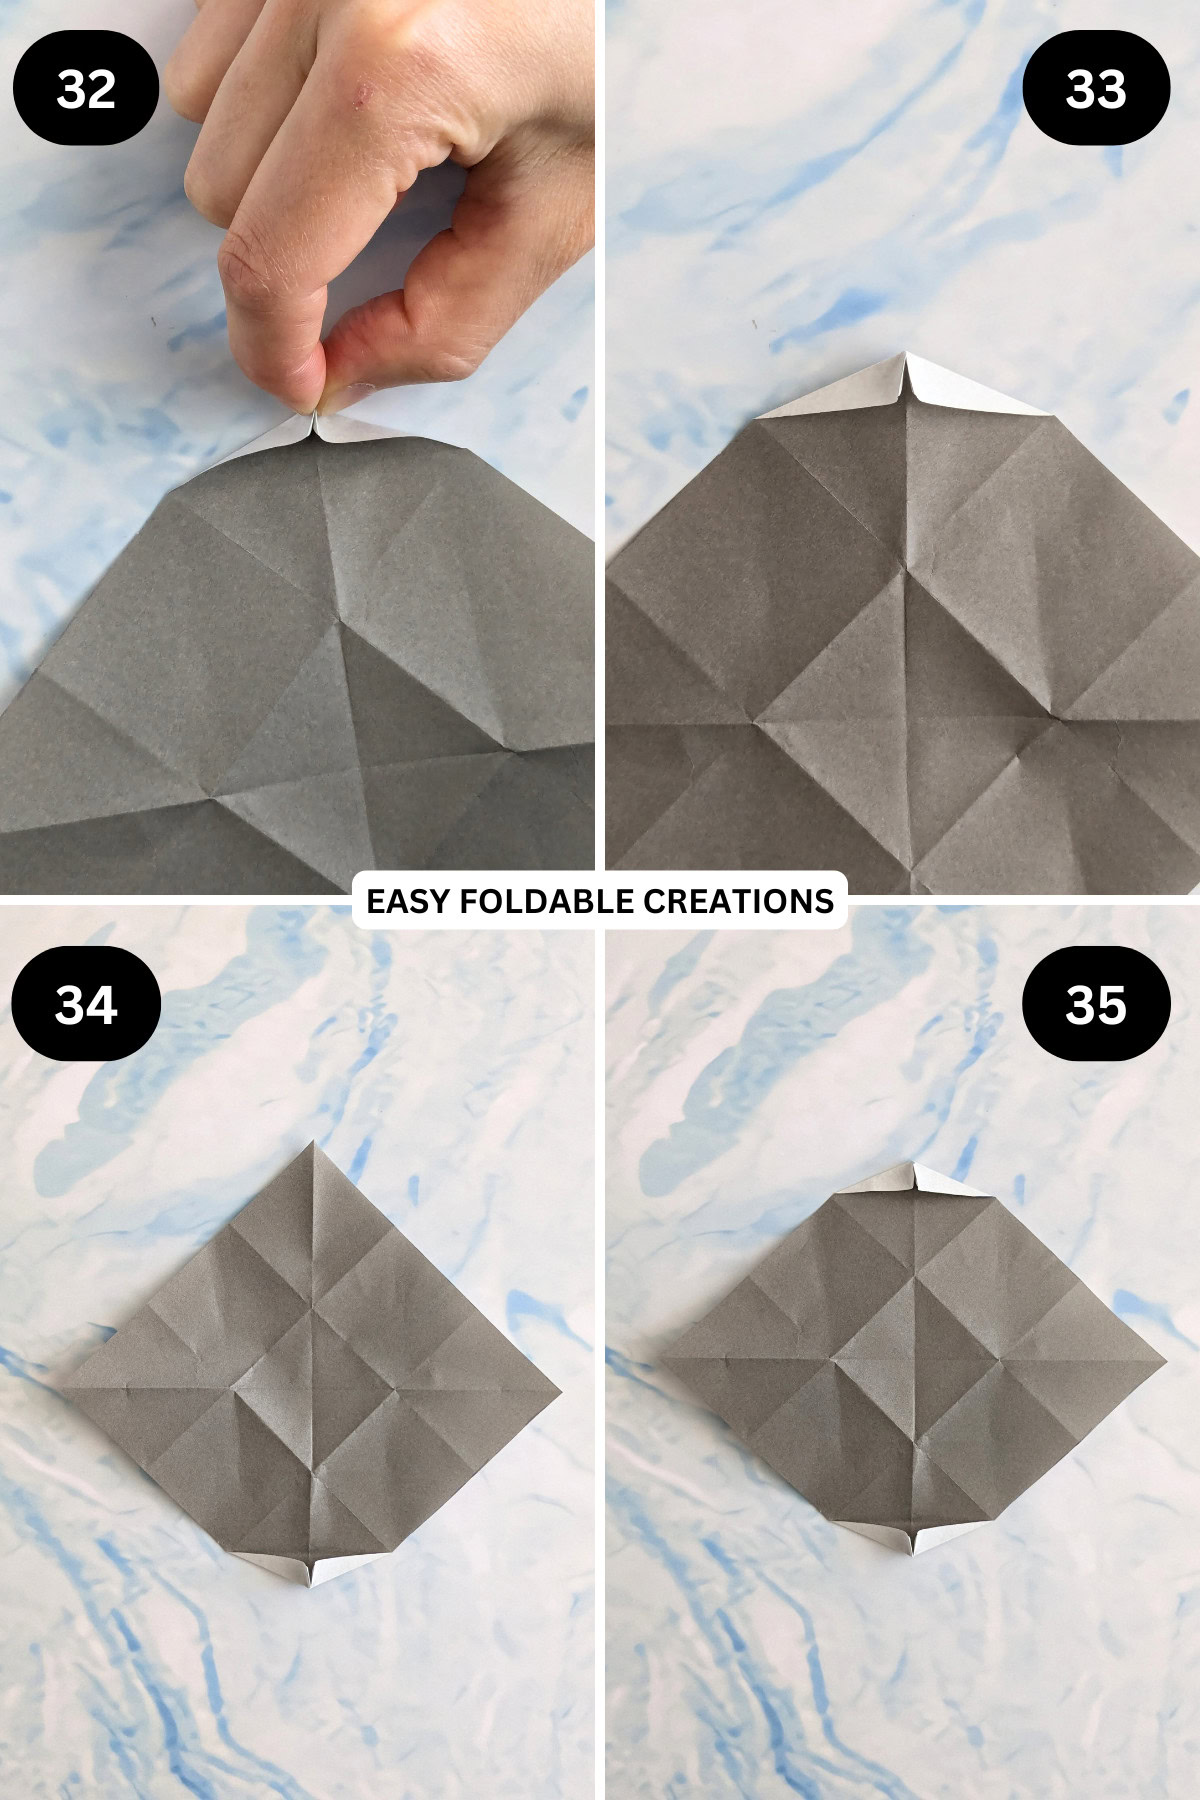
Step 31: Fold the top point down to meet the point directly below it.

Step 32: Fold the top point in half.
Step 33: Refold the creases you made in step 27 and 29. The top point you folded down earlier should stick out in the middle once folded.
Step 34: Rotate the paper 180 degrees.
Step 35: Repeat steps 25 to 33.
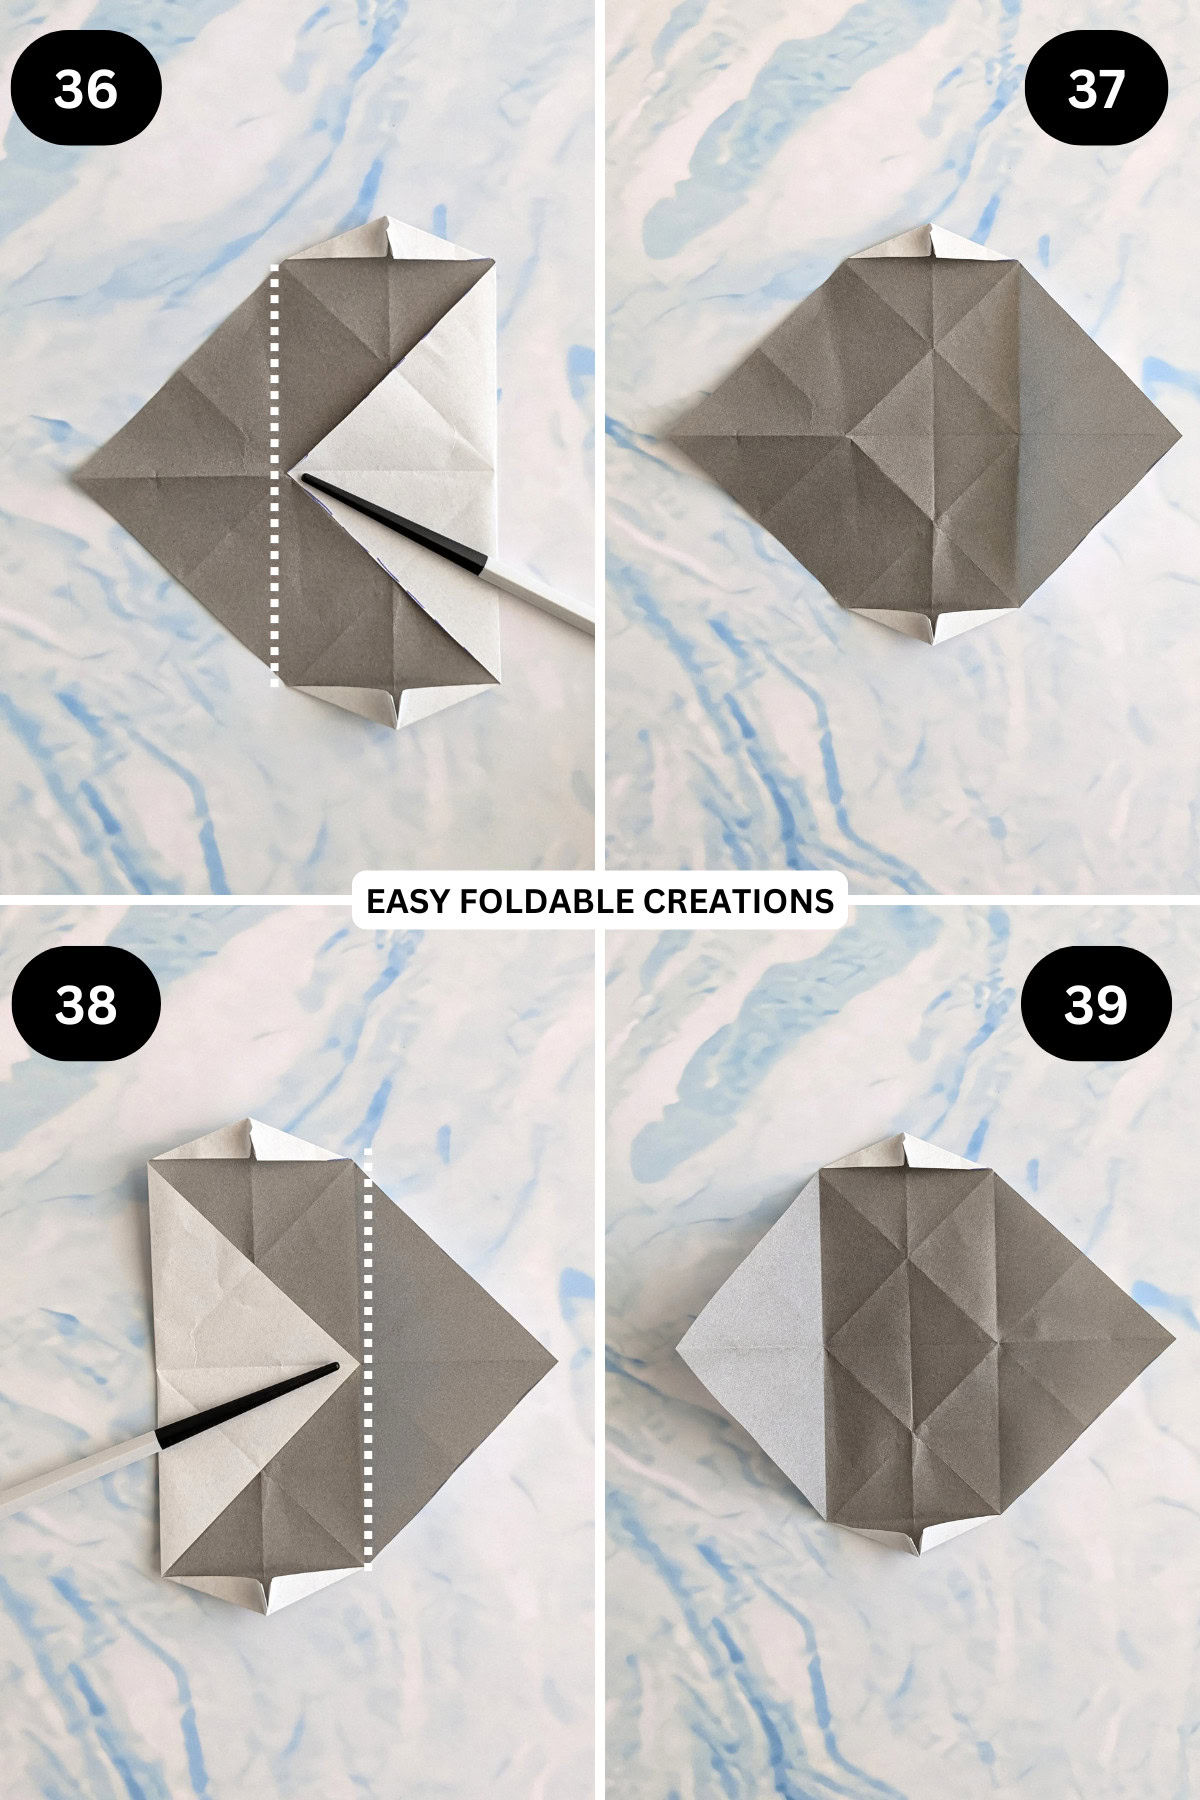
Step 36: Fold the right point to meet the right point of the square found on the left side of the paper (see picture).
Step 37: Unfold previous step.
Step 38: Fold the left point to meet the left point of the square found on the right side of the paper (see picture).
Step 39: Unfold previous step.
Step 40: Gently pull the sides in by holding the paper as shown. The paper should start to fold on itself along the middle crease.
Step 41: Fold the paper along the lines shown.
Step 42: Rotate the paper 90 degrees.
Step 43: Fold the paper along the lines shown.
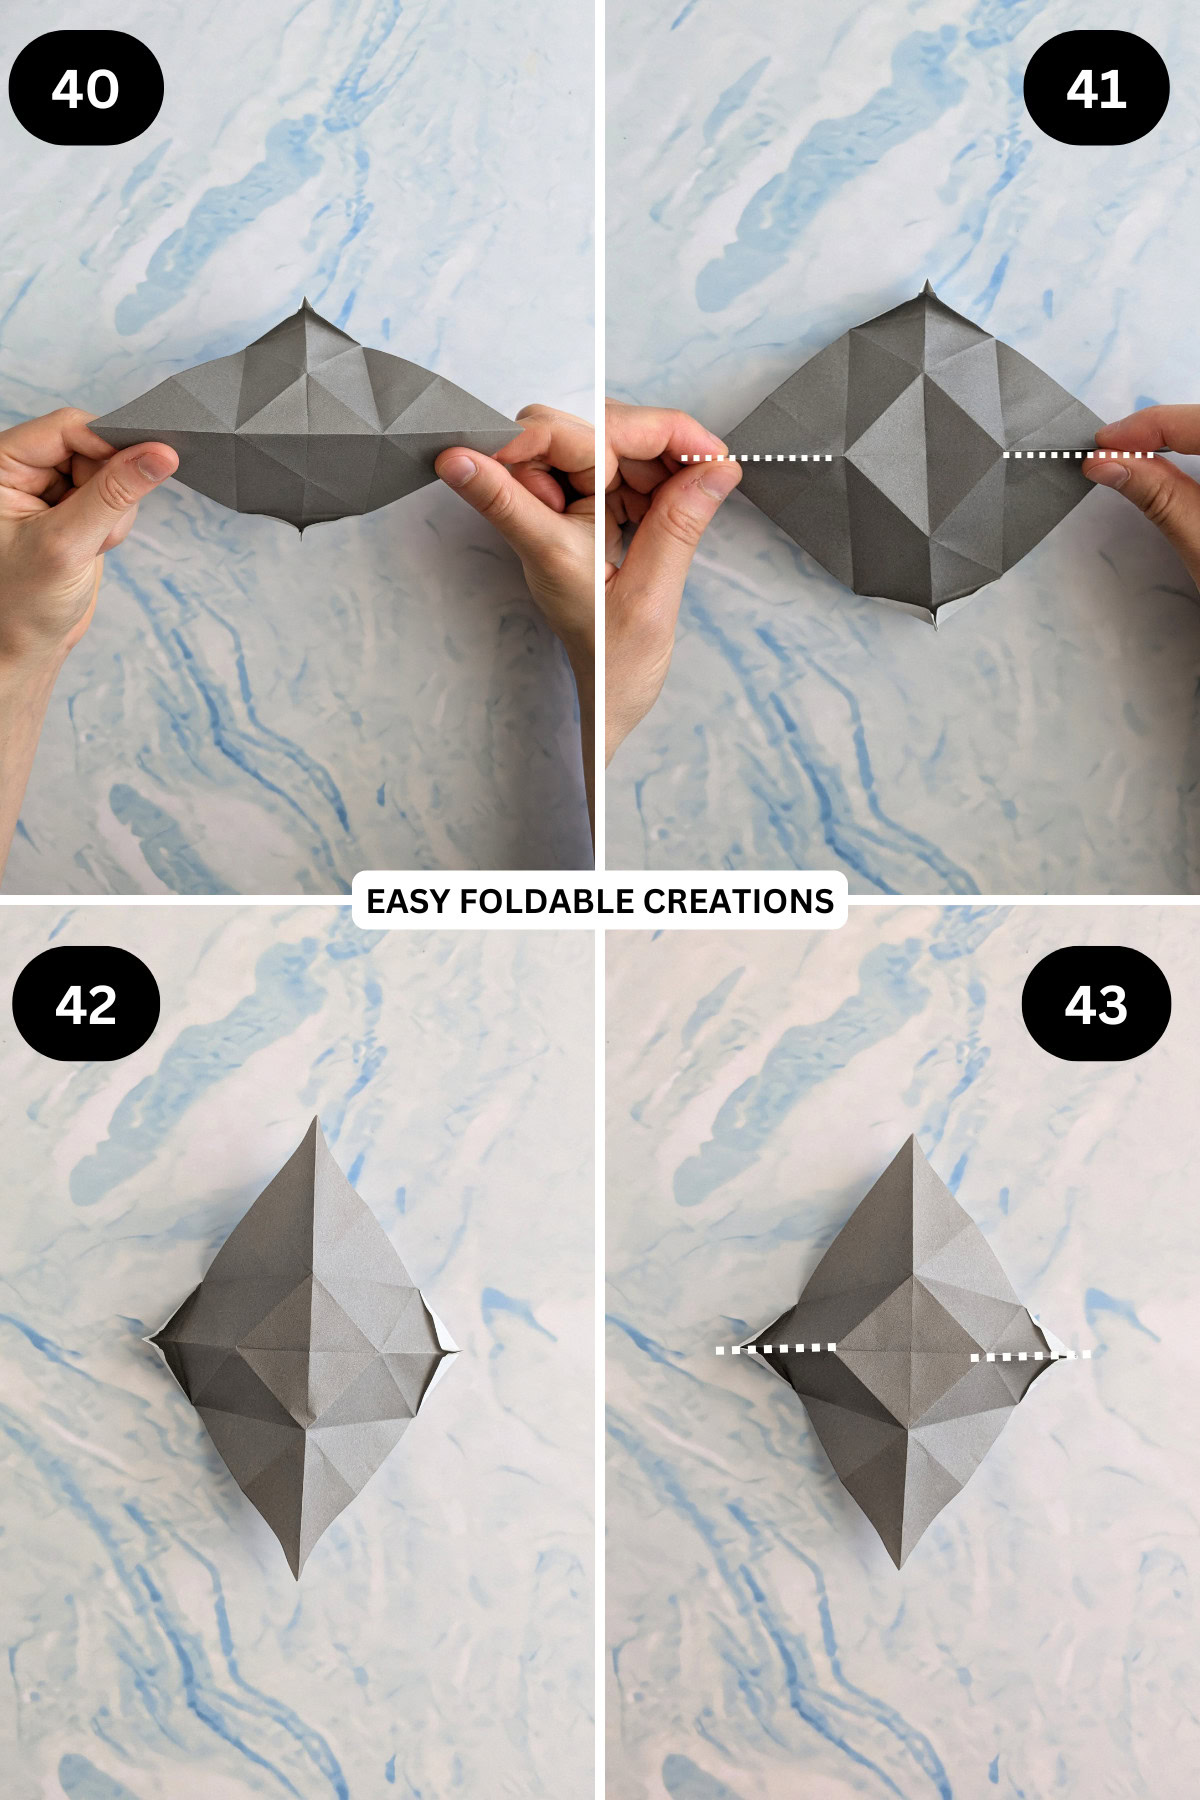
Step 44: Gently fold the middle crease inward once more.
Step 45: Hold the paper as shown and bring the middle crease in.
Step 46: Gently press the paper flat along the edges.
Step 47: Fold both the left and right flaps flat towards you.
✨ You're almost there! ✨
To unlock the final steps of the photo tutorial and complete your pattern, create a free account with Grow.me. below.
Make sure you tick the box to subscribe to our newsletter and stay up to date with the latest patterns, tips, and more!
Once you're signed up, you'll get instant access to finish your project with the photo tutorial and enjoy exclusive content in the future.
Already signed up? Hit the button below and select 'Switch to Log In' to pick up where you left off and finish your project!
Step 48: Arrange the paper so it sits as shown.
Step 49: Fold the right edge of the top flap down to meet the middle crease.
Step 50: Fold the top flap down along the middle crease.
Step 51: Flip the paper over.

Step 52: Fold the top flap down.
Step 53: Fold the left edge of the flap to meet the middle crease.
Step 54: Fold the top flap up along the middle crease.
Step 55: Fold the top flap back into the model.
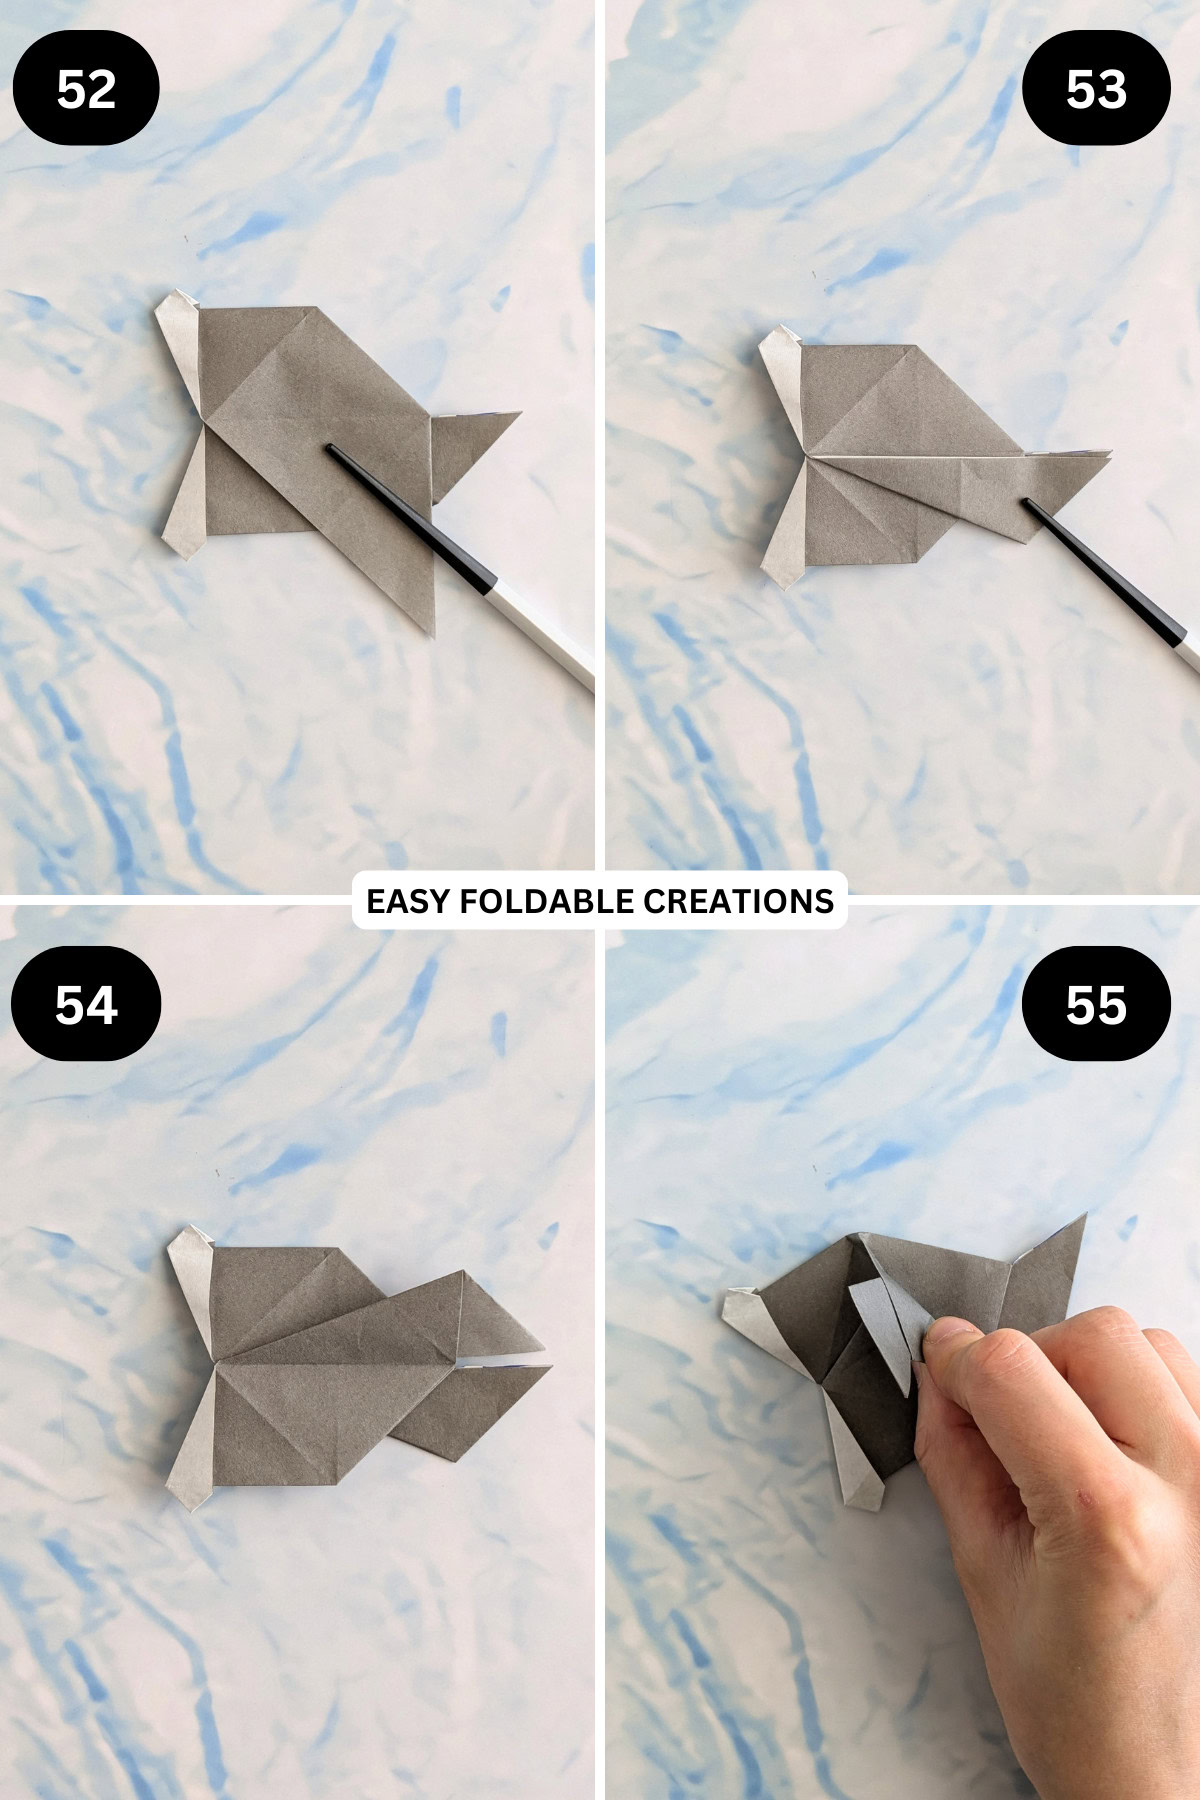
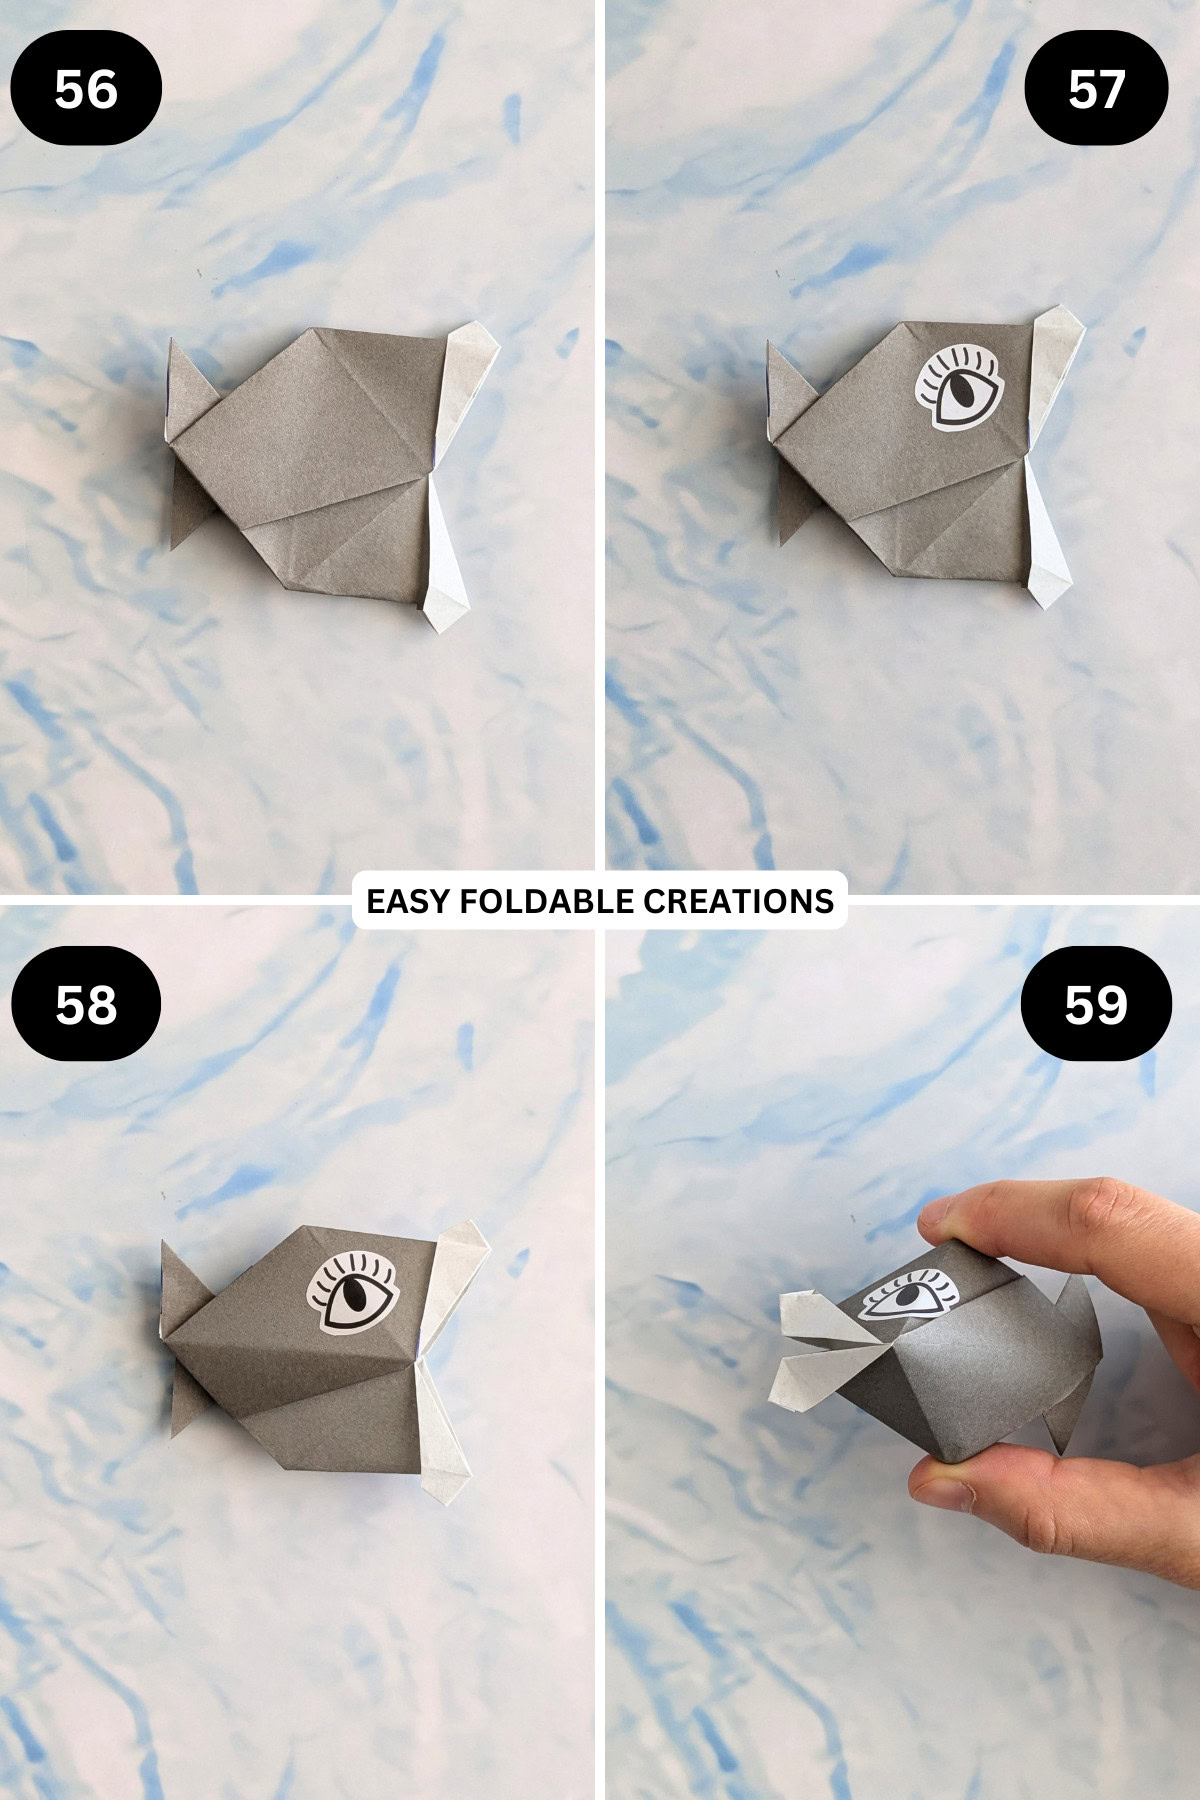
Step 56: Flip the paper over and repeat previous step.
Step 57: Decorate your fish with eyes using a marker or stickers.
Step 58: Gently open out your fish.
Step 59: Completed origami fish.
Tips For Success
- Use a bone folder to create clean, crisp folds for a more polished look.
- Experiment with different colors and patterns of paper to make each fish unique.

Common Mistakes & How To Avoid Them
Take your time with each fold, ensuring that edges are aligned correctly before creasing.
Use lighter paper for easier handling.
Color, Paper Ideas, and Variations
Use printed origami paper or scrapbooking paper for a fun, colorful effect. You could even use glow in the dark paper!
Add googly eyes or small decorations to enhance the fish's appearance and make it more playful.
Consider creating a whole school of fish in various colors and sizes for a beautiful display.
FAQ
Lightweight origami paper is recommended for easy folding, but feel free to use other types of paper as long as they are not too thick.
Absolutely! Just start with a square of any size and adjust the folds accordingly.
Other Paper Crafts You Might Like To Try:
Helpful Origami Tips
If you're curious to learn more about origami, you might like to look at our basic guides on how to make some common origami folds.
Start with the valley fold and mountain fold-these are the foundation of most origami models.
Once you're comfortable, you might like to try the petal fold for 3D shapes, and explore the bird base and square base for more complex designs.
The water bomb base is also great for creating inflatable or geometric models, like this inflatable origami rabbit.
Useful Paper Craft Terms
Want to learn a little more about paper crafts and origami?
We've made this helpful printable just for you. It explains common terms and helpful tips you might come across when you are folding origami or making a paper craft project.
You can download the useful paper craft terms printable PDF here.
Stay Connected
Made this pattern? Let us know how it went in the comments below!
Pin this post - Pin now to take your paper crafting skills to the next level.
Share on Instagram or Facebook - Capture the beauty of your finished paper craft project and share it on Instagram or Facebook! Tag us @easyfoldablecreations so we can see your work!

On the hunt for more easy paper crafts?
Then you just have to try these origami mouse, butterfly, origami heart, paper card holder, origami swan, origami boat with square paper, origami fox, and diy gift bags from wrapping paper!
Other Patterns You Might Like To Try:
Looking for other easy patterns like this? Try these:


Comments
No Comments