
Create a simple and versatile easy origami bowl with just one square sheet of paper-no scissors or glue needed!
Perfect for snacks, organizing small items, or even as a party favor holder, this easy craft is as functional as it is fun.

Jump to:
- Why You'll Love This Pattern
- Exclusive Content Just For You
- Skill Level
- Materials Needed
- Instructions
- Tips For Success
- Common Mistakes & How To Avoid Them
- Color, Paper Ideas, and Variations
- FAQ
- Other Paper Crafts You Might Like To Try:
- Helpful Origami Tips
- Useful Paper Craft Terms
- Stay Connected
- Other Patterns You Might Like To Try:
- Comments
This easy origami bowl is a timeless craft project that combines simplicity with practicality.
Whether you're hosting a party, organizing your desk, or just looking for a creative outlet, this versatile bowl is the perfect choice.
Made from just one square sheet of paper, it's a no-fuss design that doesn't require scissors, glue, or any additional tools.
The result? A sturdy, charming container that's as useful as it is decorative. If you're new to origami, this is an excellent beginner-friendly project to try.
This origami bowl has countless uses. Fill it with dried snacks like pretzels, candies, or trail mix for game day gatherings or casual get-togethers.
Use it as a decorative catch-all for small trinkets, keys, or coins on your desk or nightstand. If you're in the mood for gifting, it's a unique way to present small items like jewelry, gift cards, or sweets.
Lightweight cardstock works well for larger bowls, adding extra durability while still maintaining the folding structure.
Beyond its practical uses, this easy step by step origami bowl also offers a touch of charm to any setting.
Create a set of bowls in different colors or patterns to complement your event's theme-think bold colors for game day, soft pastels for a baby shower, or holiday patterns for festive occasions.
The customization possibilities are endless, making it a fantastic project for unleashing your creativity.
One of the most appealing aspects of this craft is its simplicity.
Whether you're a seasoned origami enthusiast or just beginning your journey, the straightforward folds and no-mess approach make it an accessible and rewarding project.
With a little practice, you can quickly create bowls of various sizes and styles to suit your needs.
Start folding your first origami bowl today and experience the joy of transforming a simple piece of paper into something truly functional and beautiful!

Why You'll Love This Pattern
- Practical and Versatile: This easy origami bowl isn't just for show-it's functional! Use it to serve dry snacks like pretzels or candies during parties, game nights, or even as a stylish desk organizer.
- Quick and Beginner-Friendly: With no need for scissors or glue, this project is ideal for beginners or kids exploring the world of origami.
- Customizable for Any Occasion: Choose festive paper for Christmas, DIY Halloween party decor, team colors for game day, or floral patterns for spring events like Easter. You can easily match the bowl to your theme or purpose.
- Eco-Friendly Craft: Instead of buying disposable bowls, create your own reusable ones using paper. It's a fun, sustainable option!
- A Great Gift Idea: Fill these handmade bowls with goodies like wrapped candies or small trinkets to create thoughtful, unique gifts.
- Folding paper into a bowl is a calming and rewarding experience, perfect for a quick creative escape or a group activity with friends or family.
Exclusive Content Just For You
Not sure what you want to make next, but feeling a bit creative? Or maybe you've been searching for a pattern that sparks something new. We've got a few ideas waiting for you.
The Fold Collective, Easy Foldable Creations' community, provides you with a library of exclusive ad-free video tutorials, printable PDF patterns, helpful tips, and more so you can improve your skills and enjoy crafting in your own time.
Skill Level
★★☆☆☆ (Easy)
Materials Needed
1 square sheet of paper.
We recommend using origami paper for smaller bowls, and lightweight cardstock for larger bowls.
| Paper Size | Finished Bowl Size | |
| Small Bowl | 6 inch x 6 inch (15 cm x 15cm) | 1.5 inch (4 cm) tall x 2 inch (6 cm) wide |
| Large Bowl (recommended to use lightweight cardstock) | 8 inch x 8 inch (20 cm x 20 cm) | 2.5 inch (7 cm) tall x 3 inch (8 cm) wide |
Instructions
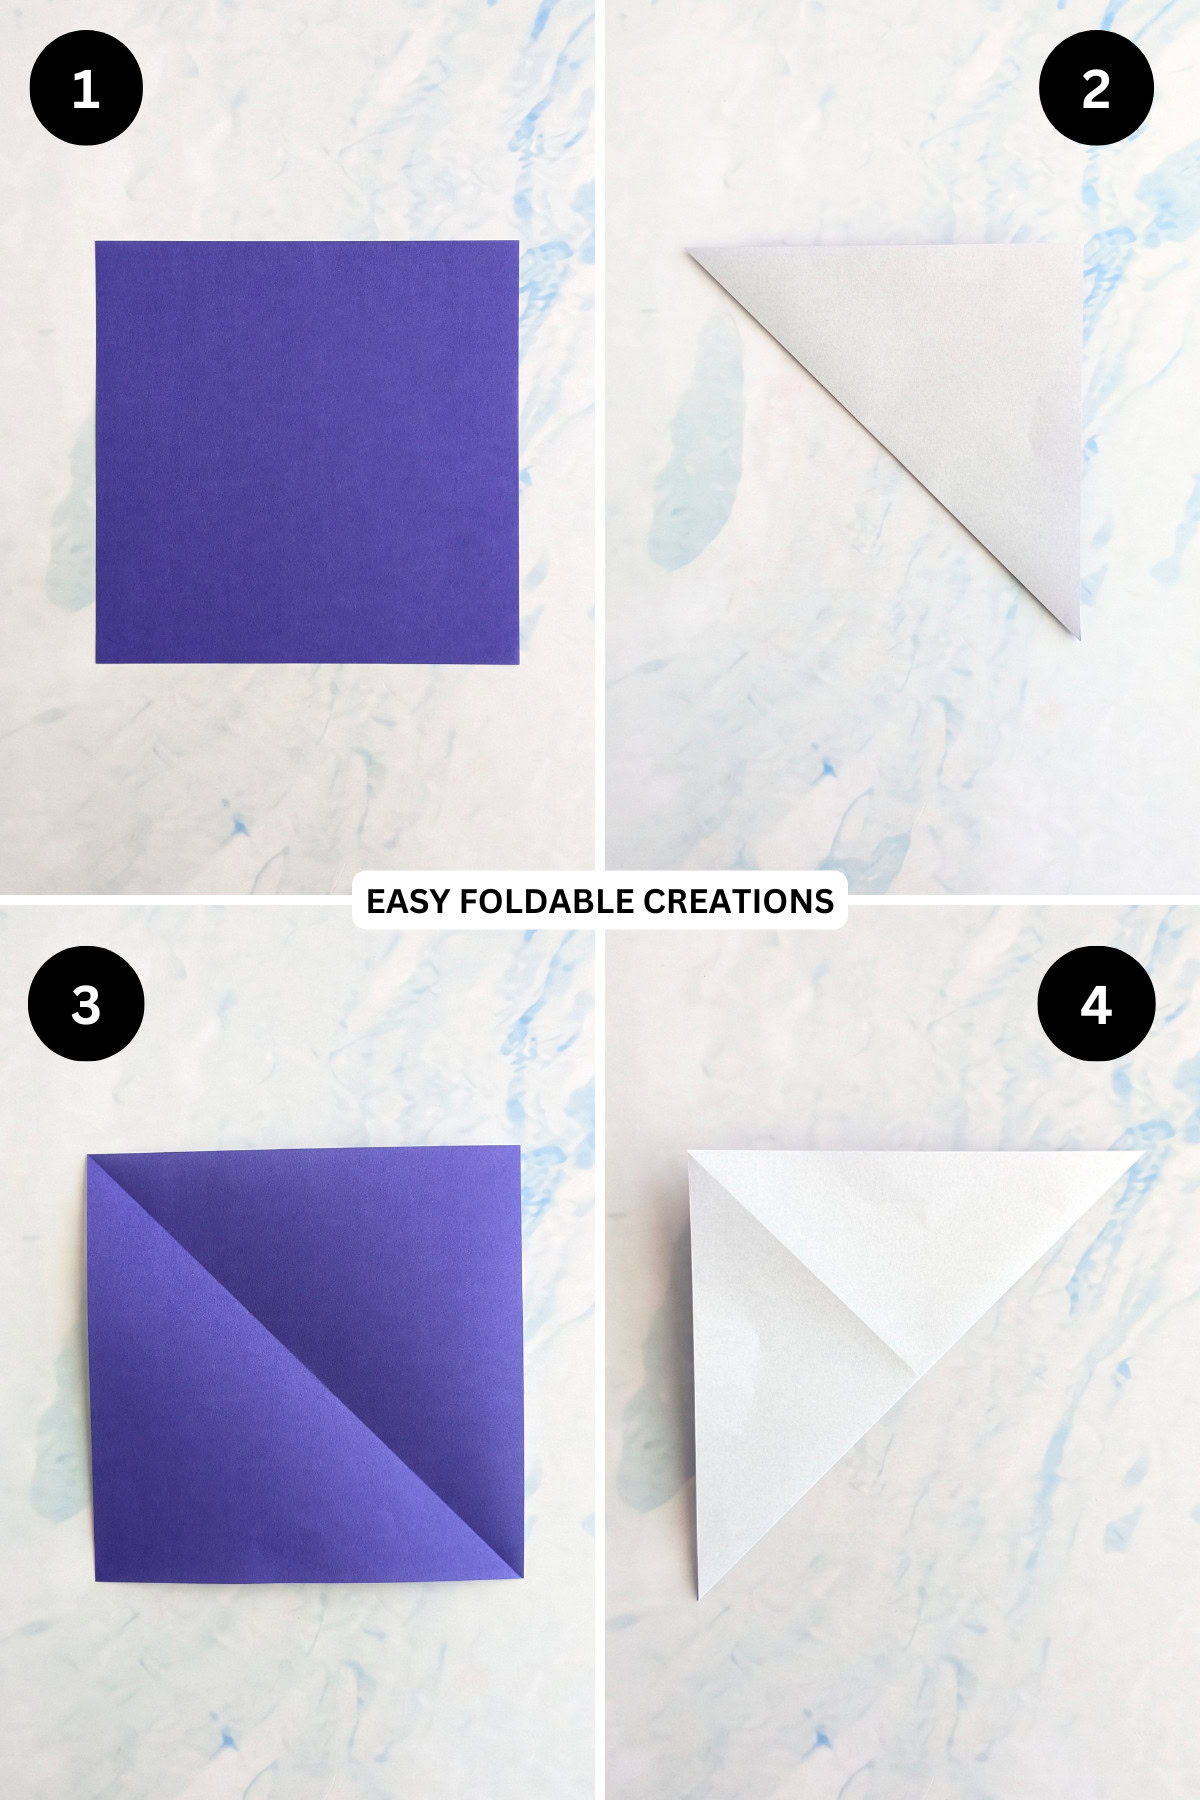
Step 1: Start with the color you want your bowl to be facing up.
Step 2: Fold the bottom left corner up to meet the top right corner.
Step 3: Unfold previous step.
Step 4: Fold the bottom right corner up to meet the top left corner.
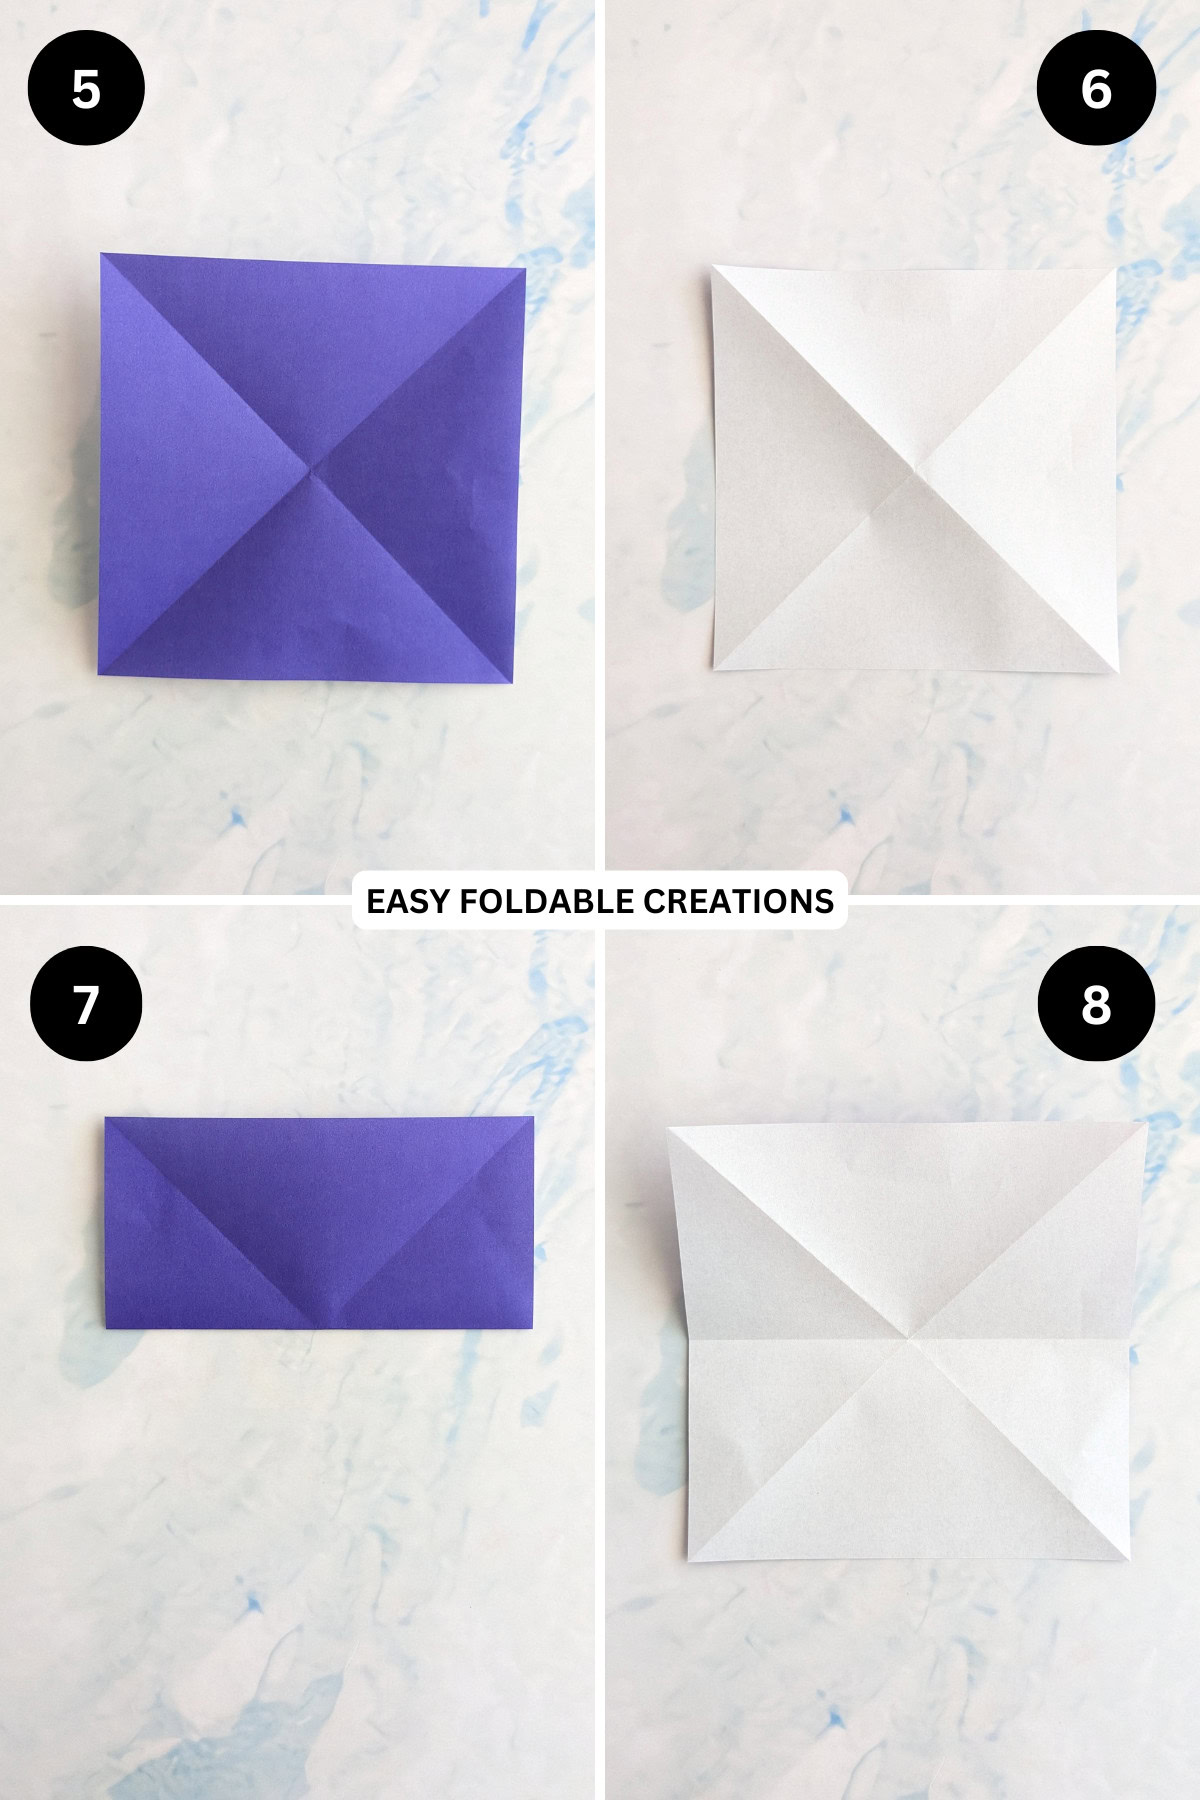
Step 5: Unfold previous step.
Step 6: Flip your paper over from left to right.
Step 7: Fold the bottom edge to the top edge.
Step 8: Unfold previous step.
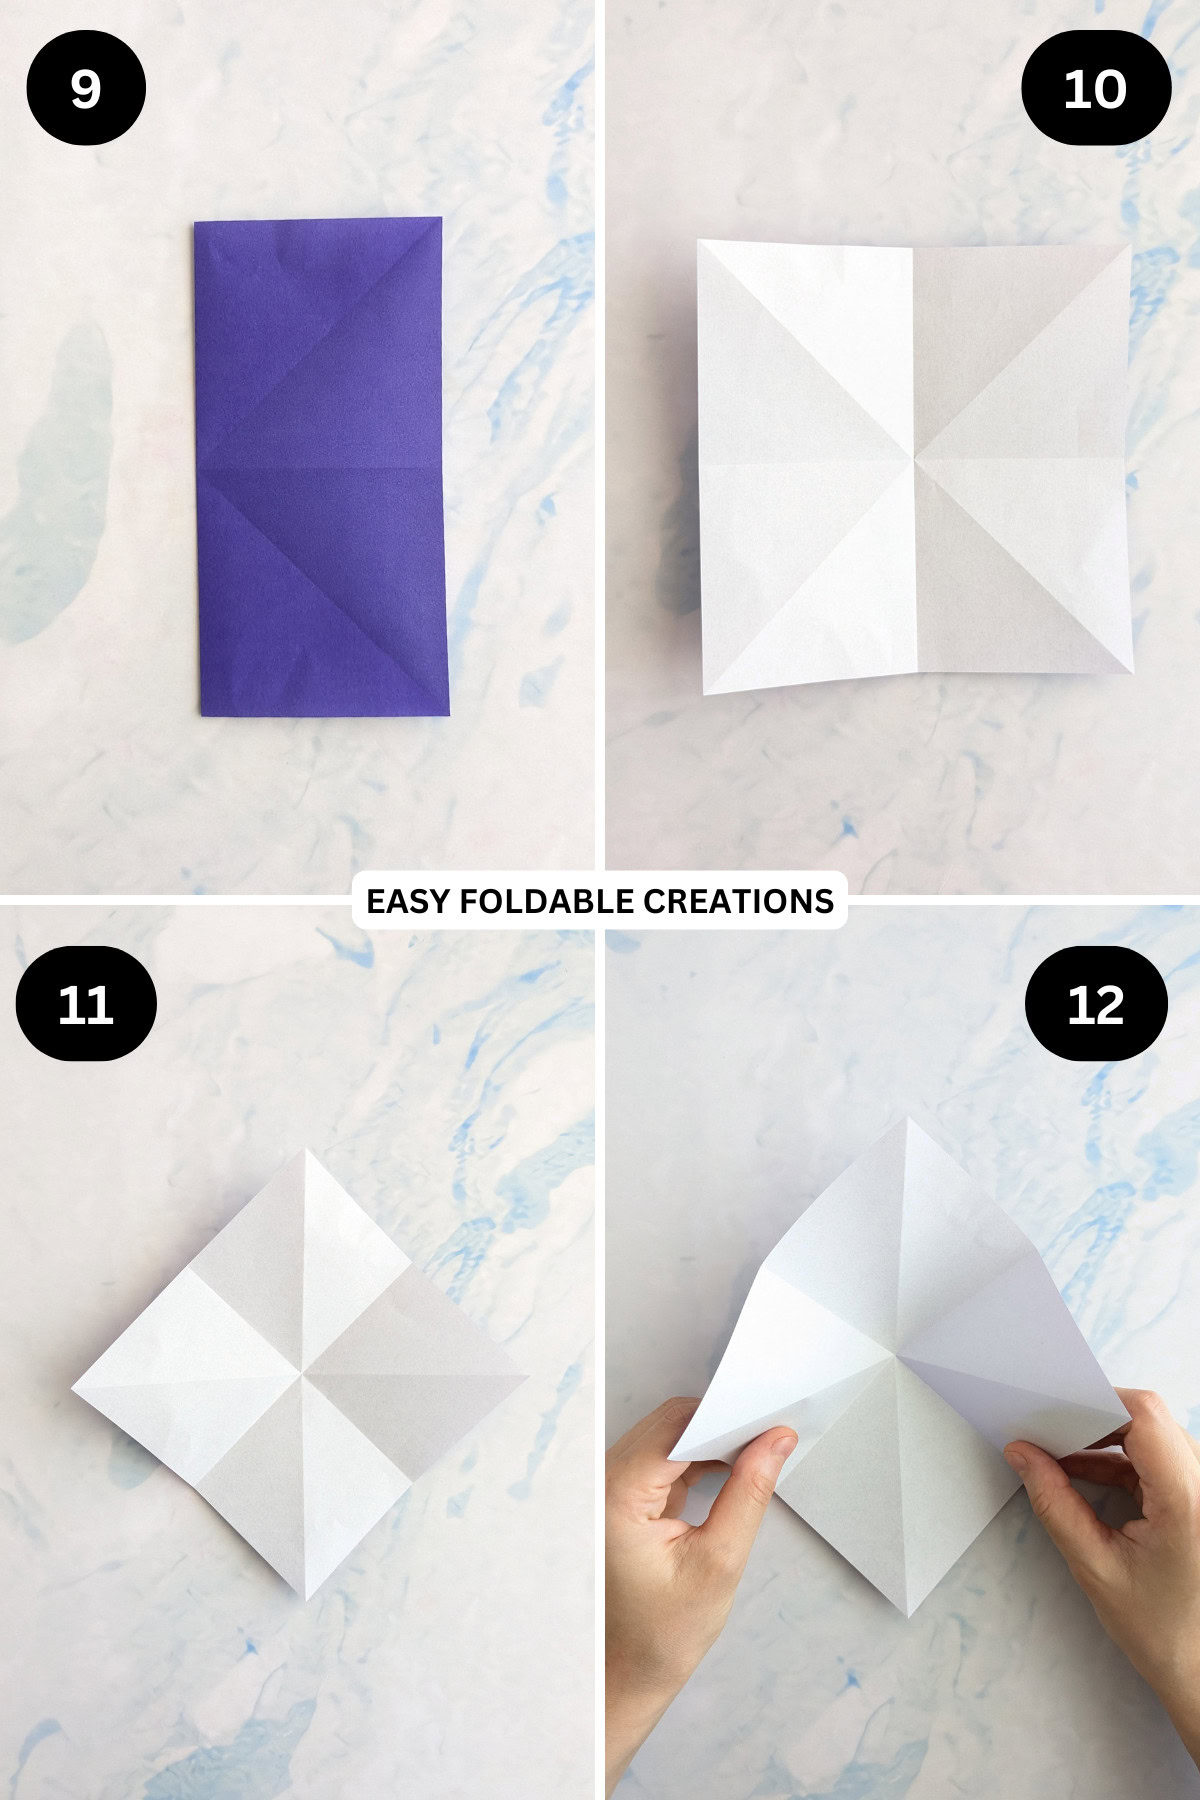
Step 9: Fold the left edge to the right edge.
Step 10: Unfold previous step.
Step 11: Rotate your paper 45 degrees so that it sits like a diamond.
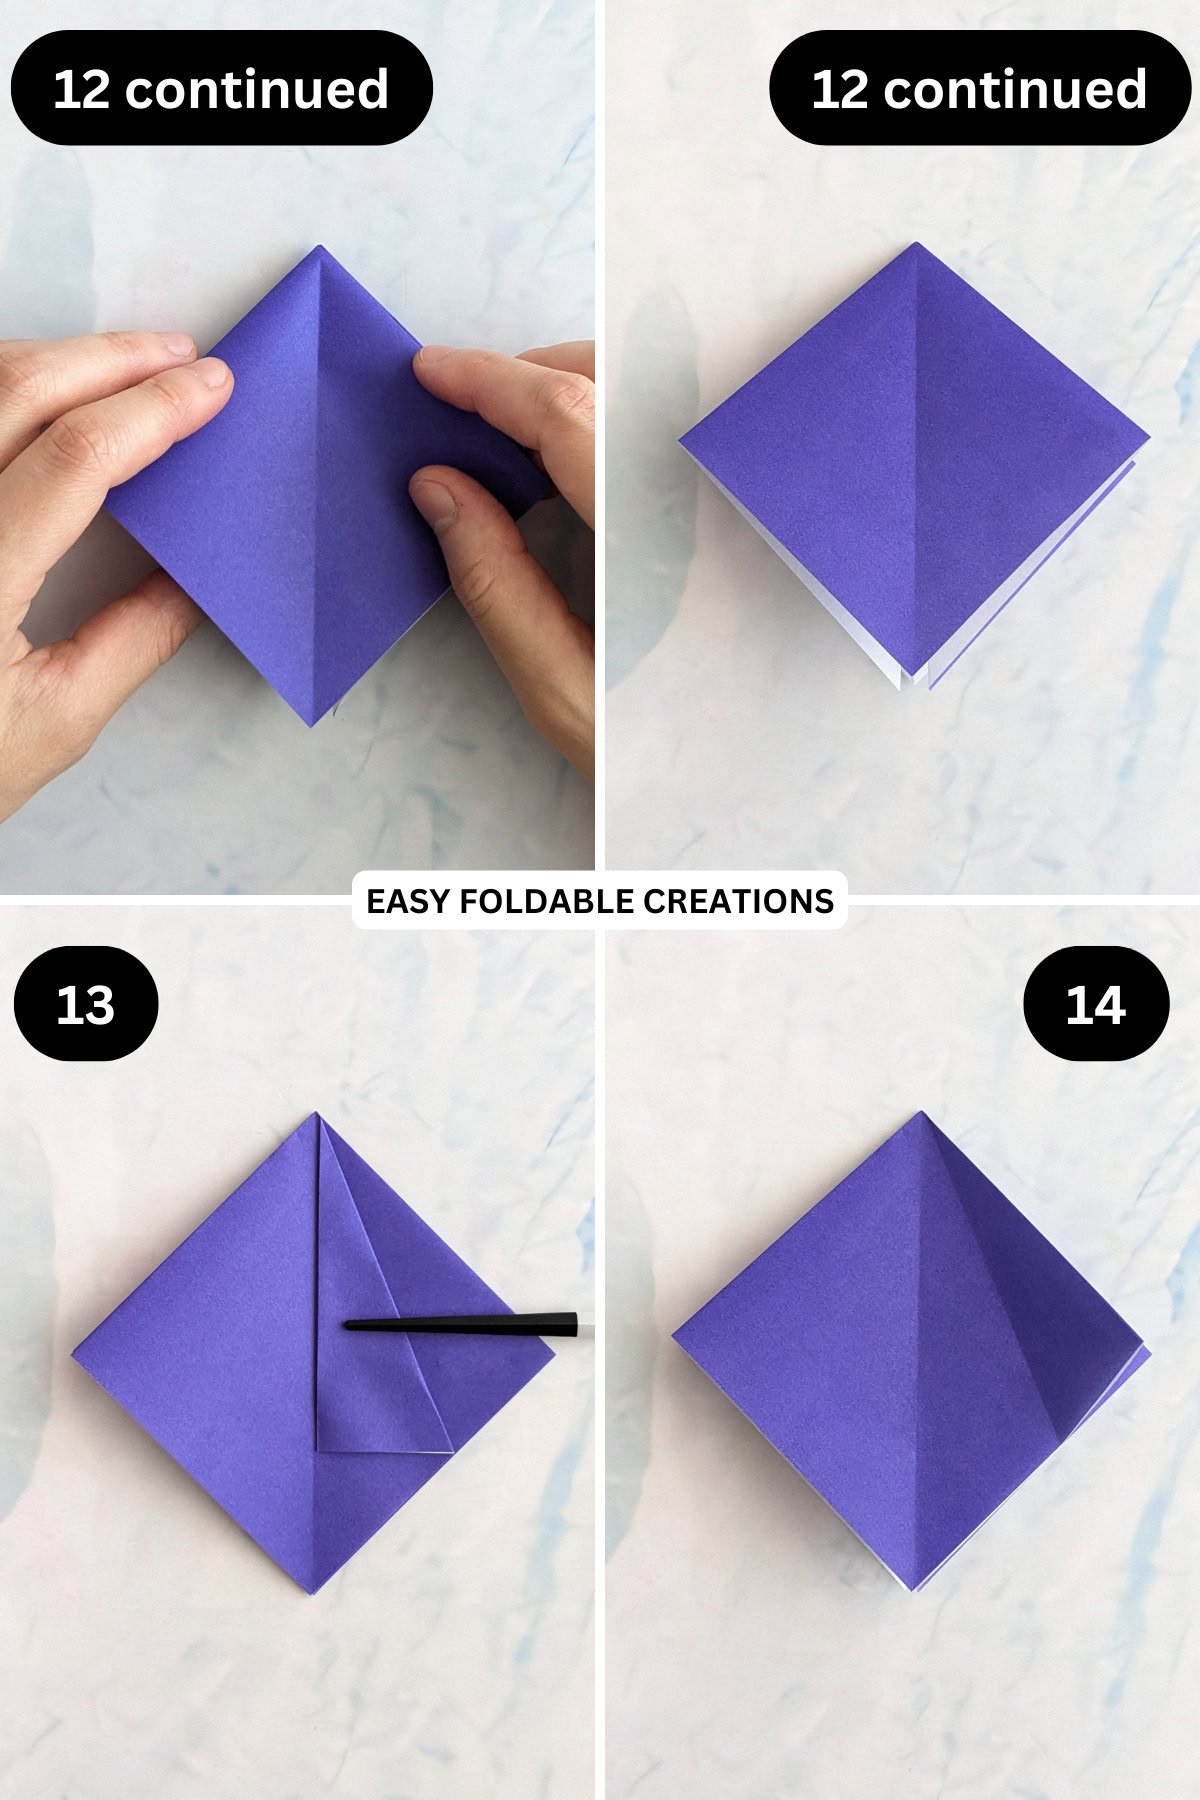
Step 12: Hold the left and right sides of the paper and bring the left and right points to meet bottom point. You will find the paper starts to collapse on itself. It will form a square.
Step 13: Making sure the open edge is towards you: Fold the top right diagonal edge (top layer only) to the middle crease.
Step 14: Unfold previous step.
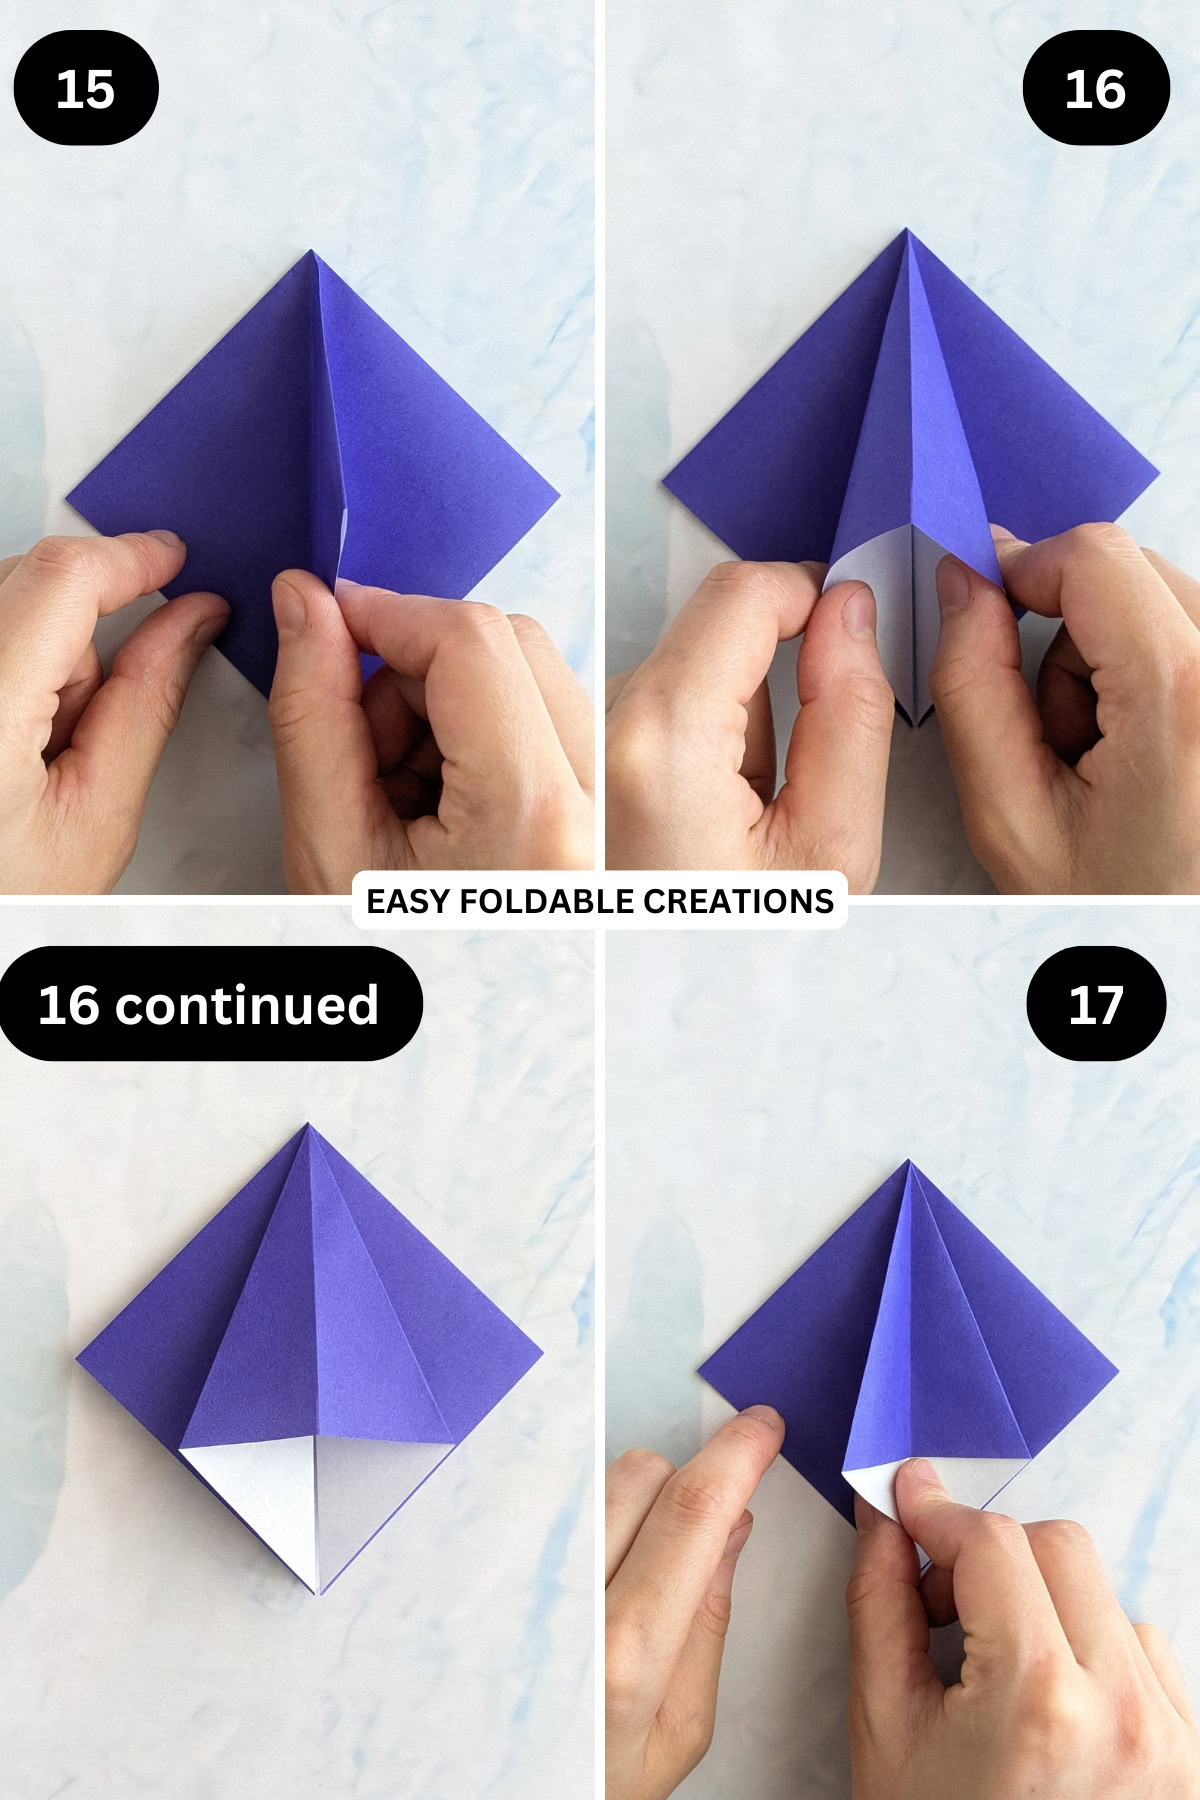
Step 15: Lift the top right flap up so it stands 90 degrees along the middle crease.
Step 16: Open out the flap and then squash fold the flap so that it sits flat.
Step 17: Fold the left side of the top flap to the right.
Step 18: Repeat steps 13 to 17 for the left side.
Step 19: Flip your paper over from left to right.
Step 20: Repeat steps 13 to 18.

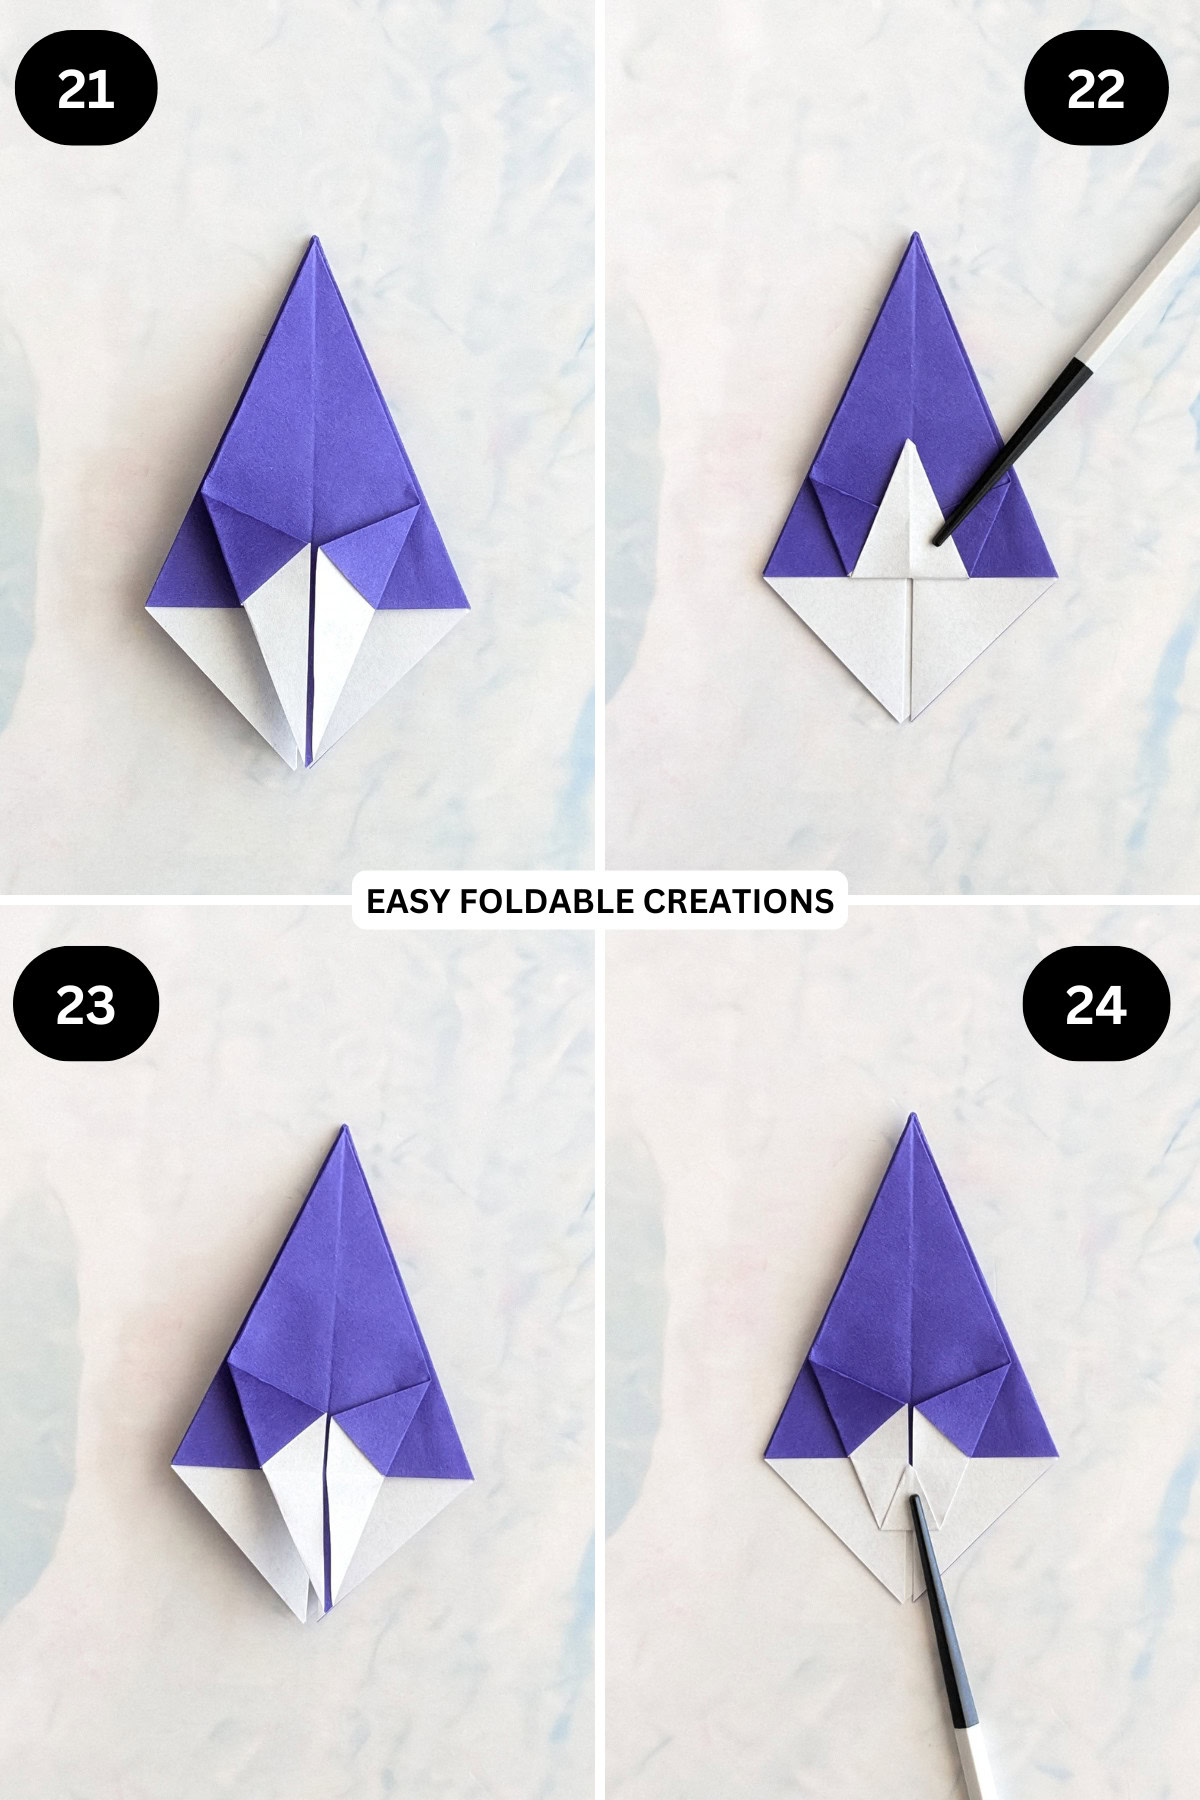
Step 21: Fold the bottom left and right diagonal edges (top layer only) in to meet the middle crease.
Step 22: Fold the bottom point up (top layer only) so that it's folded edge aligns with the edge of the colored section.
Step 23: Unfold previous step.
Step 24: Fold the bottom point up once again, but this time to meet the crease you made in step 22.
✨ You're almost there! ✨
To unlock the final steps of the photo tutorial and complete your pattern, create a free account with Grow.me. below.
Make sure you tick the box to subscribe to our newsletter and stay up to date with the latest patterns, tips, and more!
Once you're signed up, you'll get instant access to finish your project with the photo tutorial and enjoy exclusive content in the future.
Already signed up? Hit the button below and select 'Switch to Log In' to pick up where you left off and finish your project!
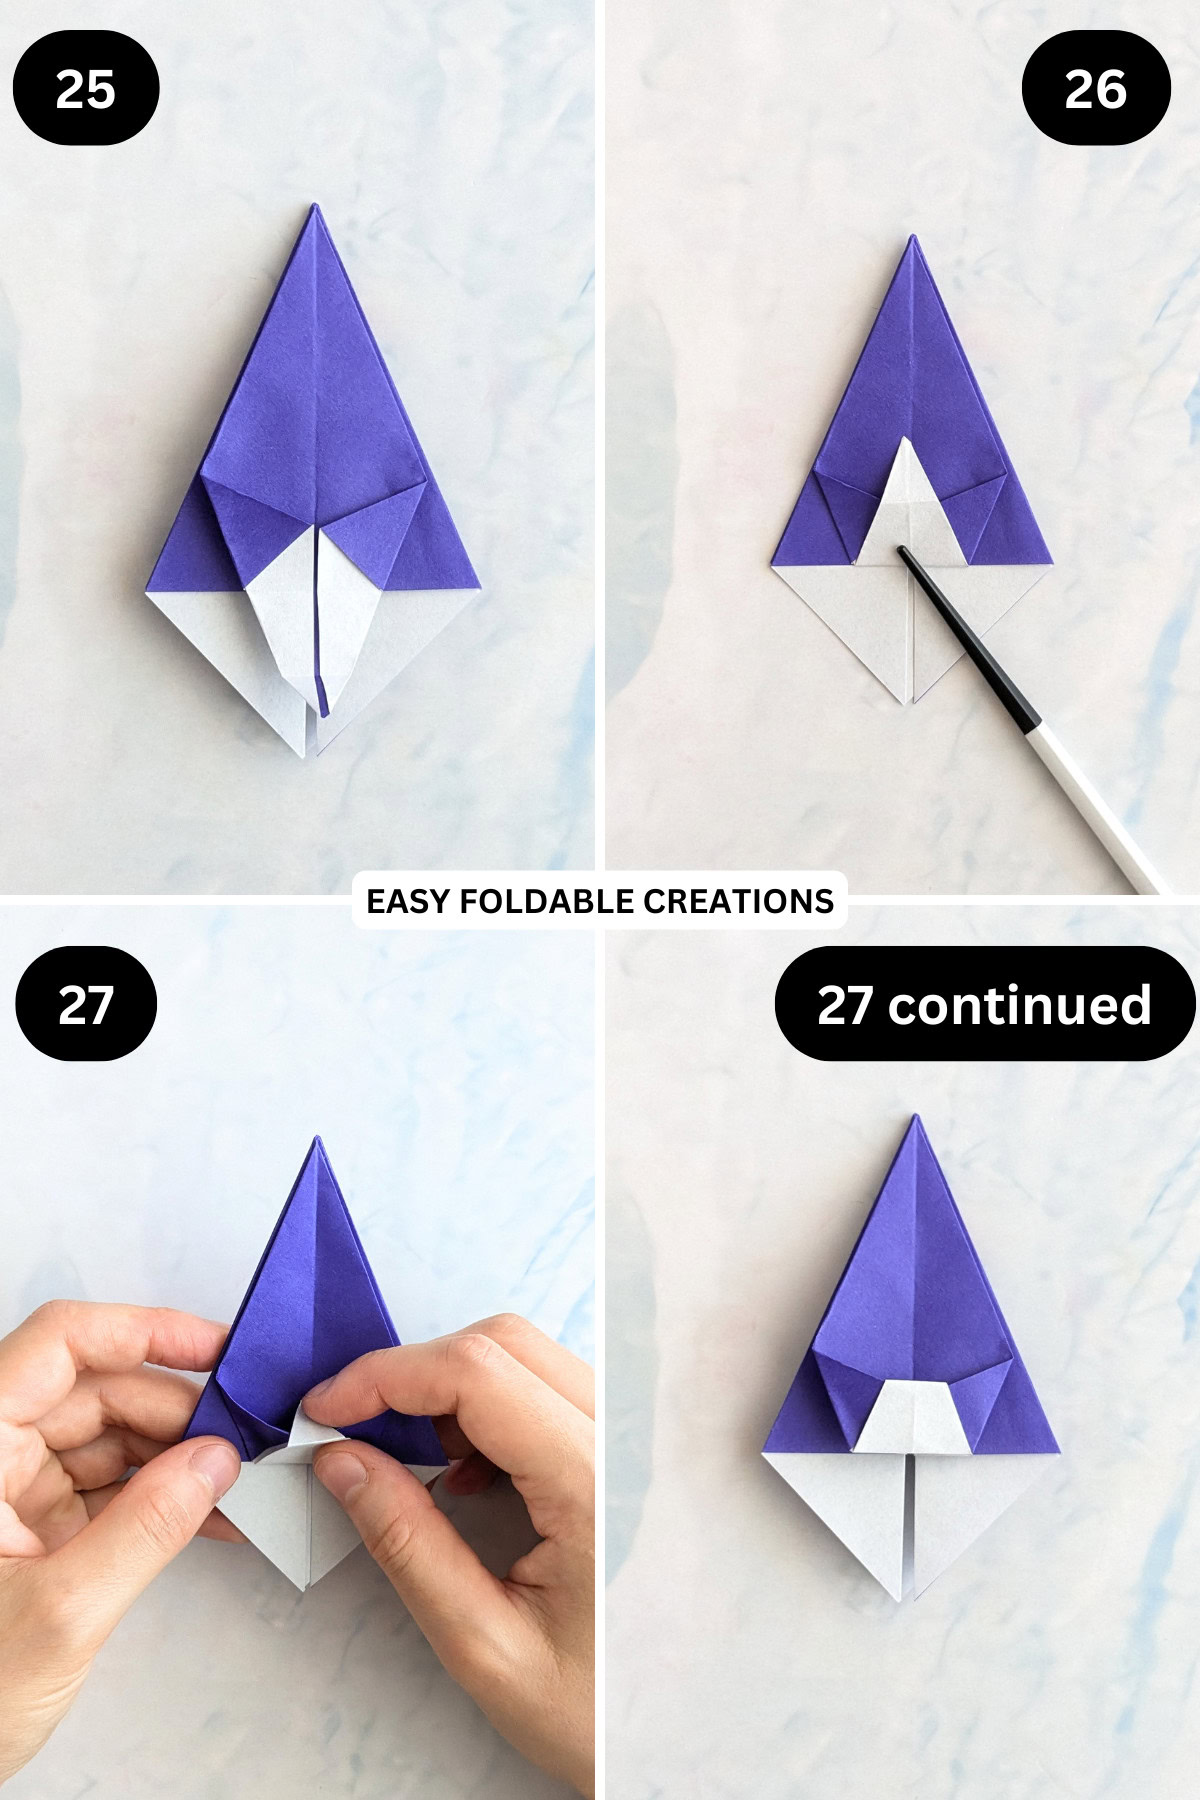
Step 25: Unfold previous step.
Step 26: Refold the bottom point up along the crease you made in step 22.
Step 27: Tuck the tip of the same point into the small pocket found underneath it.
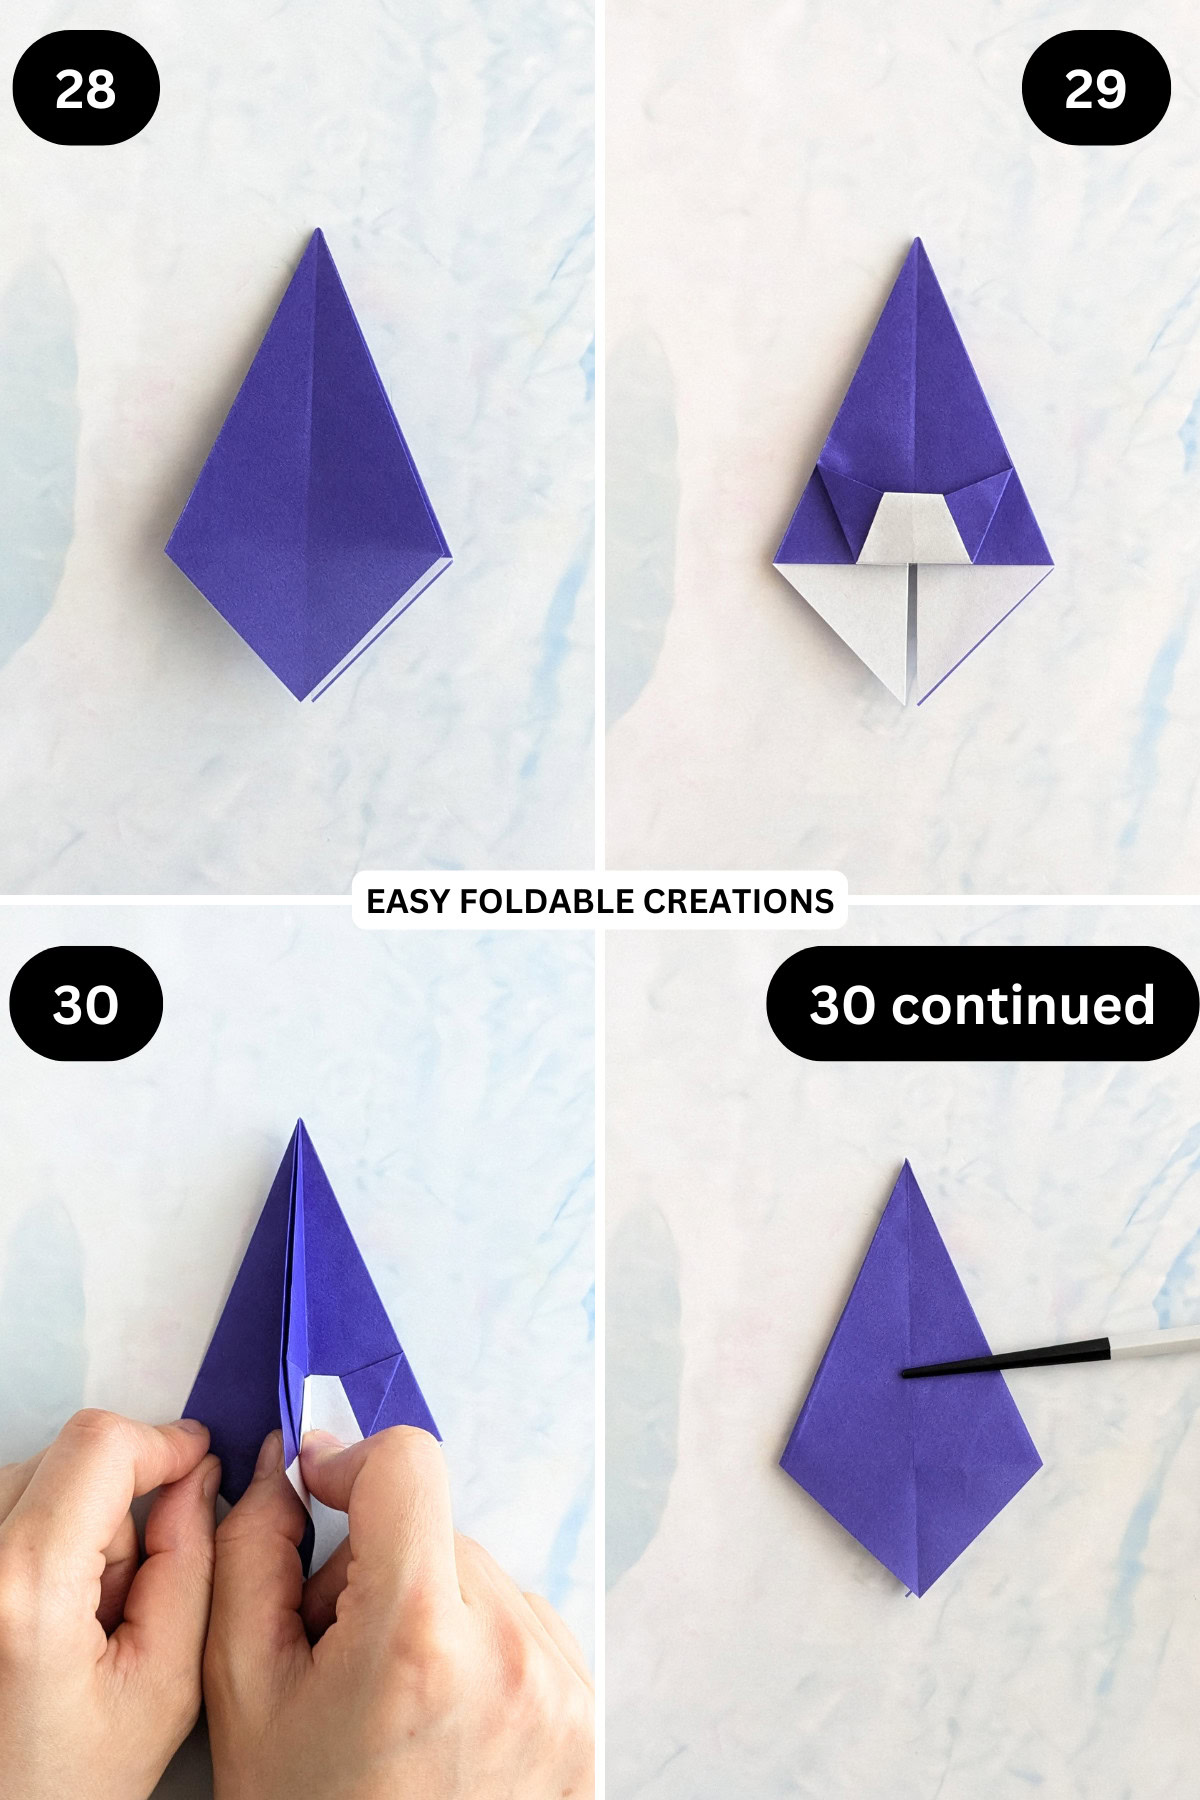
Step 28: Flip your paper over from left to right.
Step 29: Repeat steps 21 to 27.
Step 30: Turn the left side of the paper to the right, like you are turning a page in a book.
Step 31: Flip your paper over and repeat previous step.
Step 32: Repeat steps 21 to 27 for both sides.
Step 33: Rotate your paper 180 degrees, so that the point is towards you.
Step 34: Fold the point up to meet the bottom edge of the top section. Crease well.
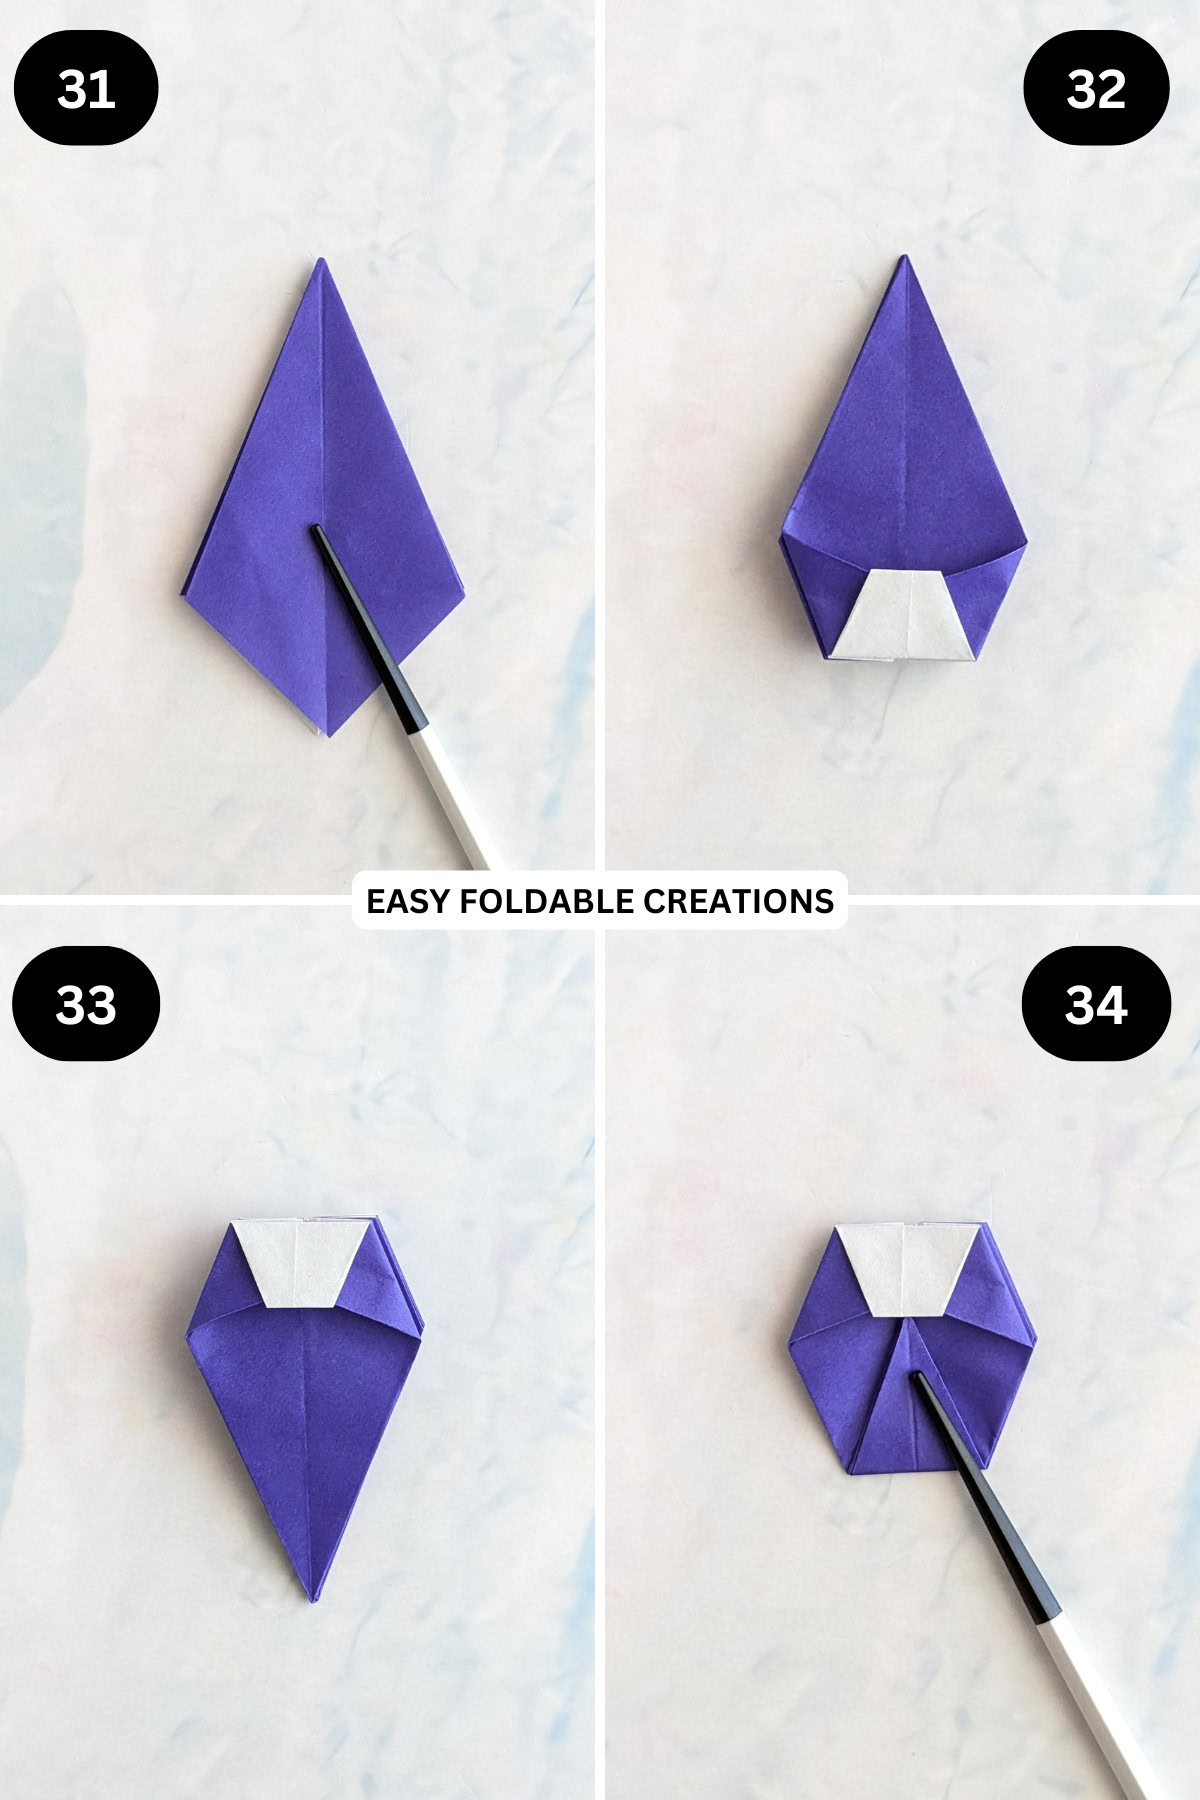
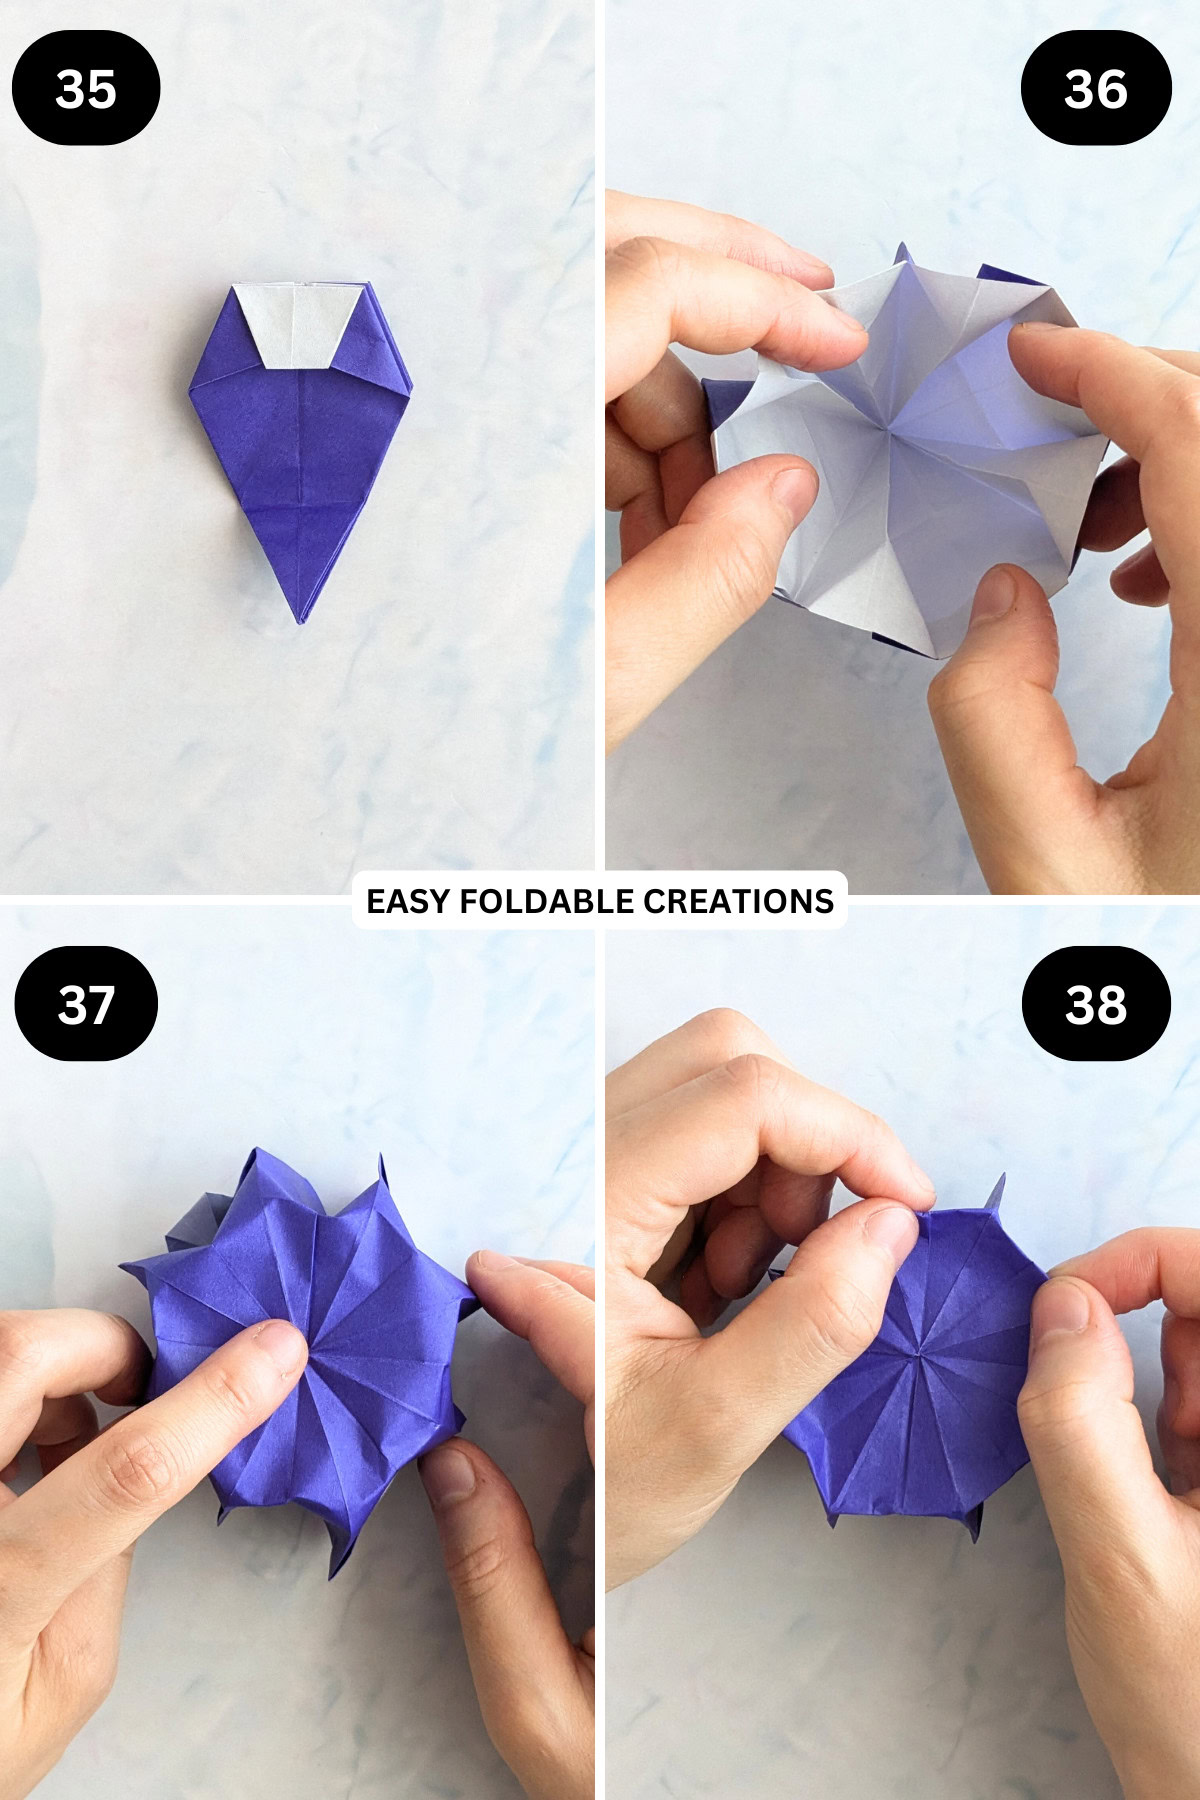
Step 35: Unfold previous step.
Step 36: Carefully open out your bowl. Gently push out the sides of the bowl. As you do so, it can help to hold the top edges so that the bowl doesn't come apart.
Step 37: Flatten the bottom of the bowl by pressing down gently on the point.
Step 38: Re crease edges.
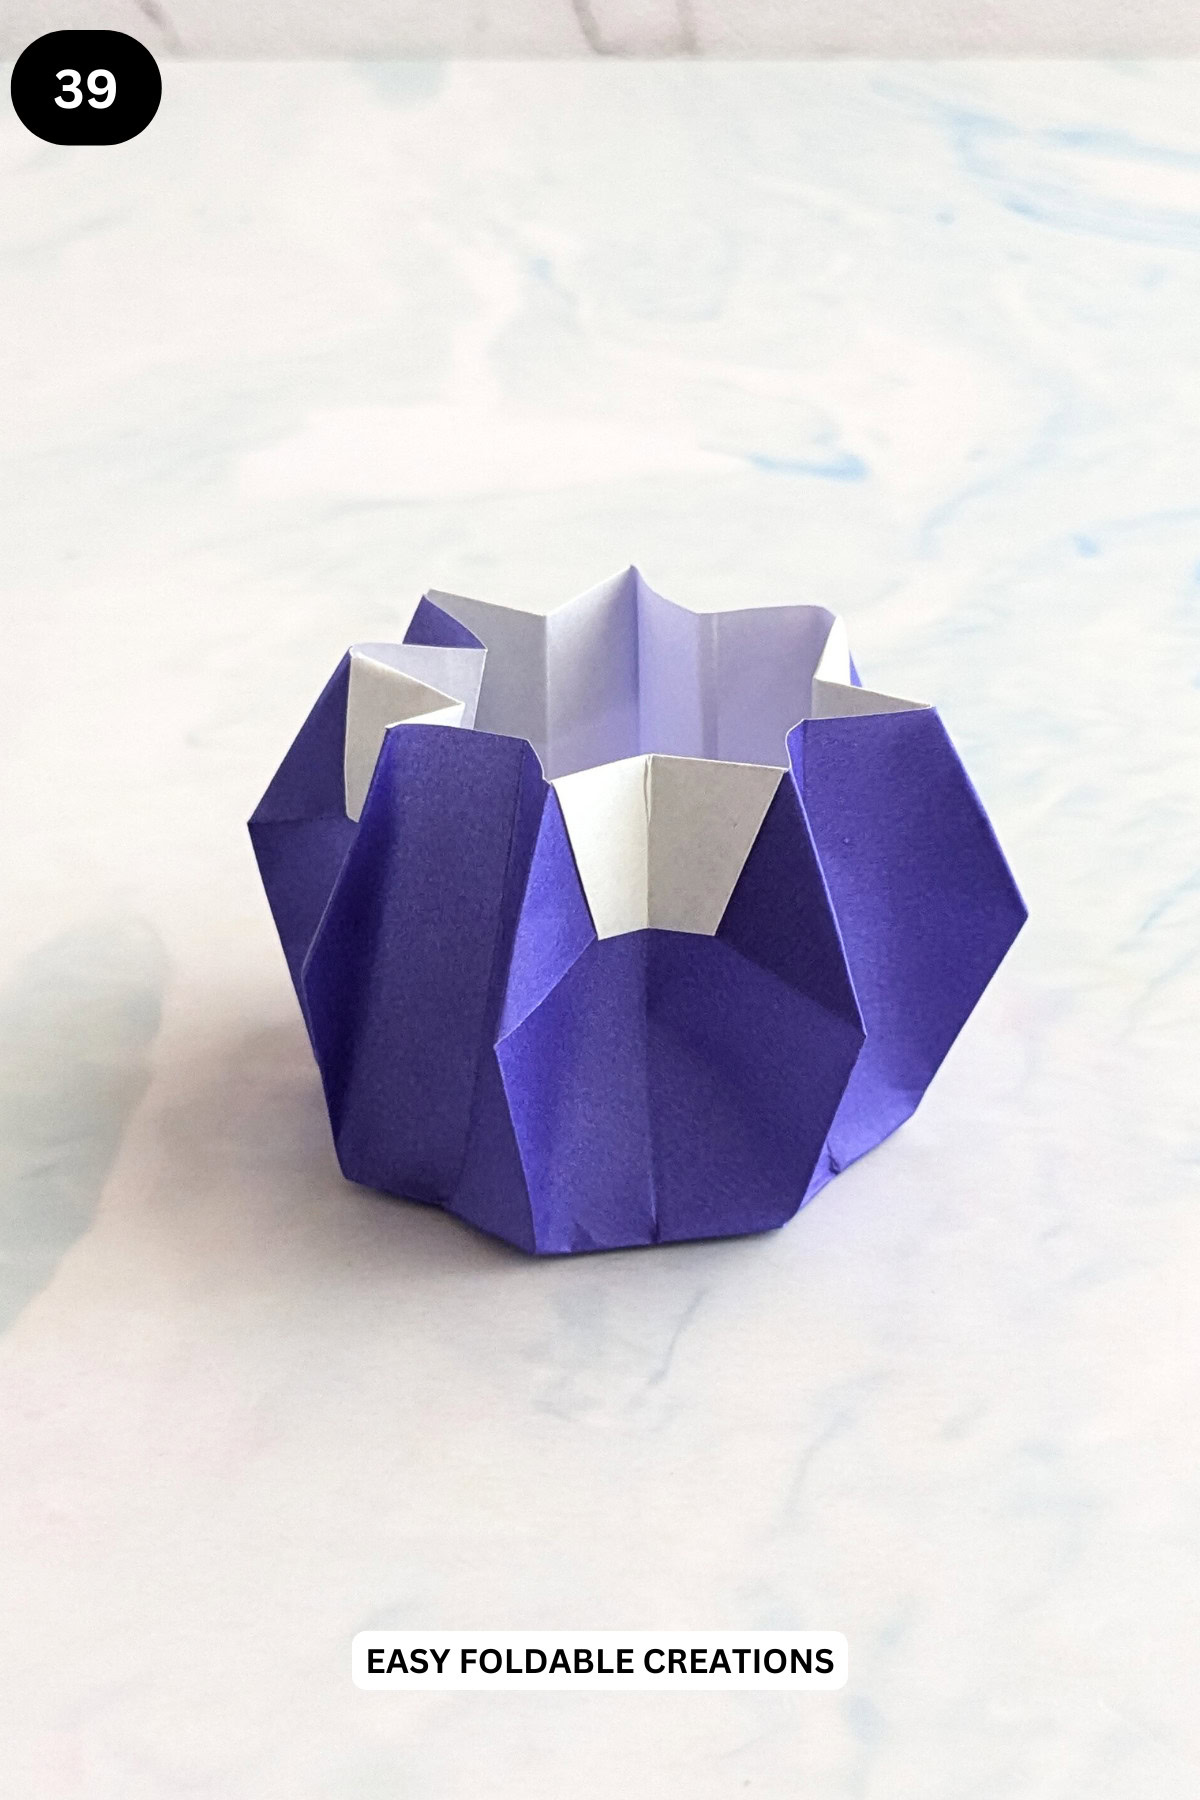
Step 39: Completed origami bowl.
Tips For Success
- Use Crisp Folds: Precise, firm creases will help maintain the bowl's structure and make it sturdier.
- Choose the Right Paper: Lightweight cardstock is ideal for larger bowls, while traditional origami paper works well for smaller ones. Avoid overly thick paper that is hard to fold neatly.
- Test for Stability: Before using the bowl for snacks or other items, ensure the sides are properly aligned and the base is sturdy.

Common Mistakes & How To Avoid Them
- Uneven Folds: Double-check that edges and corners are aligned before creasing. Misaligned folds can make the bowl lopsided.
- Paper Tearing: Be gentle when making folds, especially if using thinner paper.
- Loose Sides: Re-crease the folds and press firmly to ensure the sides stay upright.
Color, Paper Ideas, and Variations
- Game Day Snacks: Use team colors for a festive bowl to serve pretzels or candies.
- Holiday Themes: Create bowls with Christmas patterns for holding ornaments or treats, or pastel colors for Easter gatherings.
- Desk Organizer: Choose neutral tones or patterns to complement your workspace.
FAQ
Absolutely! Larger square sheets, such as 8 inches x 8 inches (20 cm x 20 cm), are perfect for creating bowls with more capacity.
This bowl is best suited for dry foods like wrapped candies or snacks. Avoid using it for moist or greasy items.
Lightweight cardstock works wonders for added durability. Additionally, ensuring crisp folds will help maintain the structure.
Other Paper Crafts You Might Like To Try:
Helpful Origami Tips
If you're curious to learn more about origami, you might like to look at our basic guides on how to make some common origami folds.
Start with the valley fold and mountain fold-these are the foundation of most origami models.
Once you're comfortable, you might like to try the petal fold for 3D shapes, and explore the bird base and square base for more complex designs.
The water bomb base is also great for creating inflatable or geometric models, like this inflatable origami rabbit.
Useful Paper Craft Terms
Want to learn a little more about paper crafts and origami?
We've made this helpful printable just for you. It explains common terms and helpful tips you might come across when you are folding origami or making a paper craft project.
You can download the useful paper craft terms printable PDF here.
Stay Connected
Made this pattern? Let us know how it went in the comments below!
Pin this post - Pin now to take your paper crafting skills to the next level.
Share on Instagram or Facebook - Capture the beauty of your finished paper craft project and share it on Instagram or Facebook! Tag us @easyfoldablecreations so we can see your work!

On the hunt for more easy paper crafts.
Check out this easy paper heart, paper bag with drawstring, diamond paper garland, origami rose, rectangle origami box with lid, simple diamond pouch napkin fold, pleated origami envelope, origami heart with wings, heart paper napkin folding idea, easy origami lotus, DIY paper flower bouquet, water lily origami flower or simple pocket napkin fold.
Other Patterns You Might Like To Try:
Looking for other easy patterns like this? Try these:


Comments
No Comments