
Looking for a unique way to spread holiday cheer? Create your own festive cards with a 3D origami Christmas tree card!
This simple yet stunning DIY craft lets you personalize your holiday greetings with a homemade touch.
Perfect for gifting or decorating, this project will make your Christmas cards stand out.

Jump to:
- Why You'll Love This Pattern
- Exclusive Content Just For You
- Skill Level
- Materials Needed
- Size Guide For Cards
- Instructions
- Tips For Success
- Common Mistakes & How To Avoid Them
- Color, Paper Ideas, and Variations
- FAQ
- Other Paper Crafts You Might Like To Try:
- Helpful Origami Tips
- Useful Paper Craft Terms
- Stay Connected
- Other Patterns You Might Like To Try:
- Comments
Creating your own Christmas cards can be a delightful way to spread holiday cheer, especially when you incorporate a 3D origami Christmas tree.
This homemade craft idea is a thoughtful and personalized way to make your holiday greetings stand out, whether you give them to friends, family, or use them as part of your festive decorations.
By folding a 3D Christmas tree and gluing it onto cardstock, you can craft a one-of-a-kind card that's perfect for the holiday season.
This project combines the fun of DIY crafts with the timeless appeal of paper crafts, and the best part is that you can adjust the size of your card to fit your needs.
From smaller, traditional cards to larger, eye-catching designs, this pattern gives you flexibility in creating your ideal Christmas card.
Whether you want a quick, simple card or something a bit more intricate, the origami Christmas tree offers endless possibilities.
Plus, this 3D effect adds a lovely pop to the card, making it extra special.
The project is also a great way to involve children in holiday preparations.
They'll love folding the paper into trees and assembling the cards, making this a fantastic family activity. In addition to giving your Christmas tree a 3D look, you can experiment with different paper colors, embellishments like stickers or glitter, and even patterned cardstock.
Paper crafts like this card not only save you from buying expensive store-bought versions but also allow you to put a personal touch on every holiday greeting.
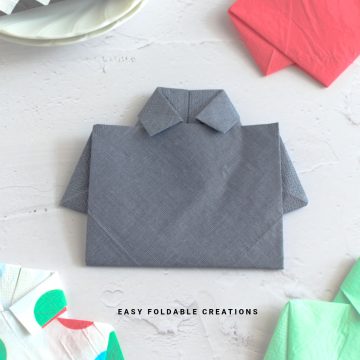
Other Christmas paper crafts you might like to try include these cute origami Santa hats, origami reindeer, Christmas tree napkins folds, or origami Christmas stockings.

Why You'll Love This Pattern
- Fun, festive, and easy to personalize for the holidays.
- 3D origami tree adds a unique touch to holiday cards.
- Customizable size, color, and decorations for a one-of-a-kind design.
- A great homemade craft idea for kids and adults alike.
Exclusive Content Just For You
Not sure what you want to make next, but feeling a bit creative? Or maybe you've been searching for a pattern that sparks something new. We've got a few ideas waiting for you.
The Fold Collective, Easy Foldable Creations' community, provides you with a library of exclusive ad-free video tutorials, printable PDF patterns, helpful tips, and more so you can improve your skills and enjoy crafting in your own time.
Skill Level
Difficulty: ★★☆☆☆ (Easy)
Materials Needed
- Cardstock: To create the card base. Any size works, but a 5x7 inch or 6x8 inch is common.
- Ruler: To measure the cardstock.
- Origami paper: For the Christmas tree. Green is traditional, but you can choose any color.
- Glue: To attach the tree to the card.
- Scissors: For trimming paper.
- Decorations: Stickers, glitter, or small gems to embellish your card.
Size Guide For Cards
Here are some recommended size examples which you could make your card:
| Cardstock size | Origami Paper Size | Completed Card Size |
| 8 inches x 6 inches (21 cm x 15 cm) | 6 inches x 6 inches (15cm x 15cm) | 4 inches x 6 inches (10.5 cm x 15 cm). RECTANGLE CARD |
| 12 inches x 6 inches (30cm x 15 cm) | 6 inches x 6 inches (15cm x 15cm) | 6 inches x 6 inches (15cm x 15 cm). SQUARE CARD |
| 6 inches x 5 inches (15cm x 12cm) | 4 inches x 4 inches (10cm x 10cm) | 3 inches x 5 inches (7.5cm x 12cm). SMALL RECTANGLE CARD |
- For example, if you want to make a card that is 4 inches x 6 inches (10.5 cm x 15 cm), you will need a cardstock cut to size 8 inches x 6 inches (21 cm x 15 cm) AND origami paper sized 6 inches x 6 inches (15cm x 15cm).
- Ideally, you want your cardstock paper to be double the finished width you want your card to be. E.g. If you want your final card to be 6" (15cm) wide, cut your cardstock to 12" (30cm) in width.
Instructions
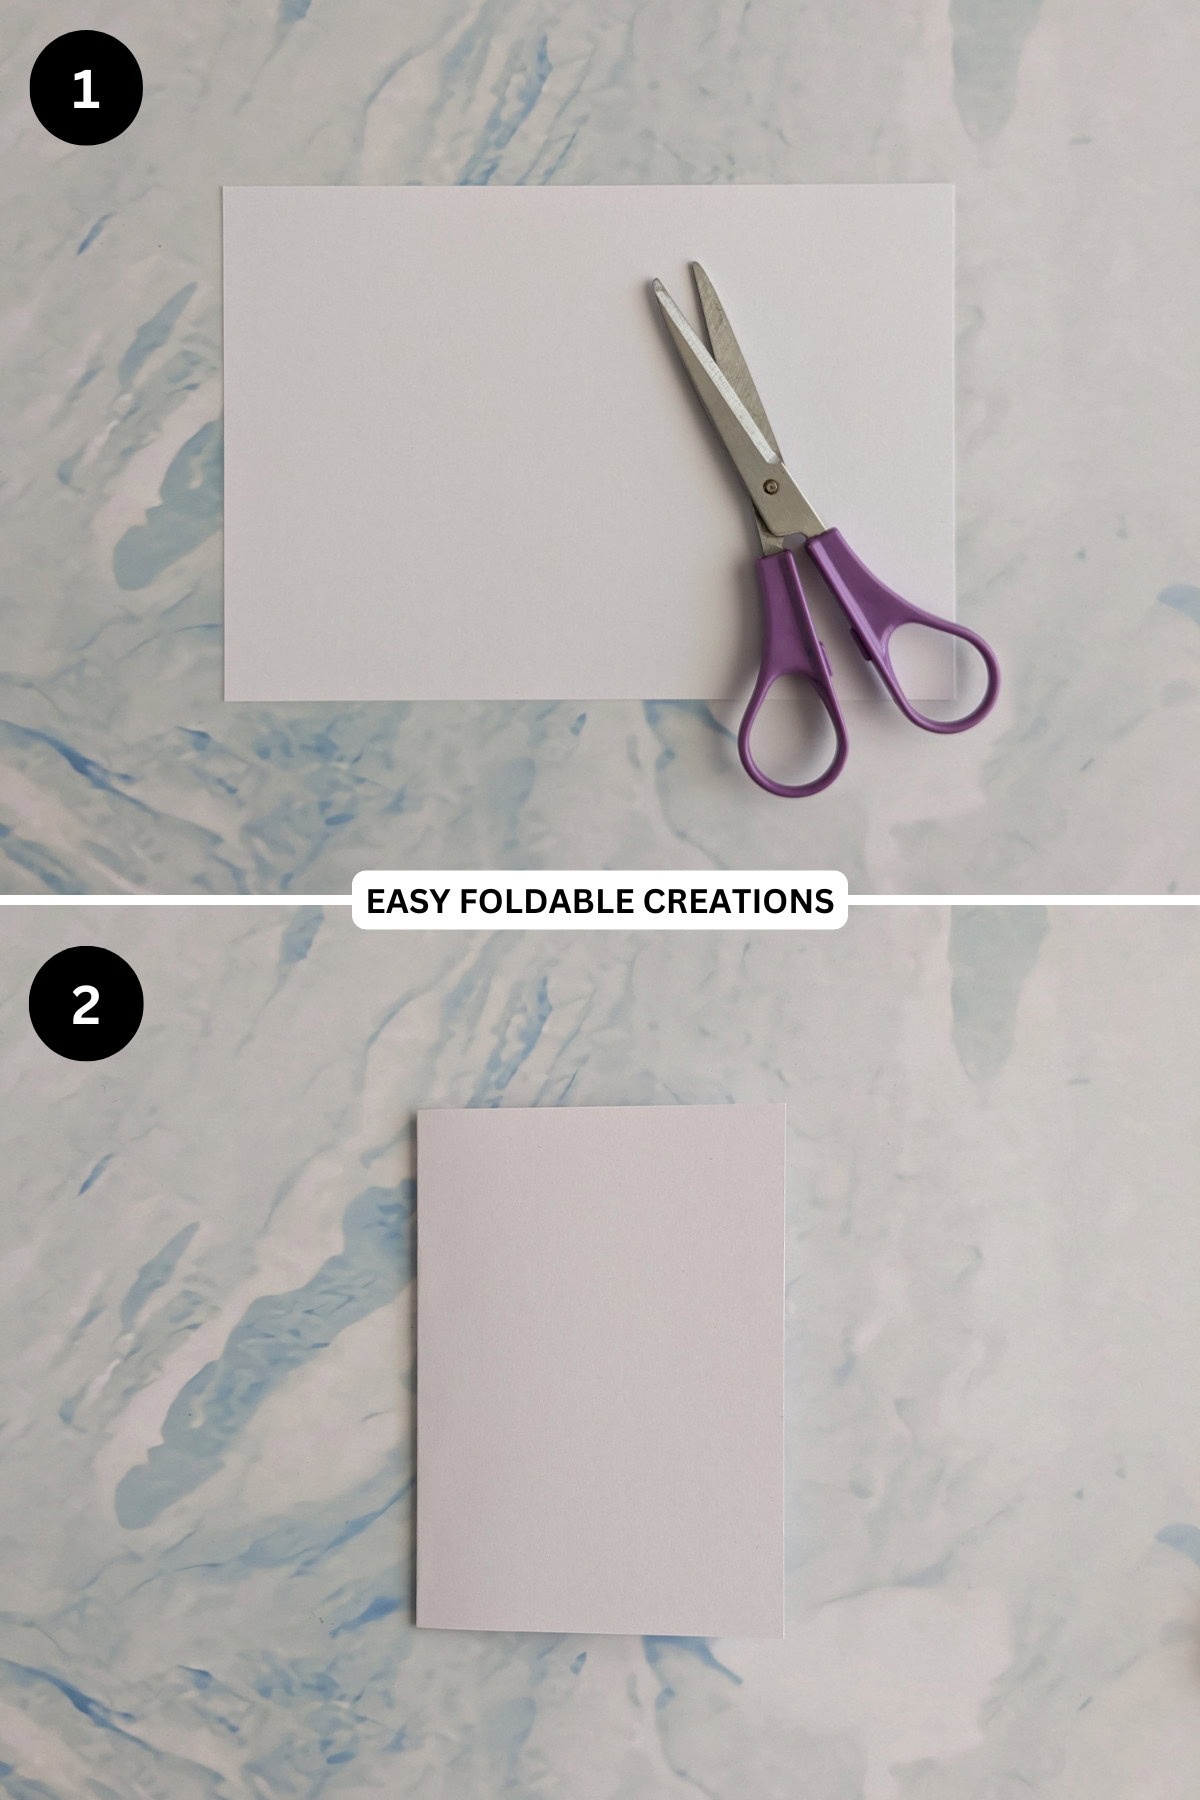
Making The Card Base
Step 1: Cut your cardstock into the desired size. See size table above for example sizes.
For this tutorial, we cut our paper into A5 size (approx. 8 inches x 6 inches (21 cm x 15 cm)). This will make a medium sized rectangle card (approx. 4 inches x 6 inches (10.5 cm x 15 cm).
Step 2: Fold your paper in half width wise (from left to right).
Making The Christmas Tree
Using your origami paper.
Step 1: Start with the color you want your Christmas tree to be facing down.
Step 2: Fold the paper in half from left to right.
Step 3: Unfold previous step.
Step 4: Fold the paper in half from top to bottom.
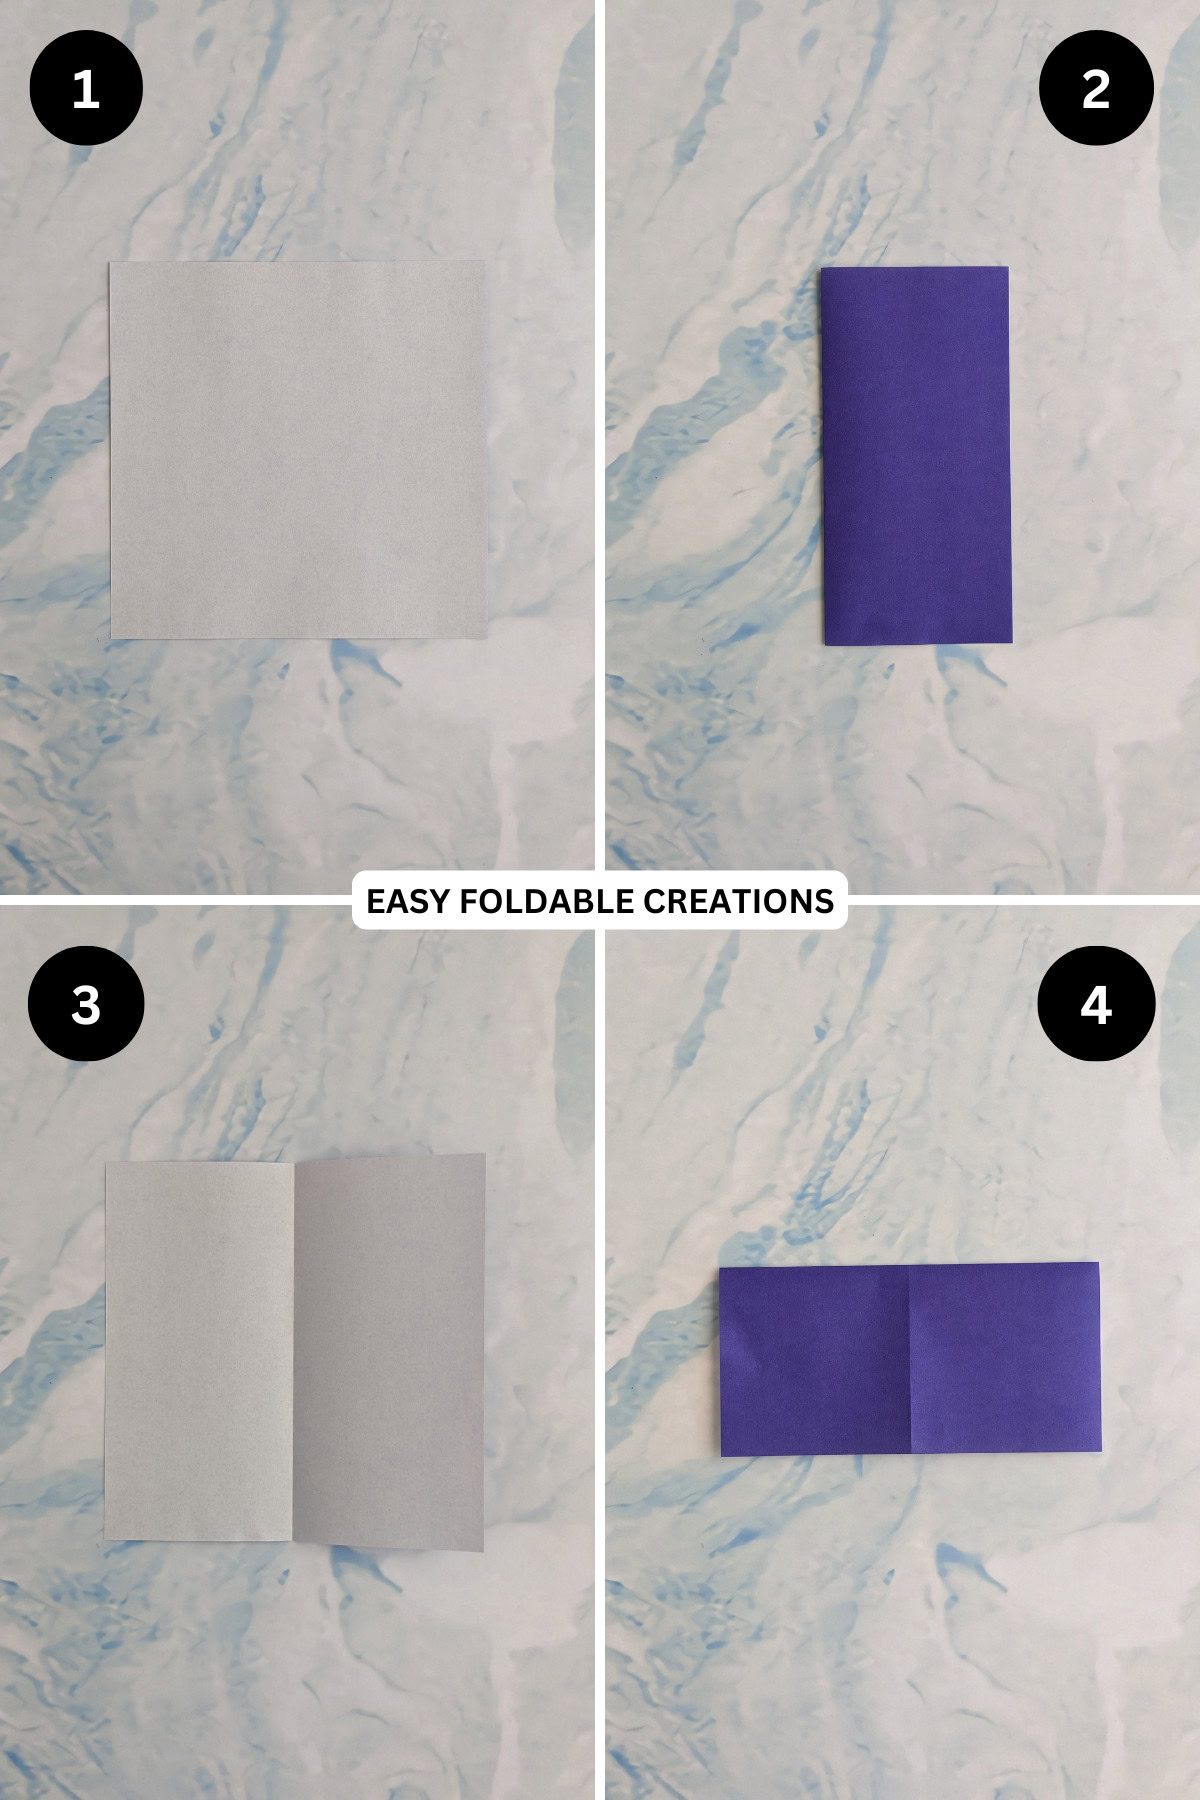
Step 5: Unfold previous step.
Step 6: Fold the paper in half diagonally, matching the top left corner to the bottom right corner.
Step 7: Unfold previous step.
Step 8: Fold the paper in half diagonally, this time matching the top right corner and bottom left corner.
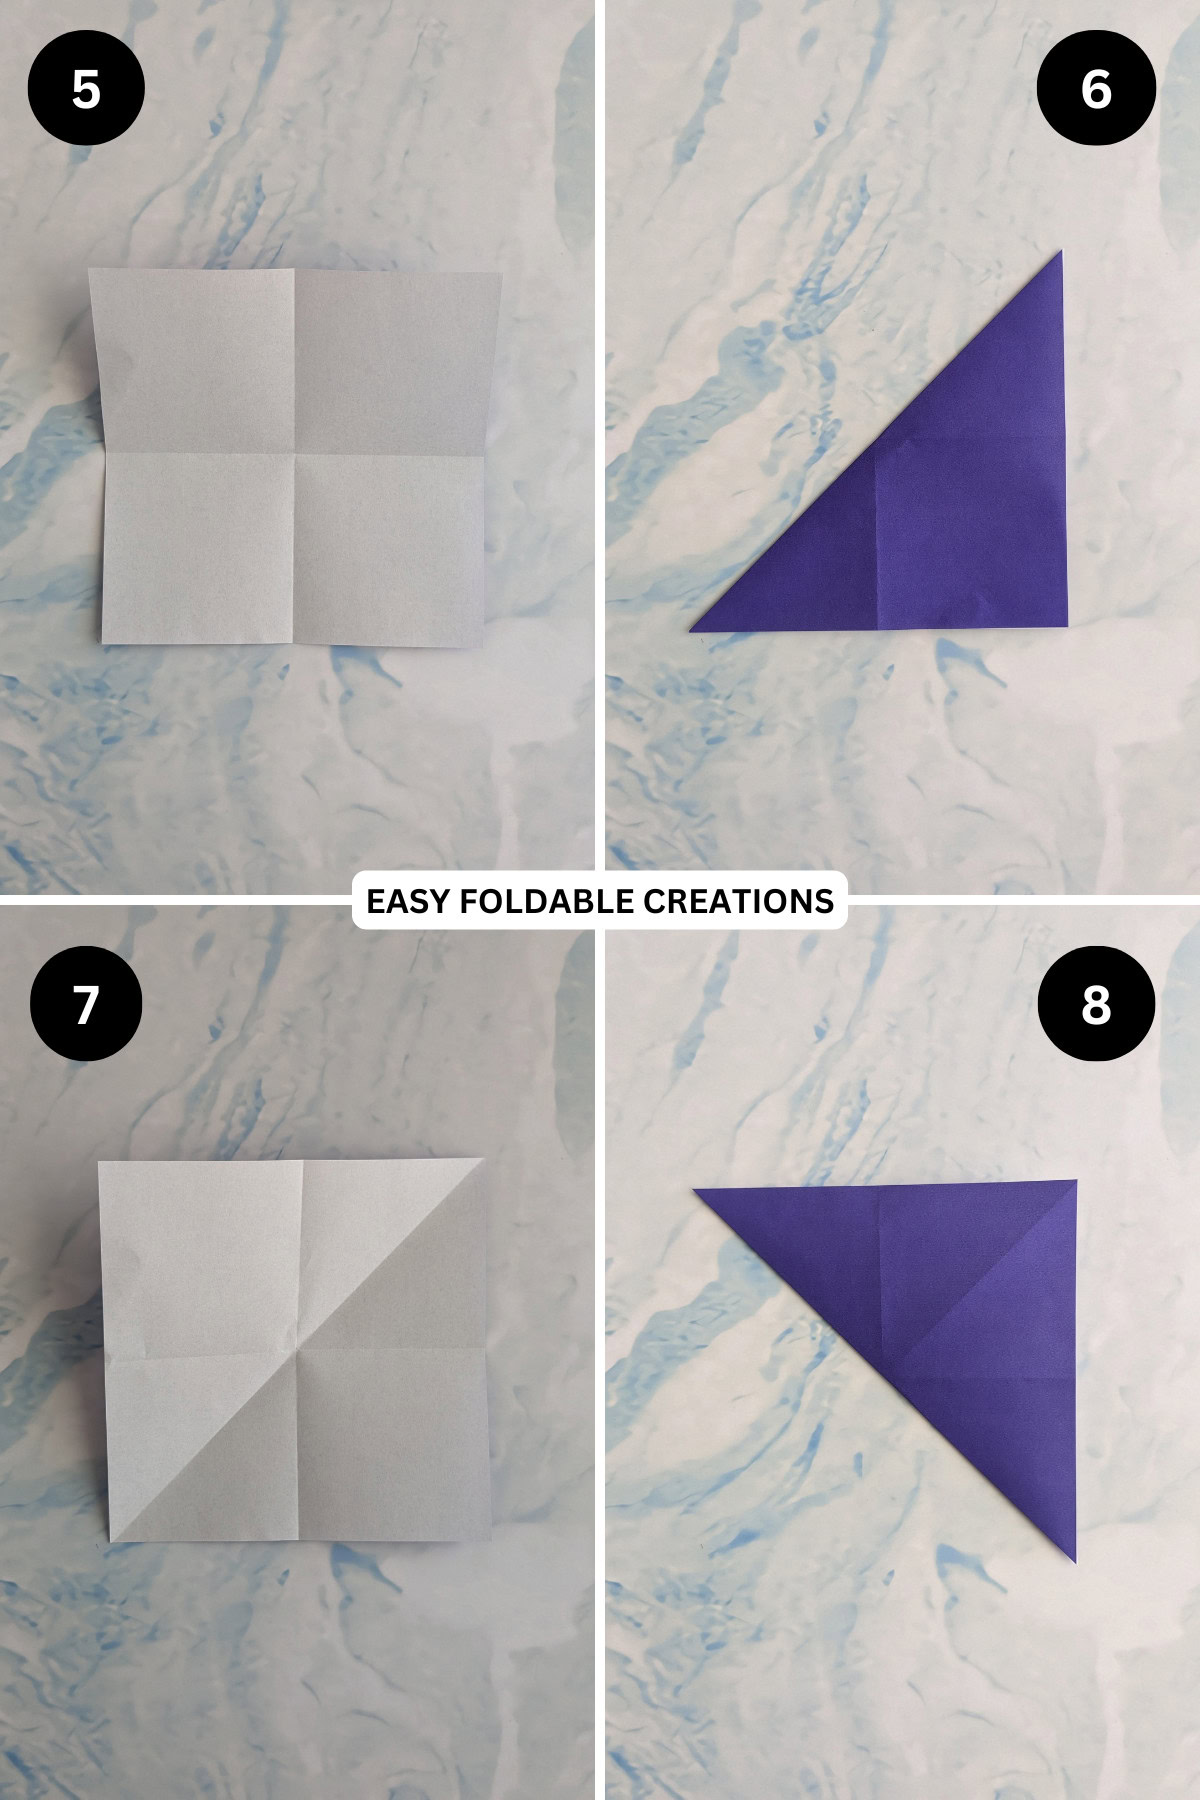
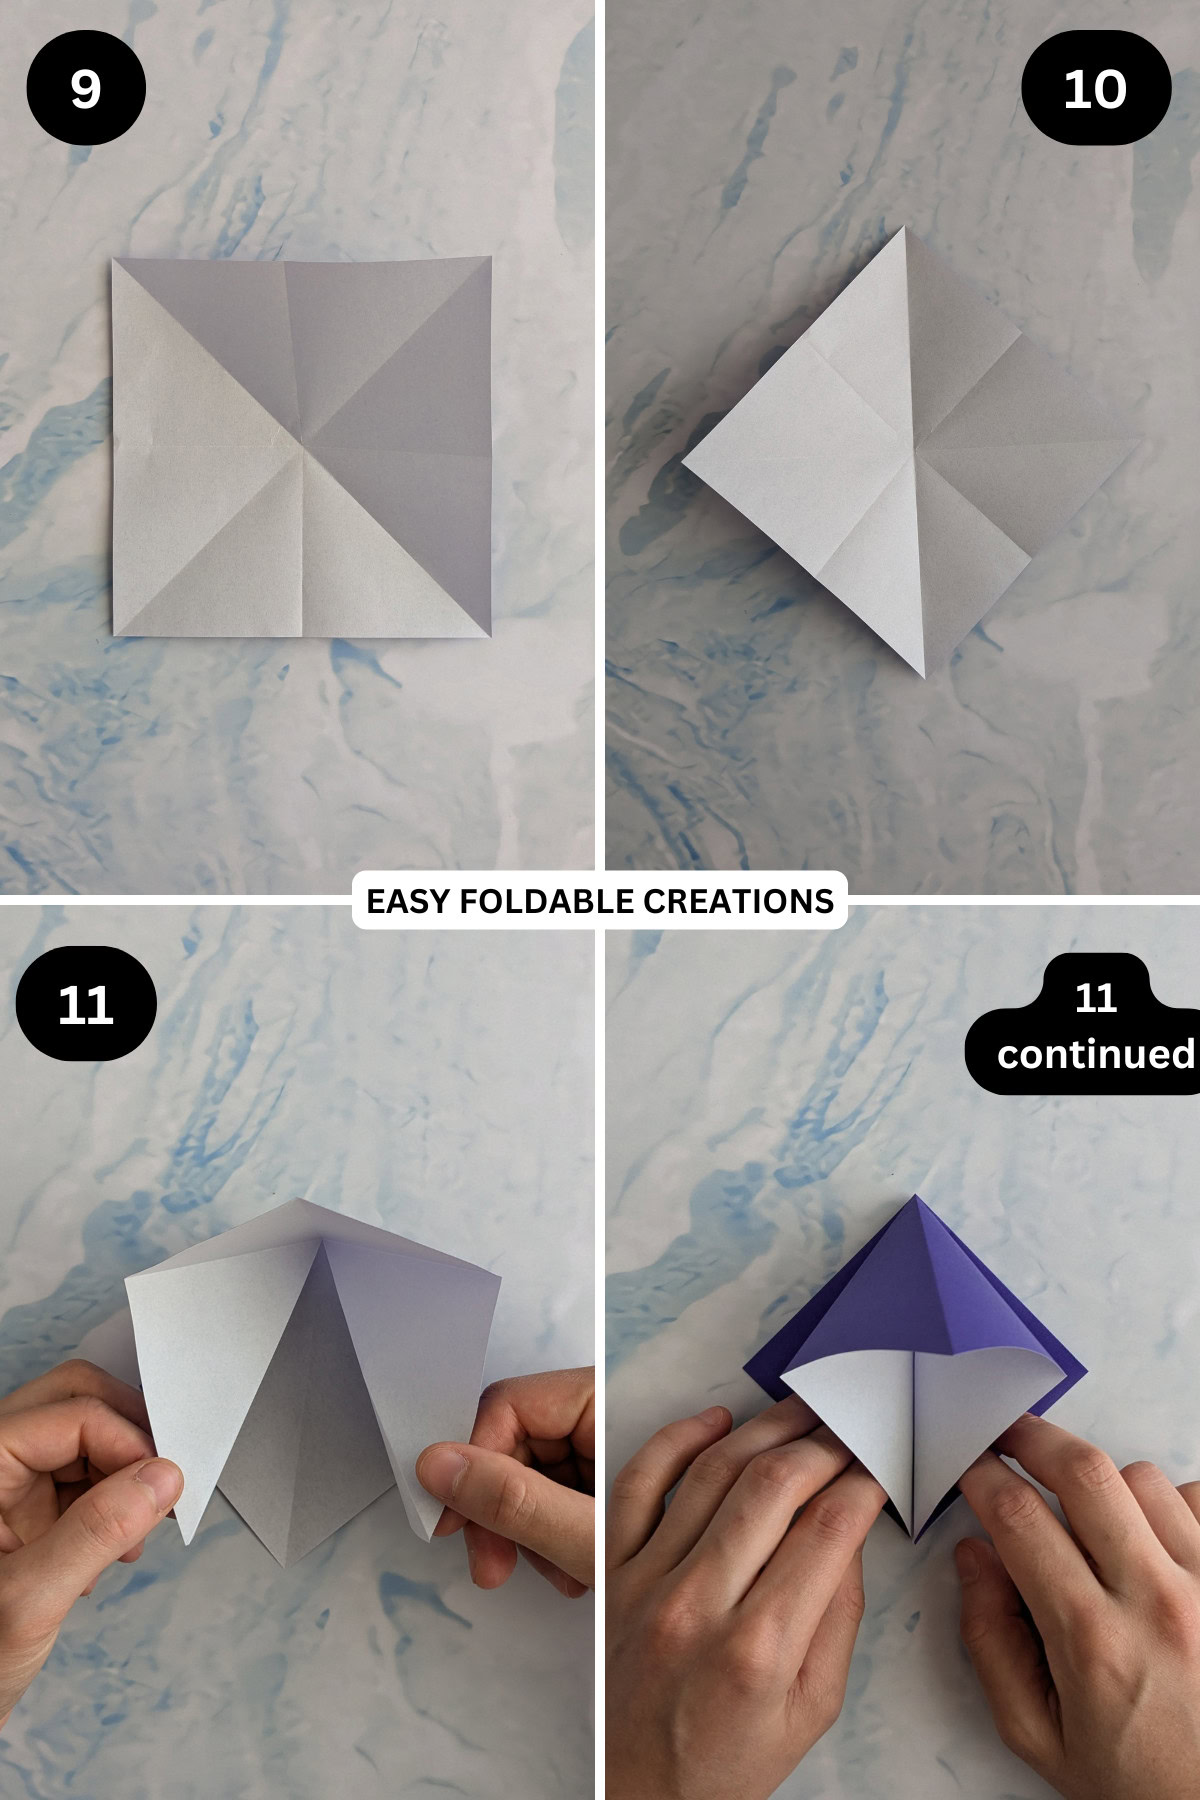
Step 9: Unfold previous step.
Step 10: Arrange the paper so that it sits in a diamond shape in front of you (see picture).
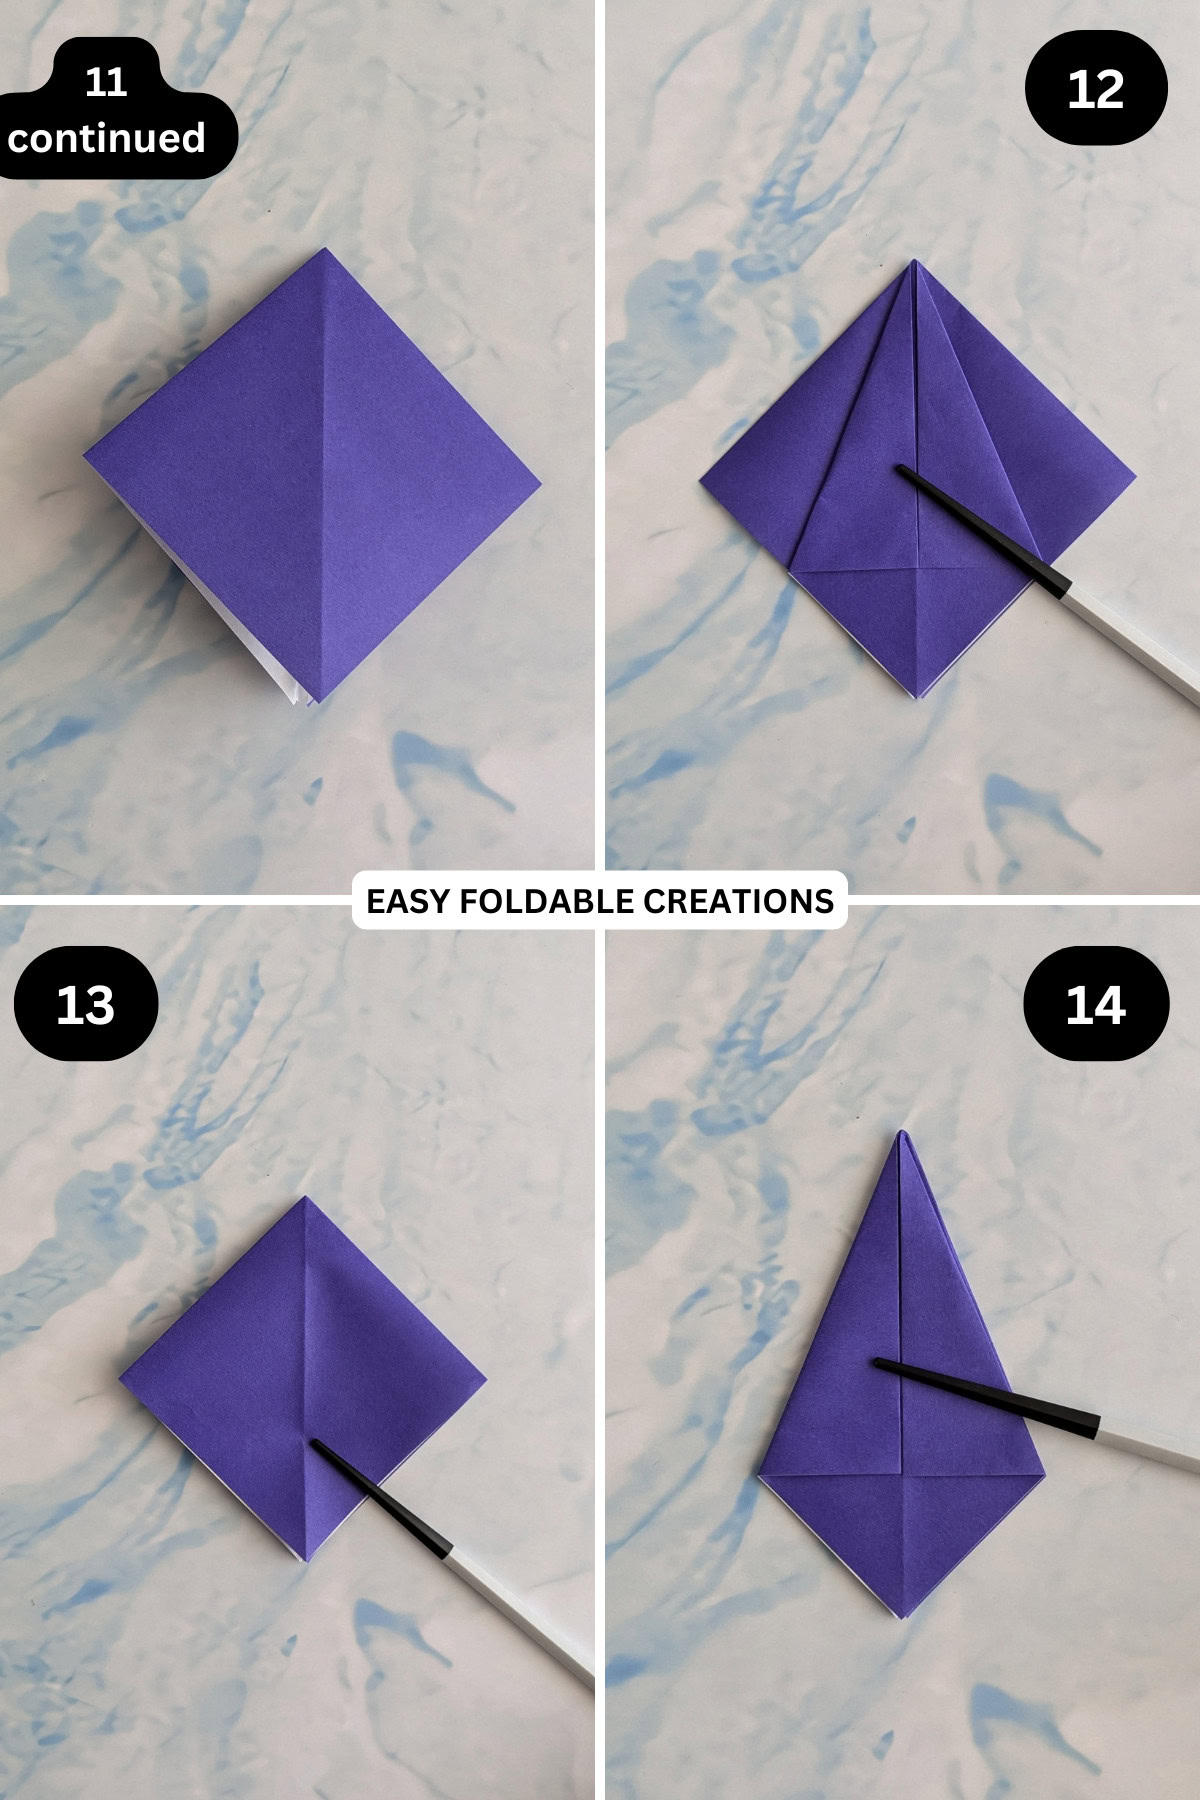
Step 11: Bring the left and right points down to meet the bottom point. The paper should start to collapse on itself. Press flat. You should now have a solid diamond shape.
Step 12: Fold the left and right sides (top layer only) to meet the centre crease.
Step 13: Flip the paper over, keeping the open end towards you.
Step 14: Fold the left and right sides to meet the centre crease. You should now have a kite shape.
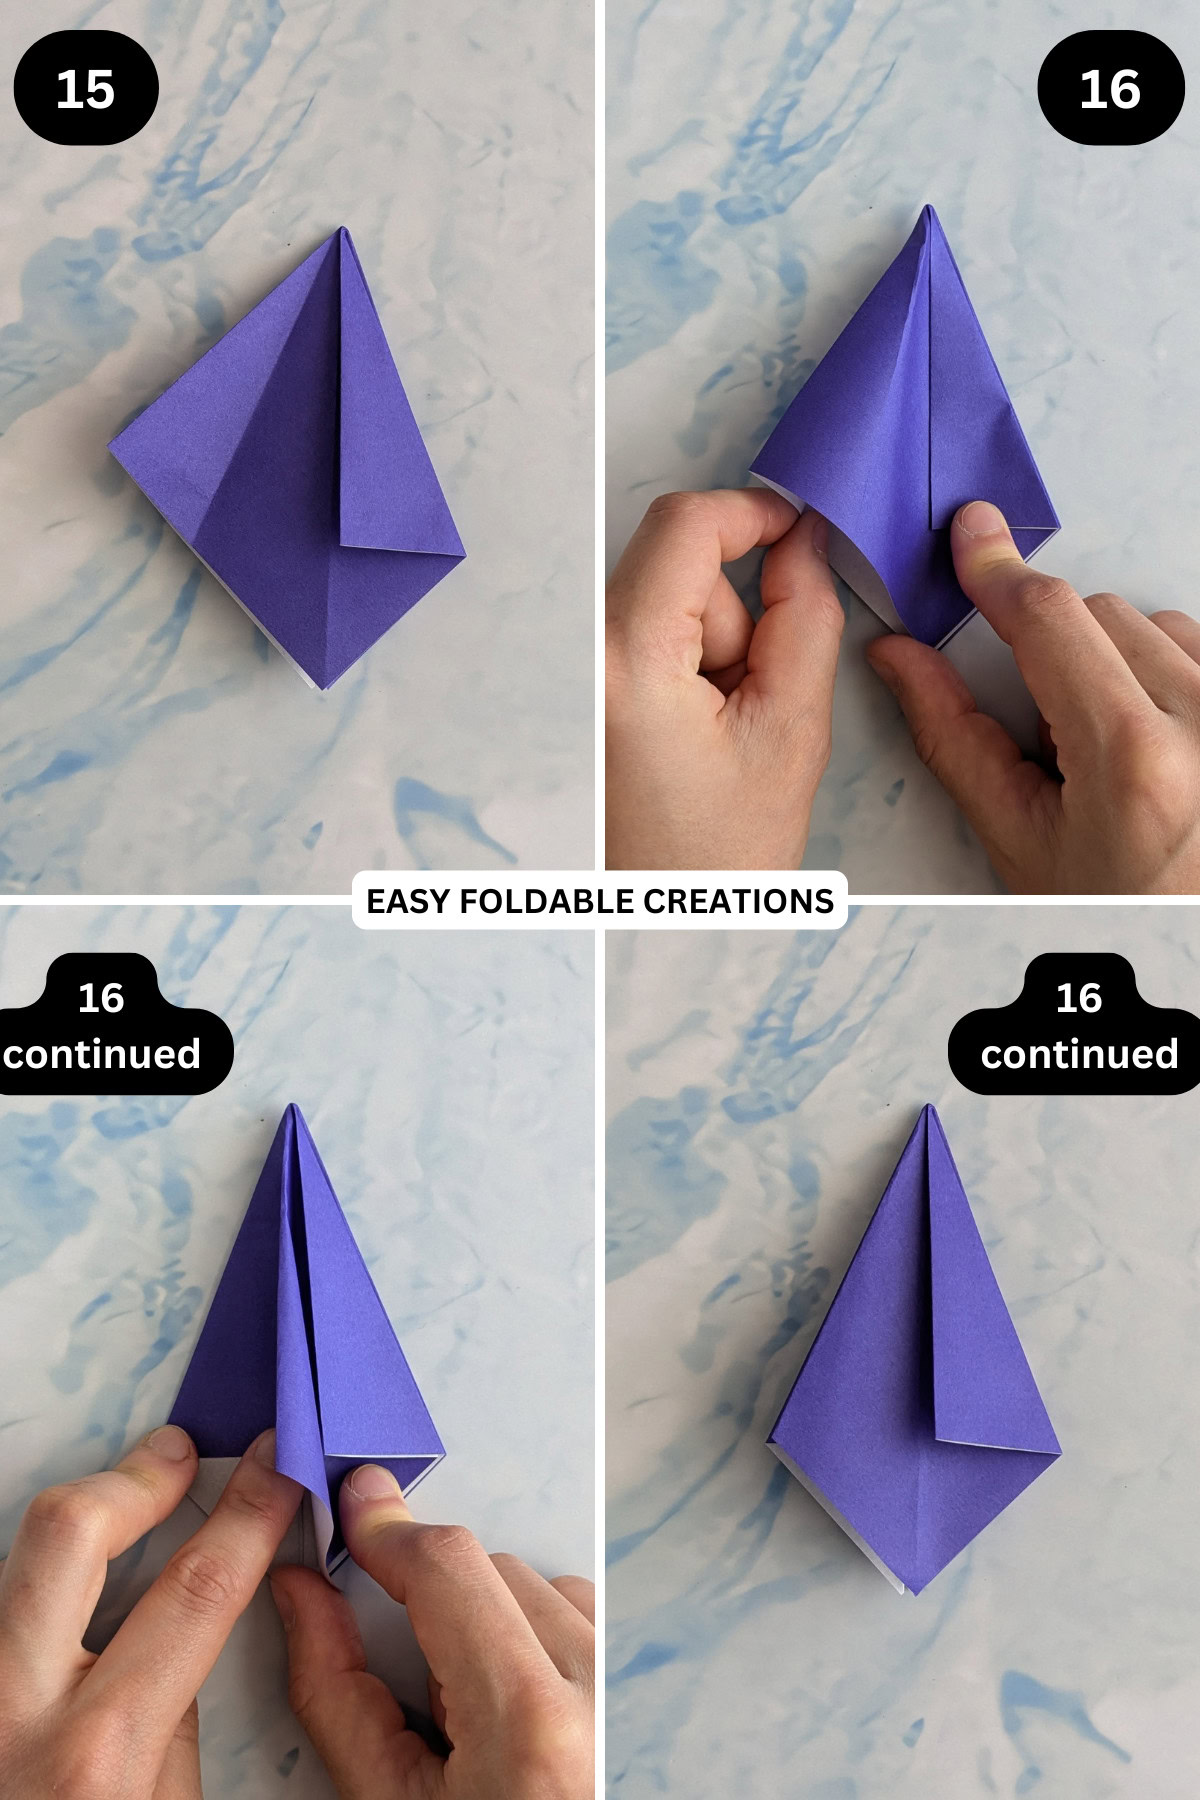
Step 15: Open the left flap back out and flatten.
Step 16: Take the outer edge of the left flap and collapse it into itself (the outermost edge will meet with the middle crease) and flatten.
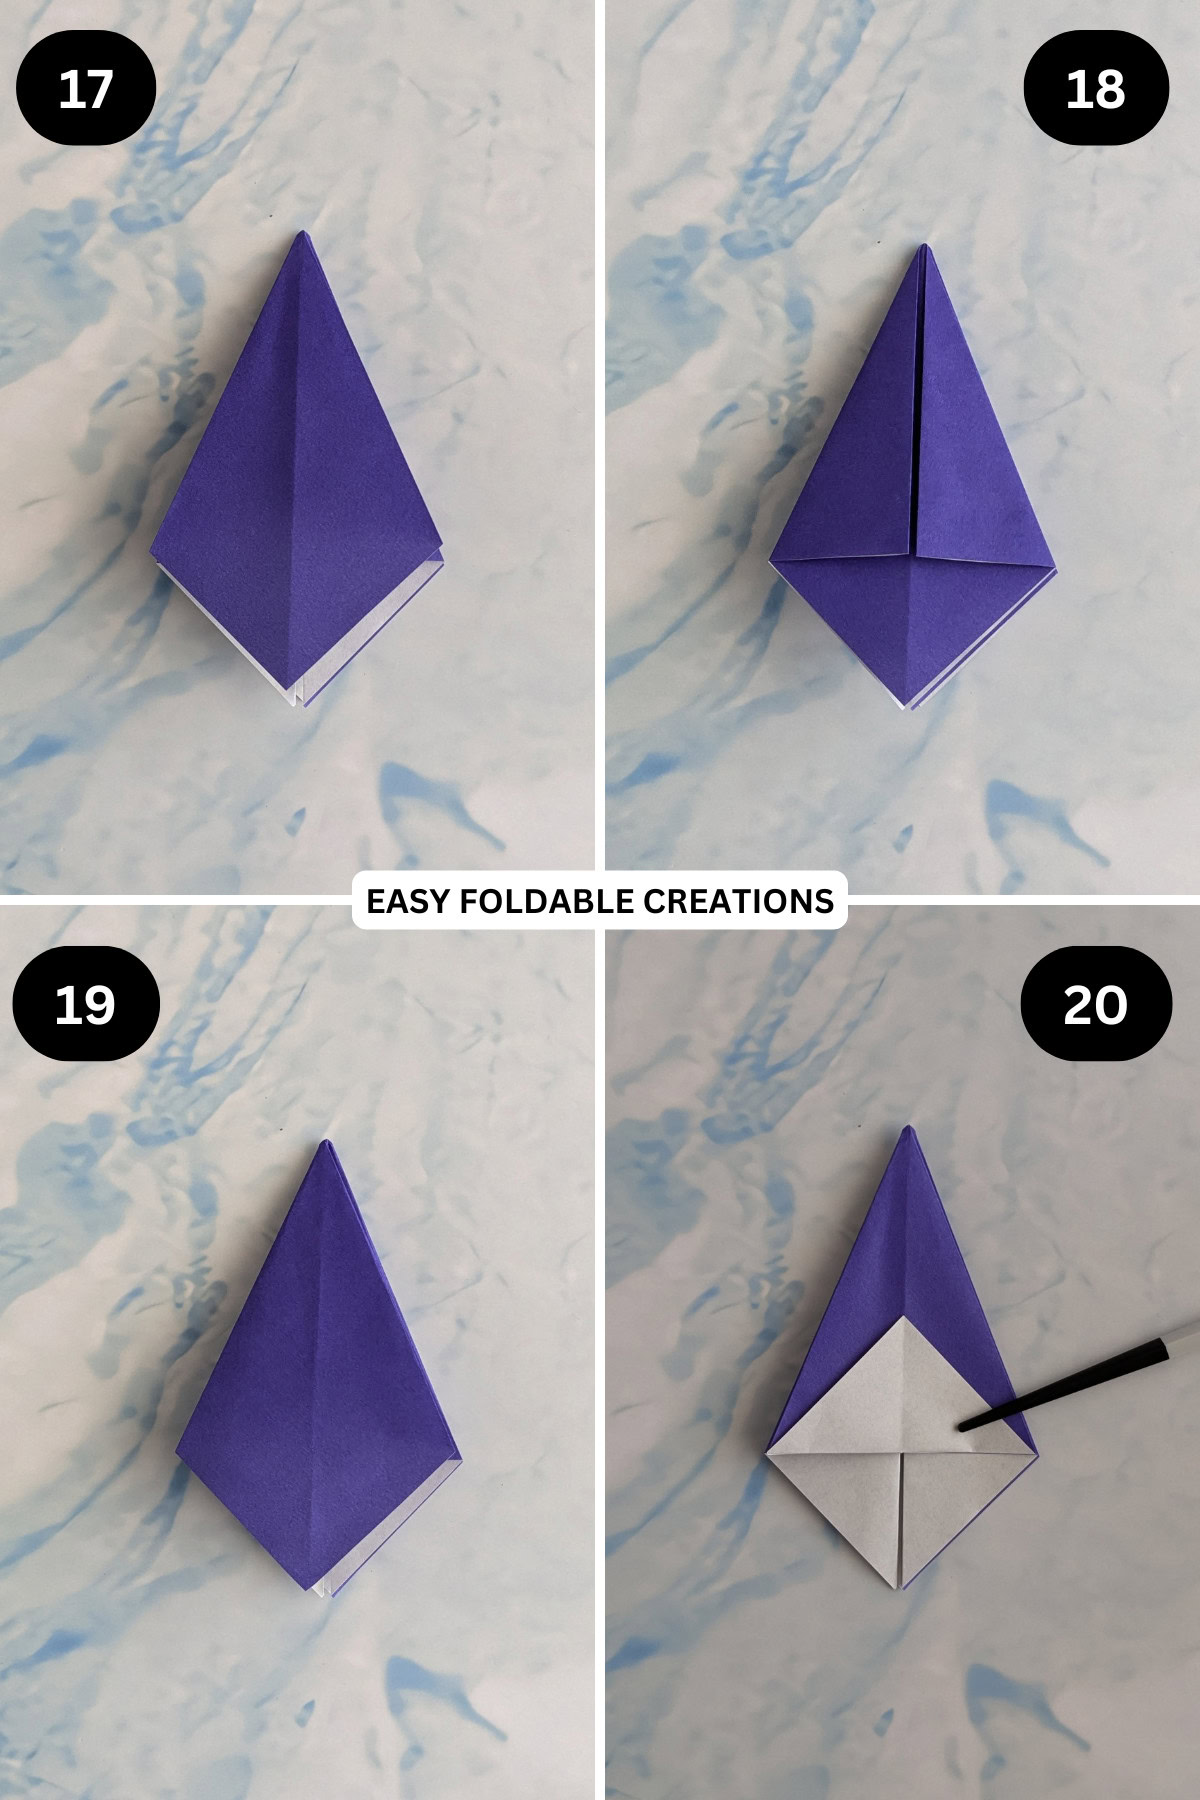
Step 17: Repeat steps 15 and 16 on the right flap.
Step 18: Flip the paper over (keeping the open edge towards you).
Step 19: Repeat step 15 to 17.
Step 20: Fold back the top layer of the open edge to form a triangle.
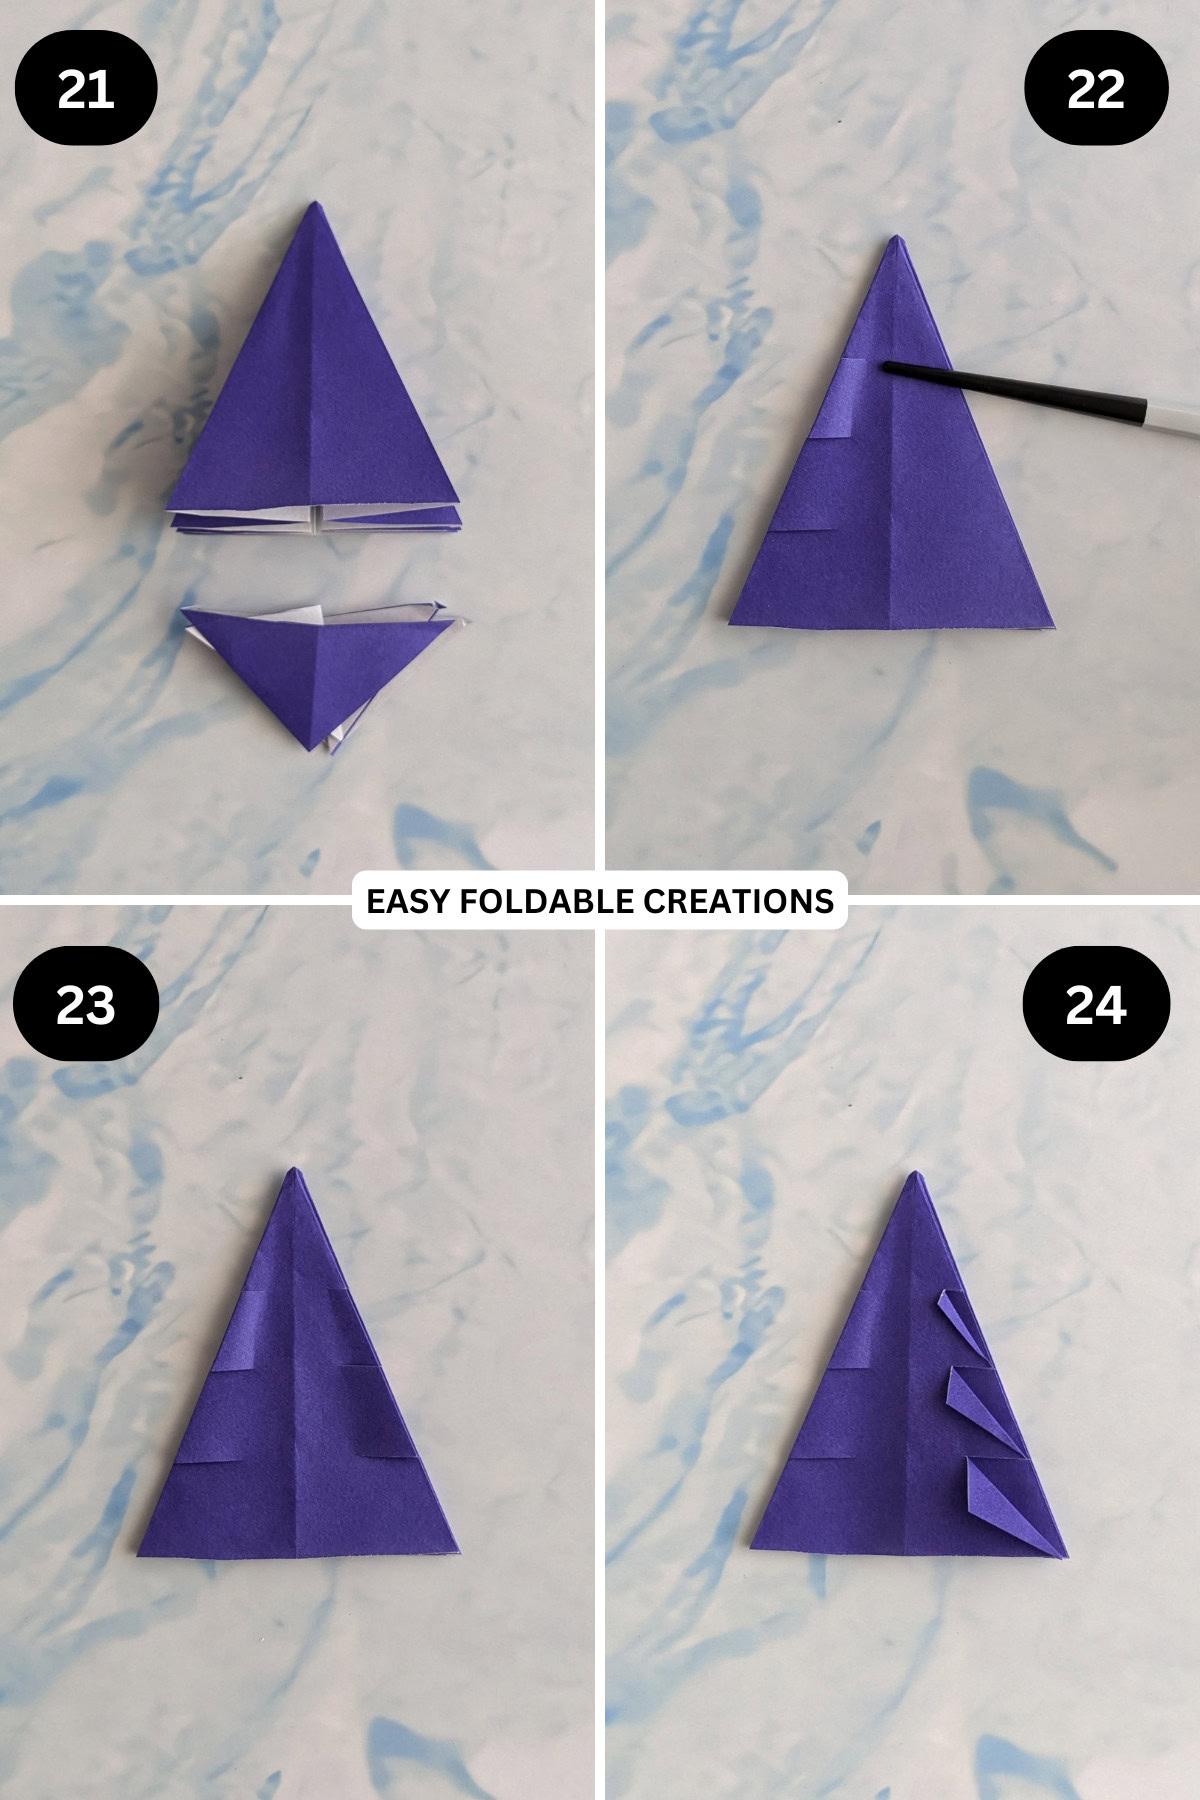
Step 21: Unfold the triangle you made in the previous step and cut along it's folded edge. You should now have a flat edge at the bottom of your paper.
Step 22: Using a pair of scissors, cut 3 horizontal lines on the left side of your triangle. Don't cut all the way through to the other side (see picture).
Step 23: Repeat previous step for the right side, keeping it as symmetrical as possible.
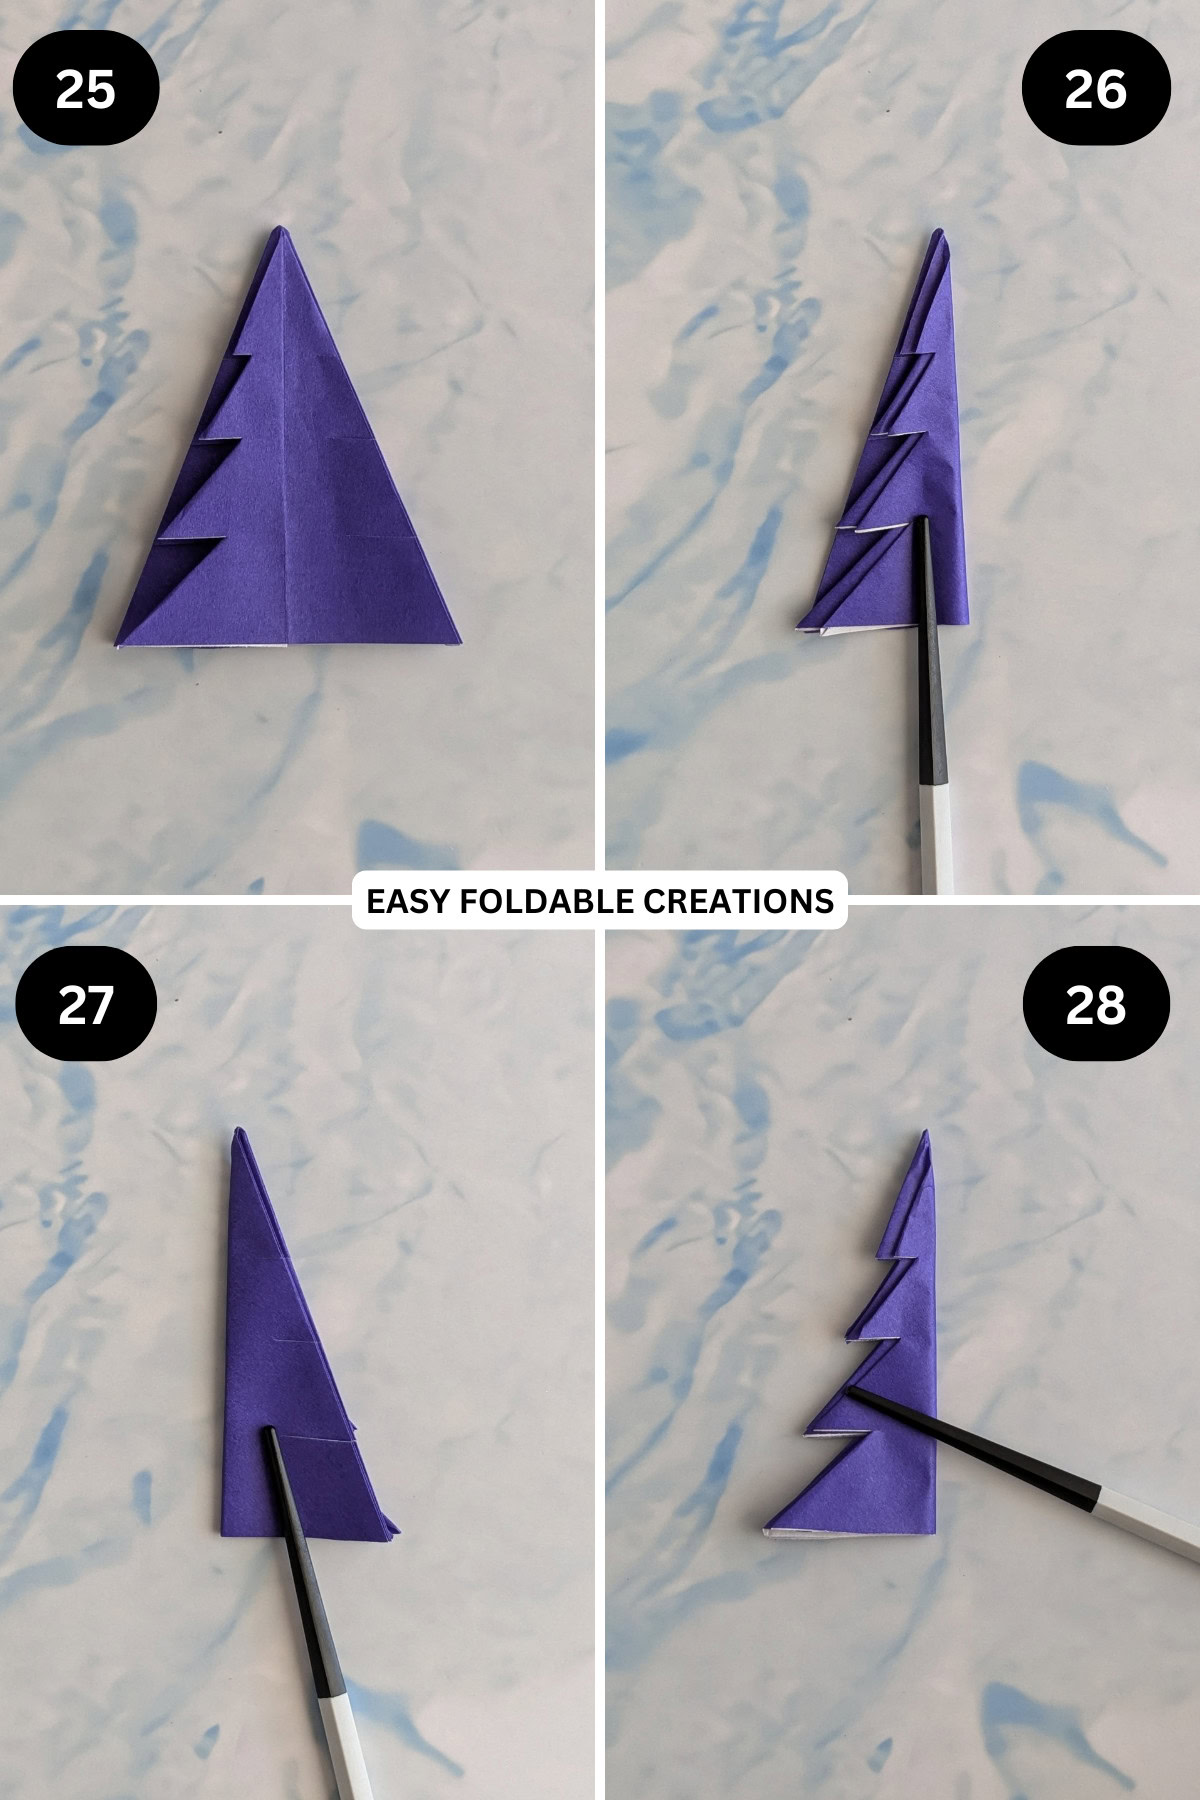
Step 24: Starting on the top layer of the right side, fold each cut line down, making a small triangle.
Step 25: Fold the top right layer to the left (like turning a page) and flatten.
Step 26: Repeat previous two (2) steps until all the branches have been folded on the right side.
Step 27: Once you have finished the right side, flip the paper over.
Step 28: Repeat steps 24 to 25 until all the branches have been folded.
✨ You're almost there! ✨
To unlock the final steps of the photo tutorial and complete your pattern, create a free account with Grow.me. below.
Make sure you tick the box to subscribe to our newsletter and stay up to date with the latest patterns, tips, and more!
Once you're signed up, you'll get instant access to finish your project with the photo tutorial and enjoy exclusive content in the future.
Already signed up? Hit the button below and select 'Switch to Log In' to pick up where you left off and finish your project!
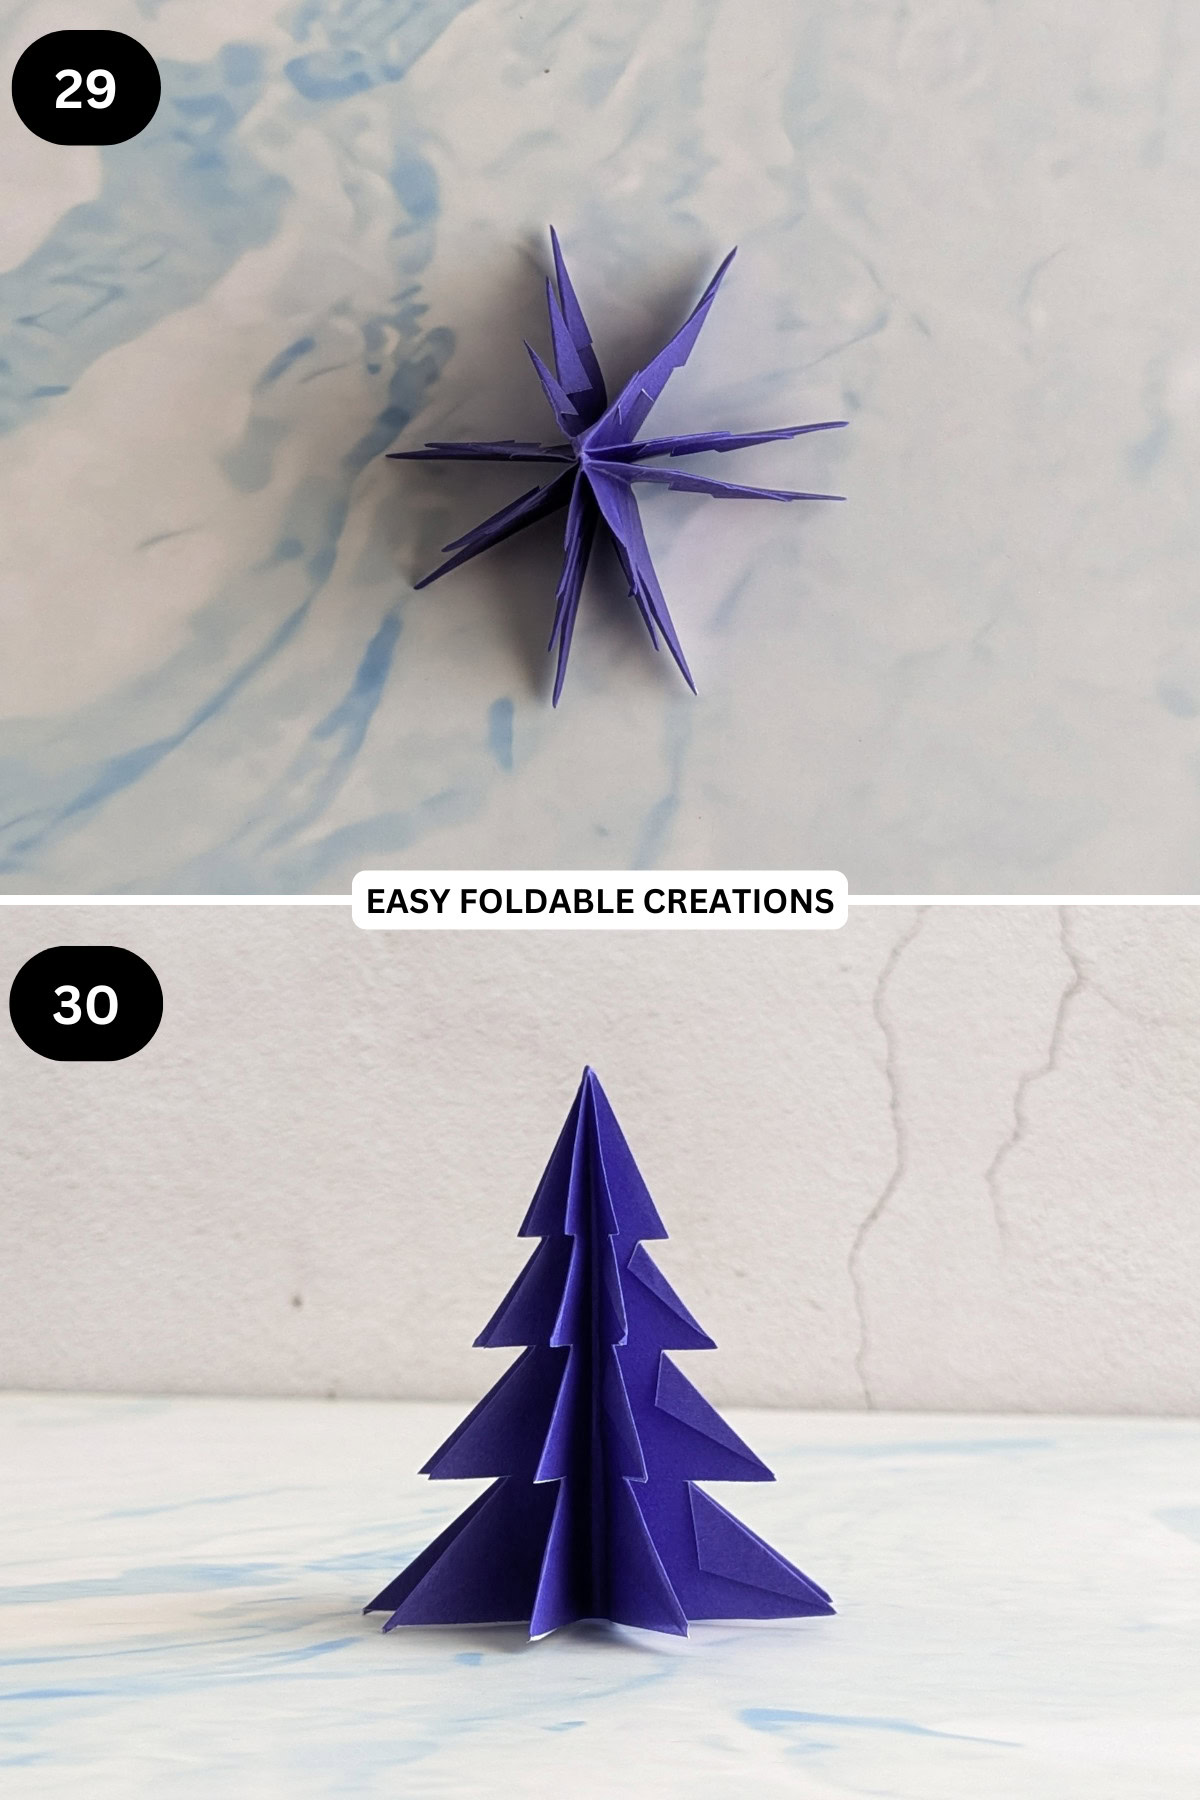
Step 29: Open out your origami tree and stand.
Step 30: Completed 3d origami Christmas tree.
Putting It All Together
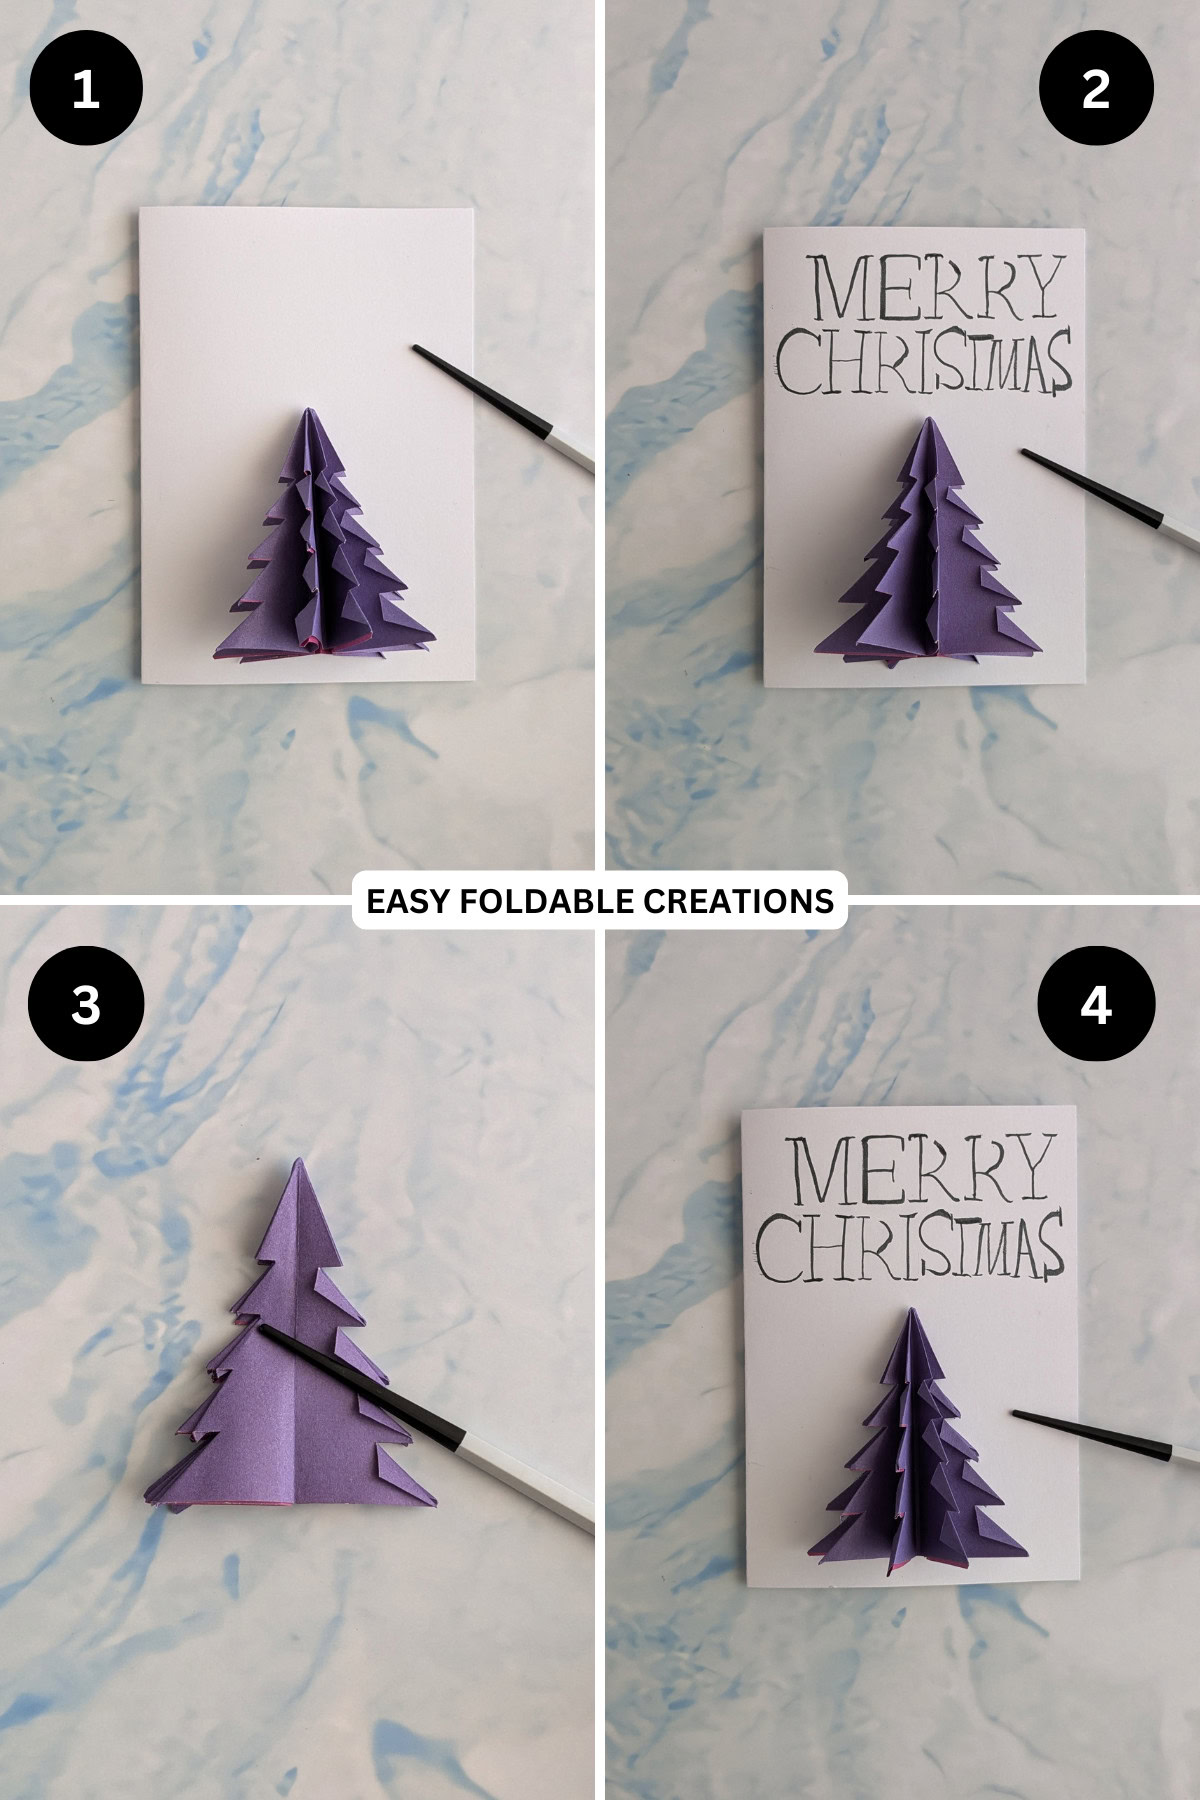
Step 1: Decide where you want your origami Christmas tree to sit on the front of your card. This could be in the middle, slightly above the bottom, the choice is yours!
Step 2: Once you have decided where you want to stick your Christmas tree, decide if you want to add any writing to the front of your card.
If you do, write it now before you stick on the Christmas tree (keep in mind where you decided you wanted to stick your Christmas tree).
Step 3: Stick the Christmas tree in place. For this you will need to flatten your Christmas tree as shown in the picture. Put glue along the back of the Christmas tree and stick onto your card.
Step 4: Optional: Decorate your origami Christmas tree card with any stickers, washi tape, or markers, as you like.
Tips For Success
- Use thicker cardstock: This will help support the weight of the 3D tree and give your card a more professional finish.
- Choose the right paper size: For larger cards, use bigger origami paper to ensure the tree stands out.

Common Mistakes & How To Avoid Them
- Not aligning folds: When folding the tree, make sure each fold is even and precise, as this ensures the final tree will look neat and symmetrical.
- Using glue too sparingly or excessively: Apply just enough glue to keep the tree in place without causing the paper to wrinkle or tear.
Color, Paper Ideas, and Variations
For a classic Christmas tree, use green origami paper, but you can get creative by using metallic or patterned paper for a modern twist.
Try making a tree out of red, silver, or gold paper for a more elegant design.
For the card itself, use festive colors like red, white, or gold cardstock, and consider decorating the tree with small glittery ornaments, stickers, or even a small star on top.
If you want to make the card extra special, layer different paper textures like velvet or holographic paper for the tree and card backing.
You can also write a heartfelt message inside the card or draw some small presents under the tree for extra detail.
FAQ
Yes, but origami paper will hold the folds better. If using regular paper, be sure to press firmly on each fold for sharp, clean lines.
Absolutely! You can add multiple trees to the same card, or create a layered effect by gluing different sizes of trees on top of each other.
A standard glue stick works well, but for thicker trees, you may want to use craft glue for extra hold.
Other Paper Crafts You Might Like To Try:
Helpful Origami Tips
If you're curious to learn more about origami, you might like to look at our basic guides on how to make some common origami folds.
Start with the valley fold and mountain fold-these are the foundation of most origami models.
Once you're comfortable, you might like to try the petal fold for 3D shapes, and explore the bird base and square base for more complex designs.
The water bomb base is also great for creating inflatable or geometric models, like this inflatable origami rabbit.
Useful Paper Craft Terms
Want to learn a little more about paper crafts and origami?
We've made this helpful printable just for you. It explains common terms and helpful tips you might come across when you are folding origami or making a paper craft project.
You can download the useful paper craft terms printable PDF here.
Stay Connected
Made this pattern? Let us know how it went in the comments below!
Pin this post - Pin now to take your paper crafting skills to the next level.
Share on Instagram or Facebook - Capture the beauty of your finished paper craft project and share it on Instagram or Facebook! Tag us @easyfoldablecreations so we can see your work!

After your next easy craft project that you can make in no time?
Try this Christmas paper chain, cool origami projects, middle level origami, origami beanie, candy cane, or advanced origami projects if you are feeling a little adventurous.
Other Patterns You Might Like To Try:
Looking for other easy patterns like this? Try these:


Comments
No Comments