
Add a personal touch to your holiday gifts with this charming 3D origami Christmas tree gift tag!
Easy to make and delightful to behold, it's a festive way to celebrate the season.

Jump to:
- Why You'll Love This Pattern
- Exclusive Content Just For You
- Skill Level
- Materials Needed
- Instructions
- Putting It All Together
- Tips For Success
- Color, Paper Ideas, and Variations
- FAQ
- Other Paper Crafts You Might Like To Try:
- Helpful Origami Tips
- Useful Paper Craft Terms
- Stay Connected
- Other Patterns You Might Like To Try:
- Comments
The holiday season is a time for giving, and what better way to show your thoughtfulness than with a handmade gift tag?
This 3D origami Christmas tree gift tag combines the elegance of origami with the festive spirit of Christmas, creating a unique and memorable way to label your gifts.
Whether you're wrapping presents for family, friends, or colleagues, this DIY craft project is sure to bring a smile to anyone's face.
The beauty of this project lies not only in its visual appeal but also in the joy of creating something special with your own hands.
Imagine your loved ones unwrapping their gifts to find this delightful little tree on the tag!
This origami tree can be customized in various colors and patterns, allowing you to match it to the wrapping paper or the personality of the recipient.
You can use traditional green origami paper for a classic look or opt for glittery or patterned paper for something more festive.
The options are endless, making this a fun craft to get creative with.
Plus, making a batch of these tags can be a great way to involve children in holiday preparations, turning the crafting session into a cherished family tradition.
This 3D origami Christmas tree gift tag is not only a charming addition to your gifts but also serves as a small decoration that can be hung on Christmas trees or used as a part of your holiday décor.
After the presents are opened, recipients can choose to keep the tags and display them, adding to their holiday cheer.
In addition to its aesthetic appeal, creating these tags allows you to practice your origami skills and explore the art of folding paper.
As you work through the steps, you'll discover the meditative qualities of origami, making this project a relaxing way to prepare for the bustling holiday season.

Other easy to make Christmas paper crafts you have to make include this Christmas tree napkins fold, lucky stars, origami reindeer, DIY Christmas tree cake toppers, and bow napkin folds!
Why You'll Love This Pattern
- Unique and Creative: Stand out from traditional gift tags with a handmade 3D tree.
- Personal Touch: Customize your tags to match the recipient's style or your gift wrap.
- Fun for All Ages: A great activity for families and children to enjoy together.
- Versatile Uses: Not only a tag but also a festive ornament or decoration.
- Practice Your Skills: Improve your origami techniques with a simple and rewarding project.
Exclusive Content Just For You
Not sure what you want to make next, but feeling a bit creative? Or maybe you've been searching for a pattern that sparks something new. We've got a few ideas waiting for you.
The Fold Collective, Easy Foldable Creations' community, provides you with a library of exclusive ad-free video tutorials, printable PDF patterns, helpful tips, and more so you can improve your skills and enjoy crafting in your own time.
Skill Level
Difficulty: ★★☆☆☆ (Easy)
Materials Needed
- Origami paper or decorative paper (green, glitter, or patterned)
- Scissors
- Glue
- Gift tag (swing tag). Or cardstock to make your own.
- Hole punch
- String or ribbon (for attaching the tag)
Instructions
Making The Christmas Tree
Using your origami paper.
Step 1: Start with the color you want your Christmas tree to be facing down.
Step 2: Fold the paper in half from left to right.
Step 3: Unfold previous step.
Step 4: Fold the paper in half from top to bottom.
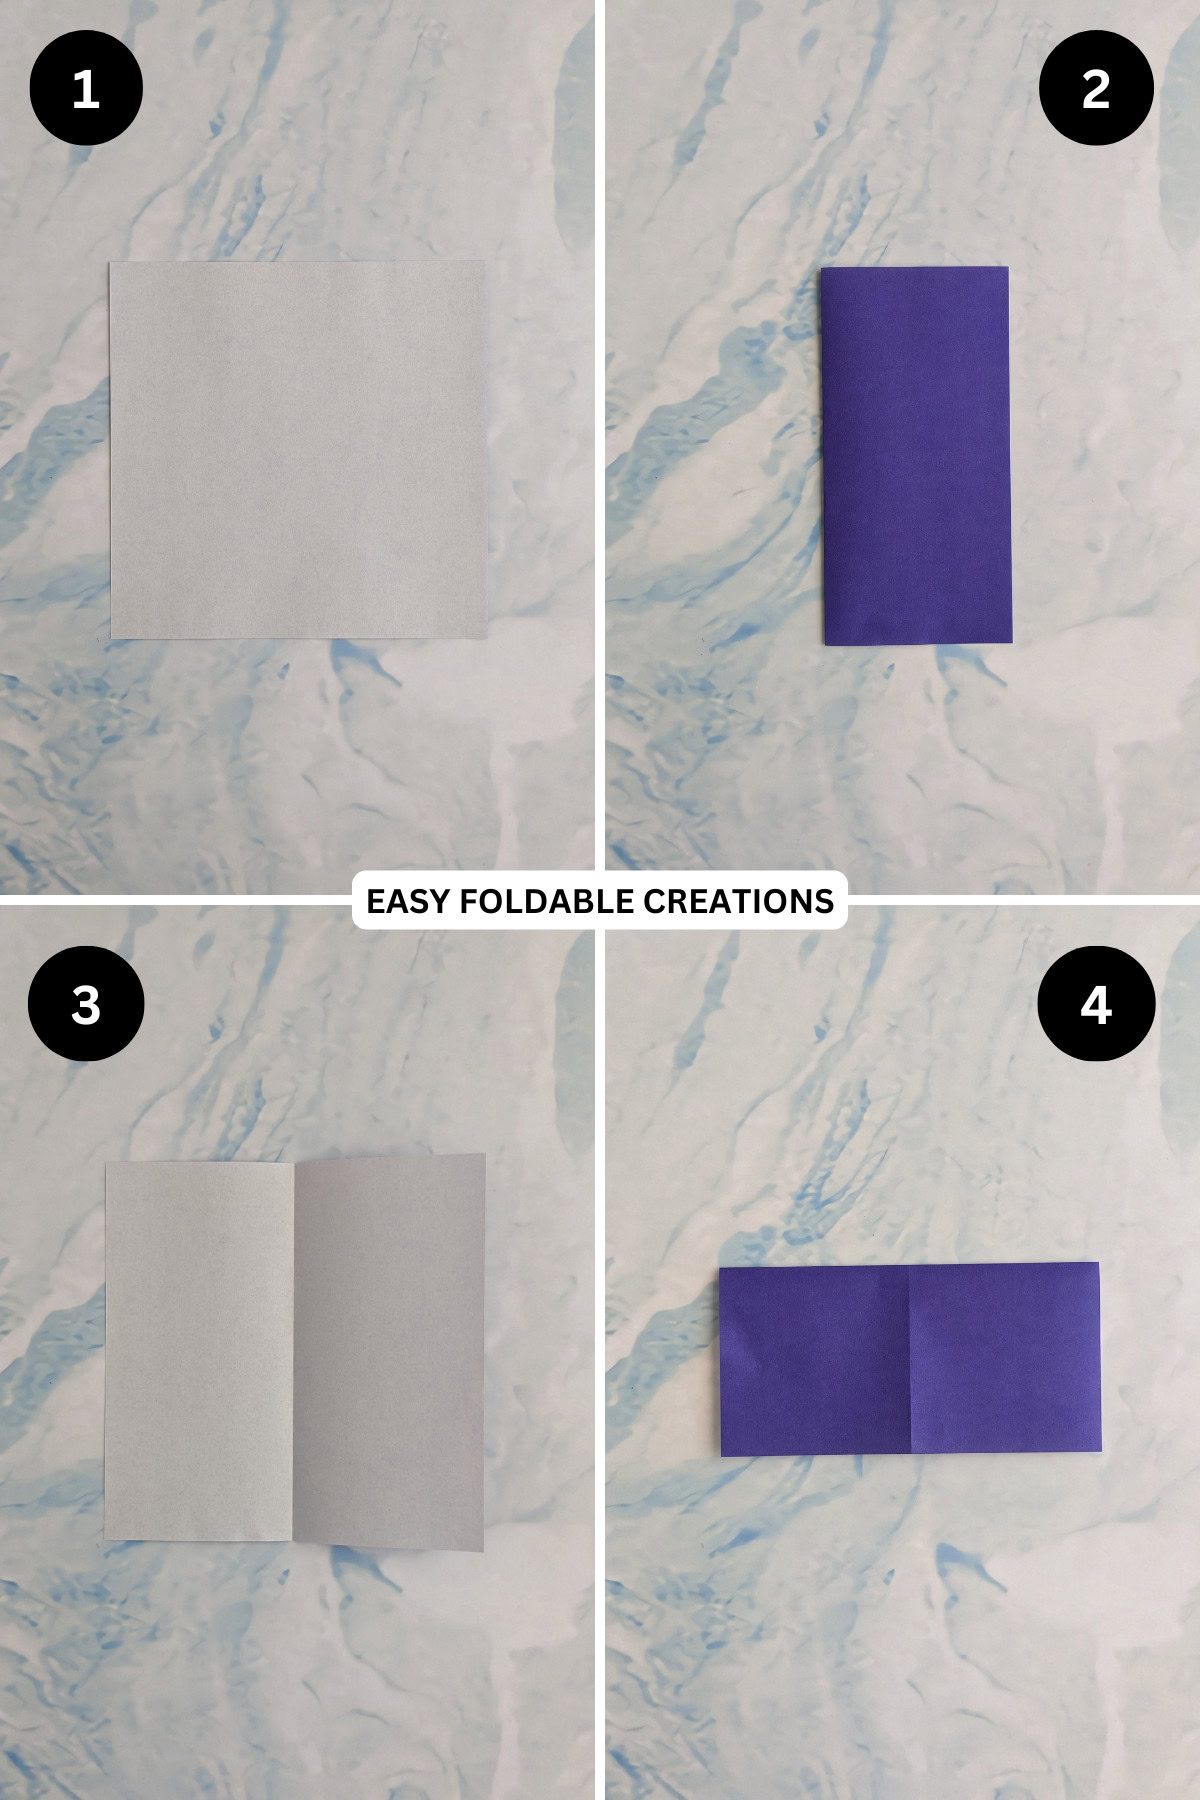
Step 5: Unfold previous step.
Step 6: Fold the paper in half diagonally, matching the top left corner to the bottom right corner.
Step 7: Unfold previous step.
Step 8: Fold the paper in half diagonally, this time matching the top right corner and bottom left corner.
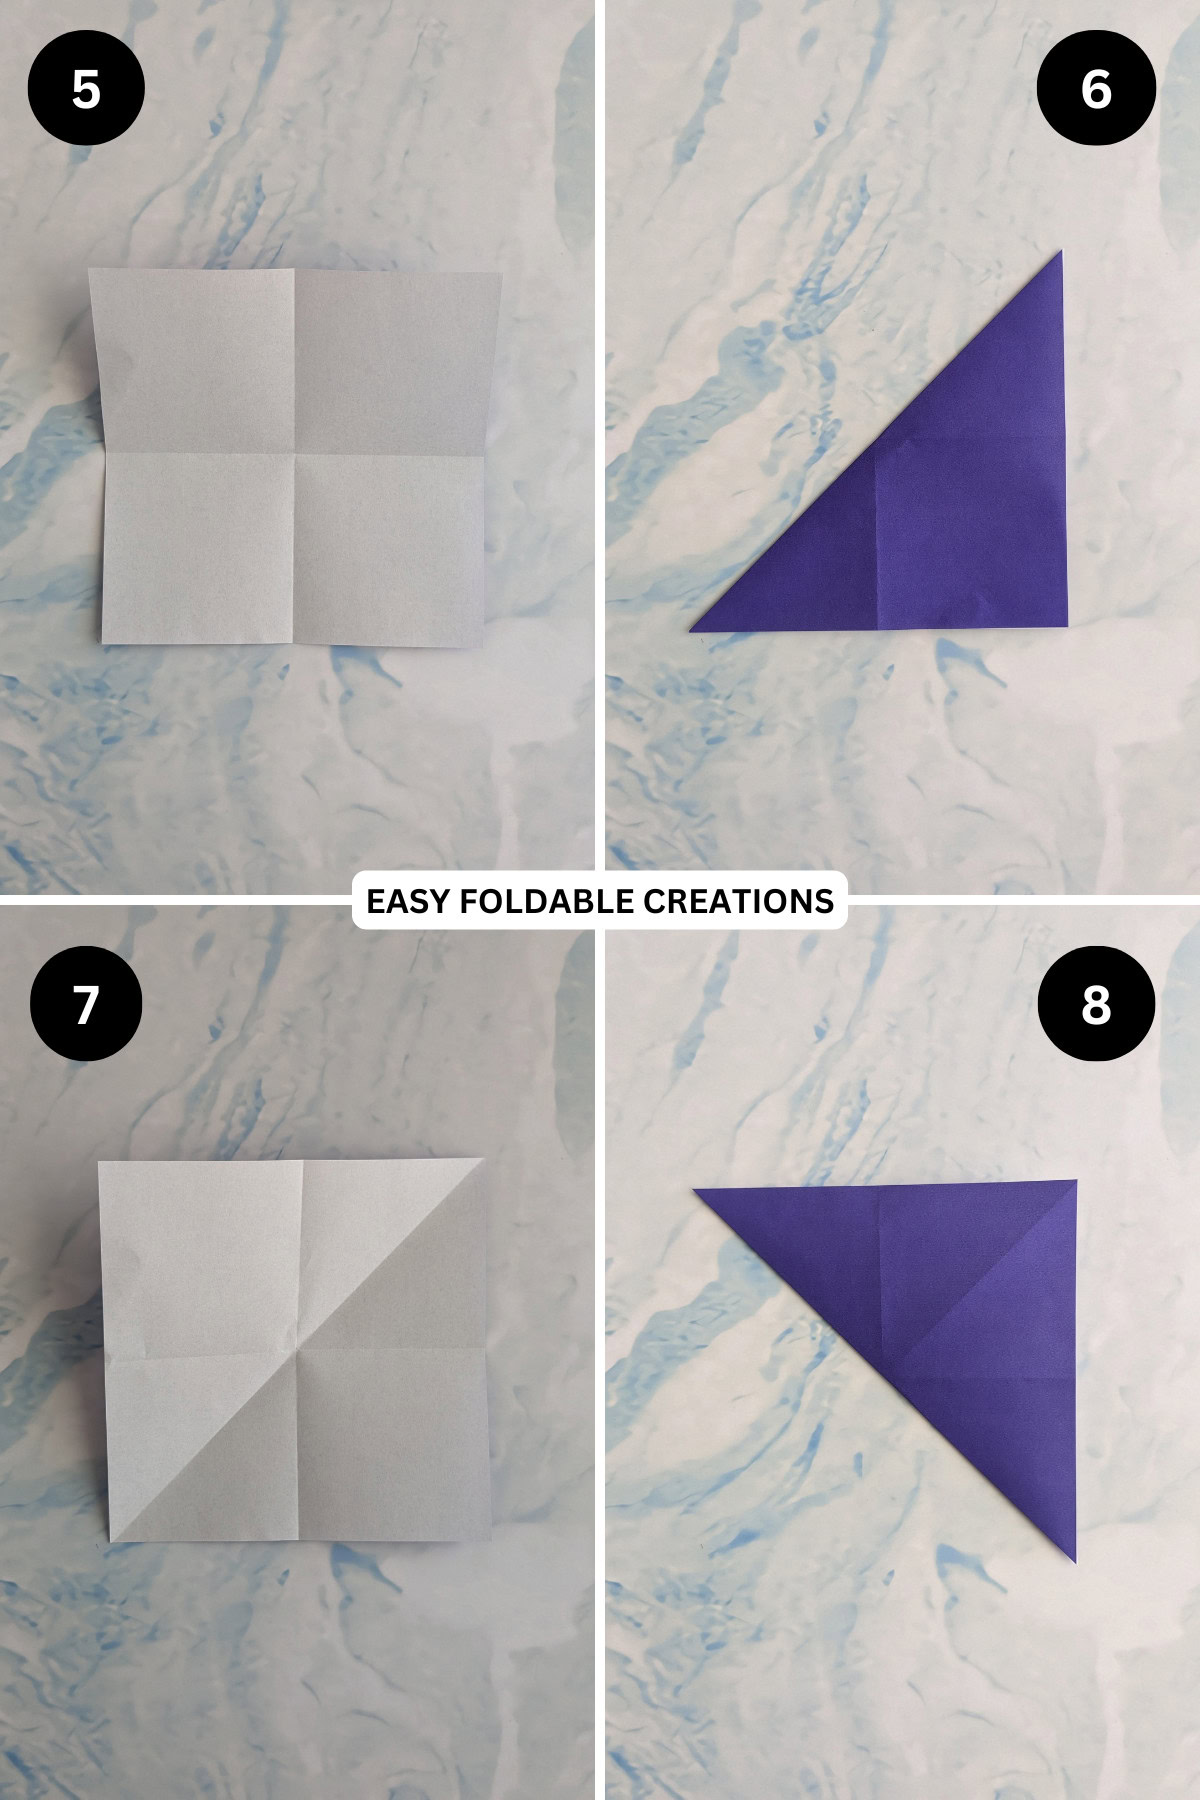
Step 9: Unfold previous step.
Step 10: Arrange the paper so that it sits in a diamond shape in front of you (see picture).
Step 11: Bring the left and right points down to meet the bottom point. The paper should start to collapse on itself. Press flat. You should now have a solid diamond shape.
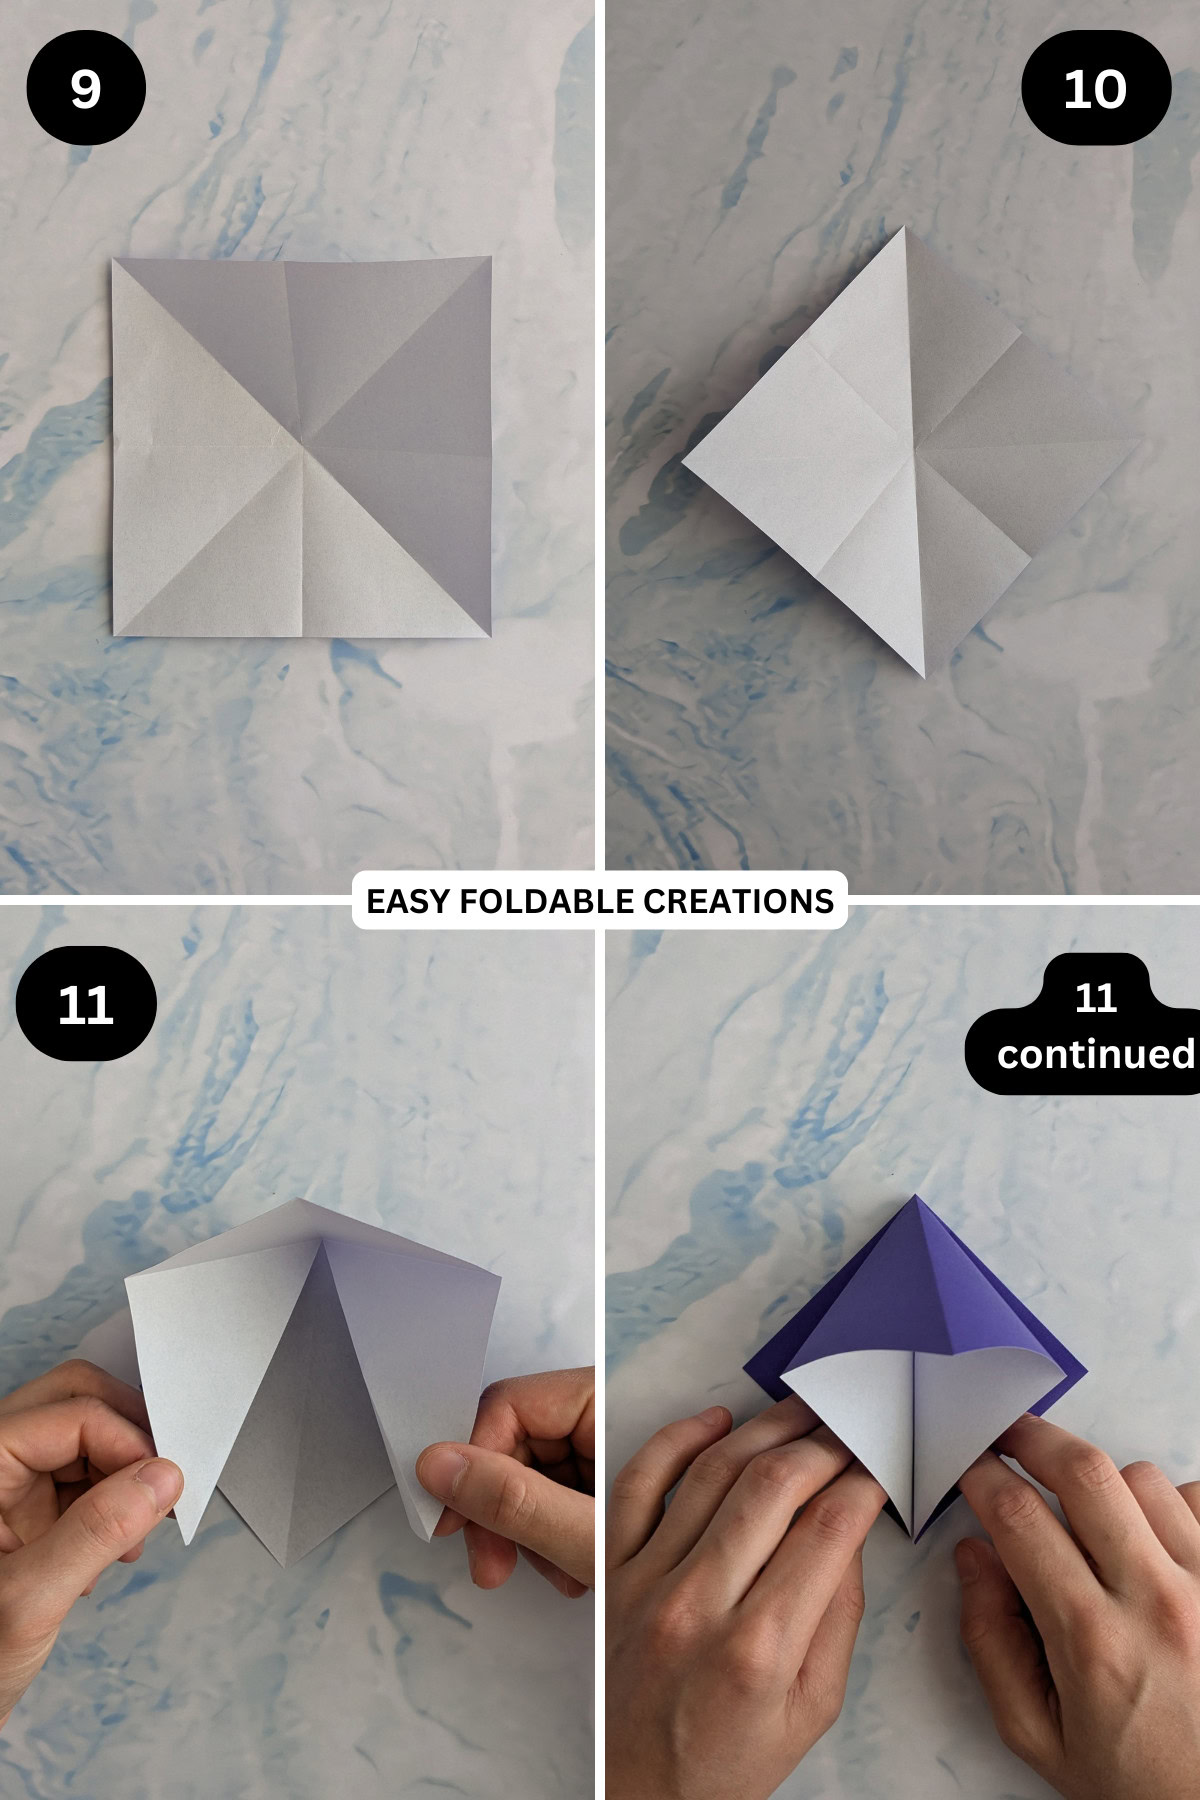
Step 12: Fold the left and right sides (top layer only) to meet the centre crease.
Step 13: Flip the paper over, keeping the open end towards you.
Step 14: Fold the left and right sides to meet the centre crease. You should now have a kite shape.
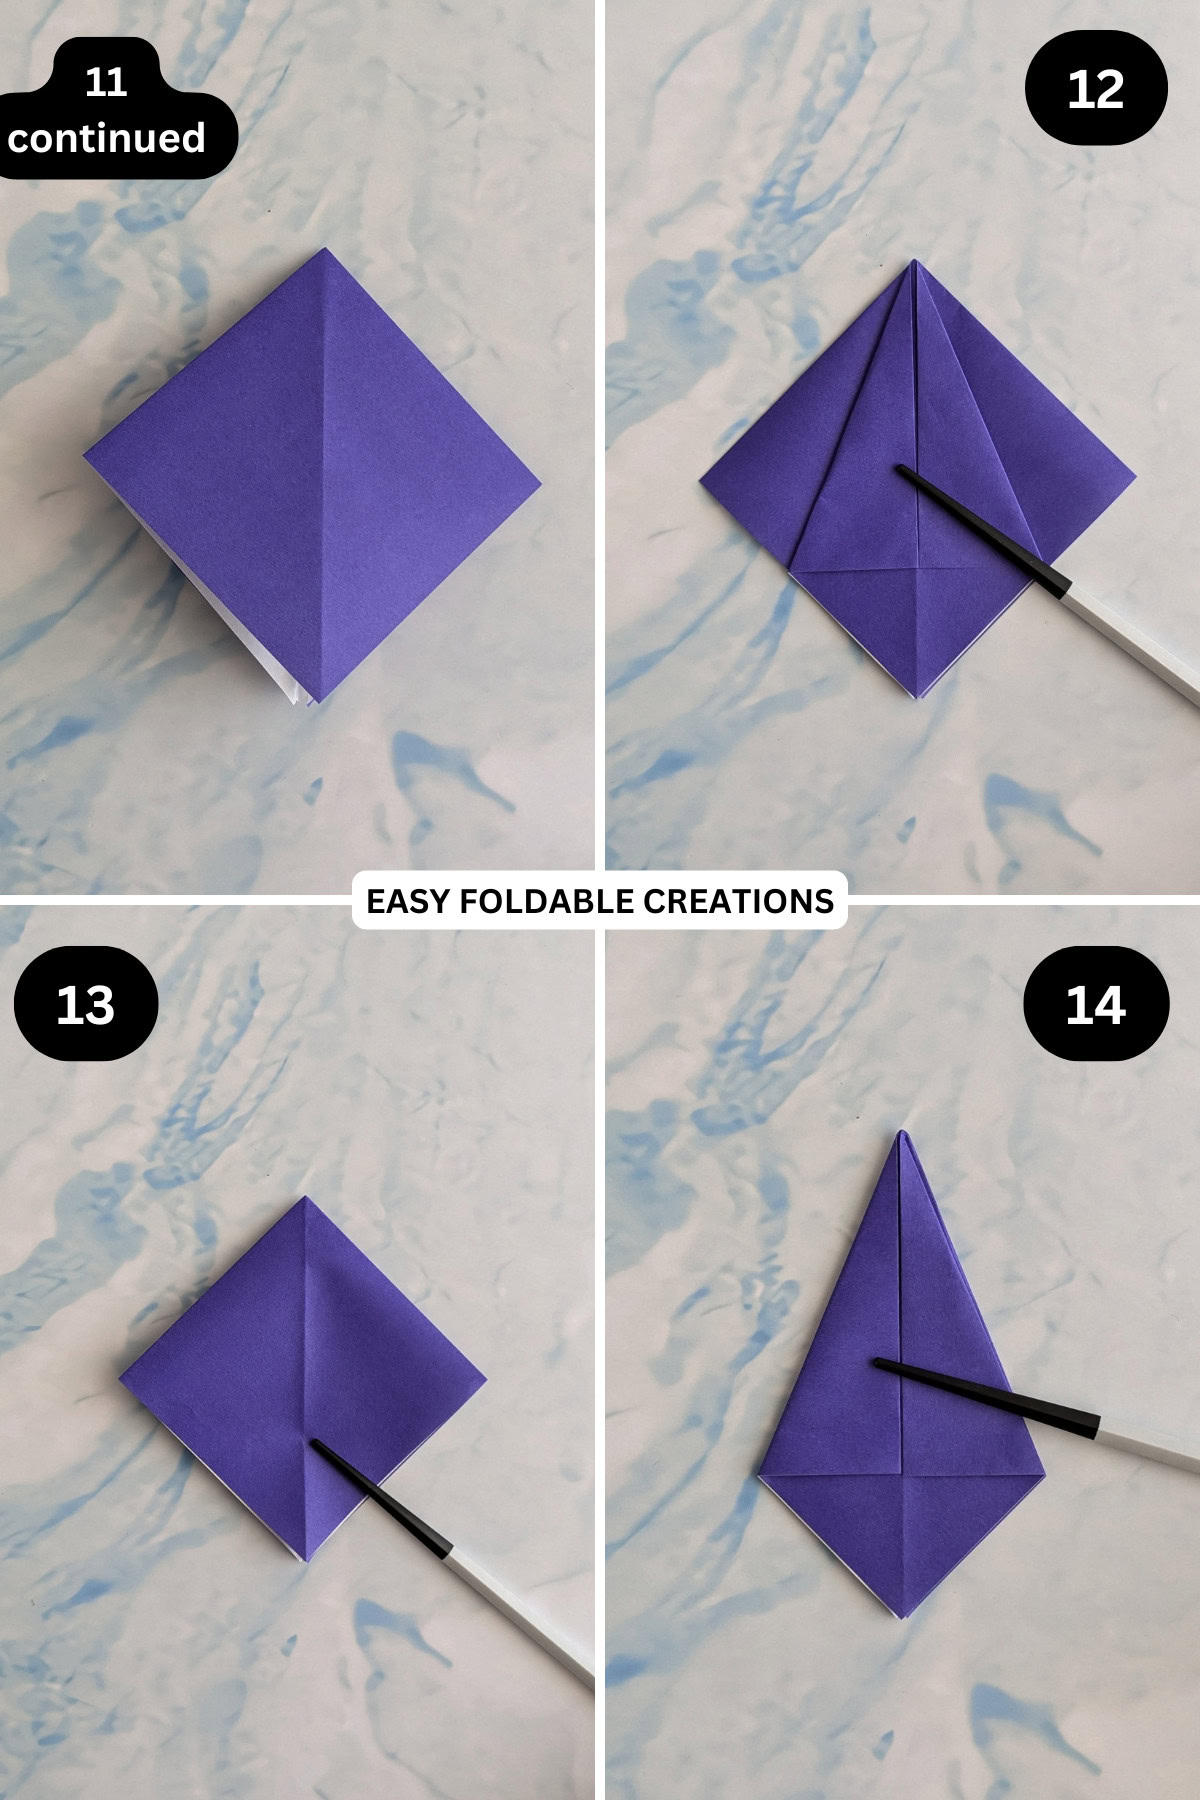
Step 15: Open the left flap back out and flatten.
Step 16: Take the outer edge of the left flap and collapse it into itself (the outermost edge will meet with the middle crease) and flatten.
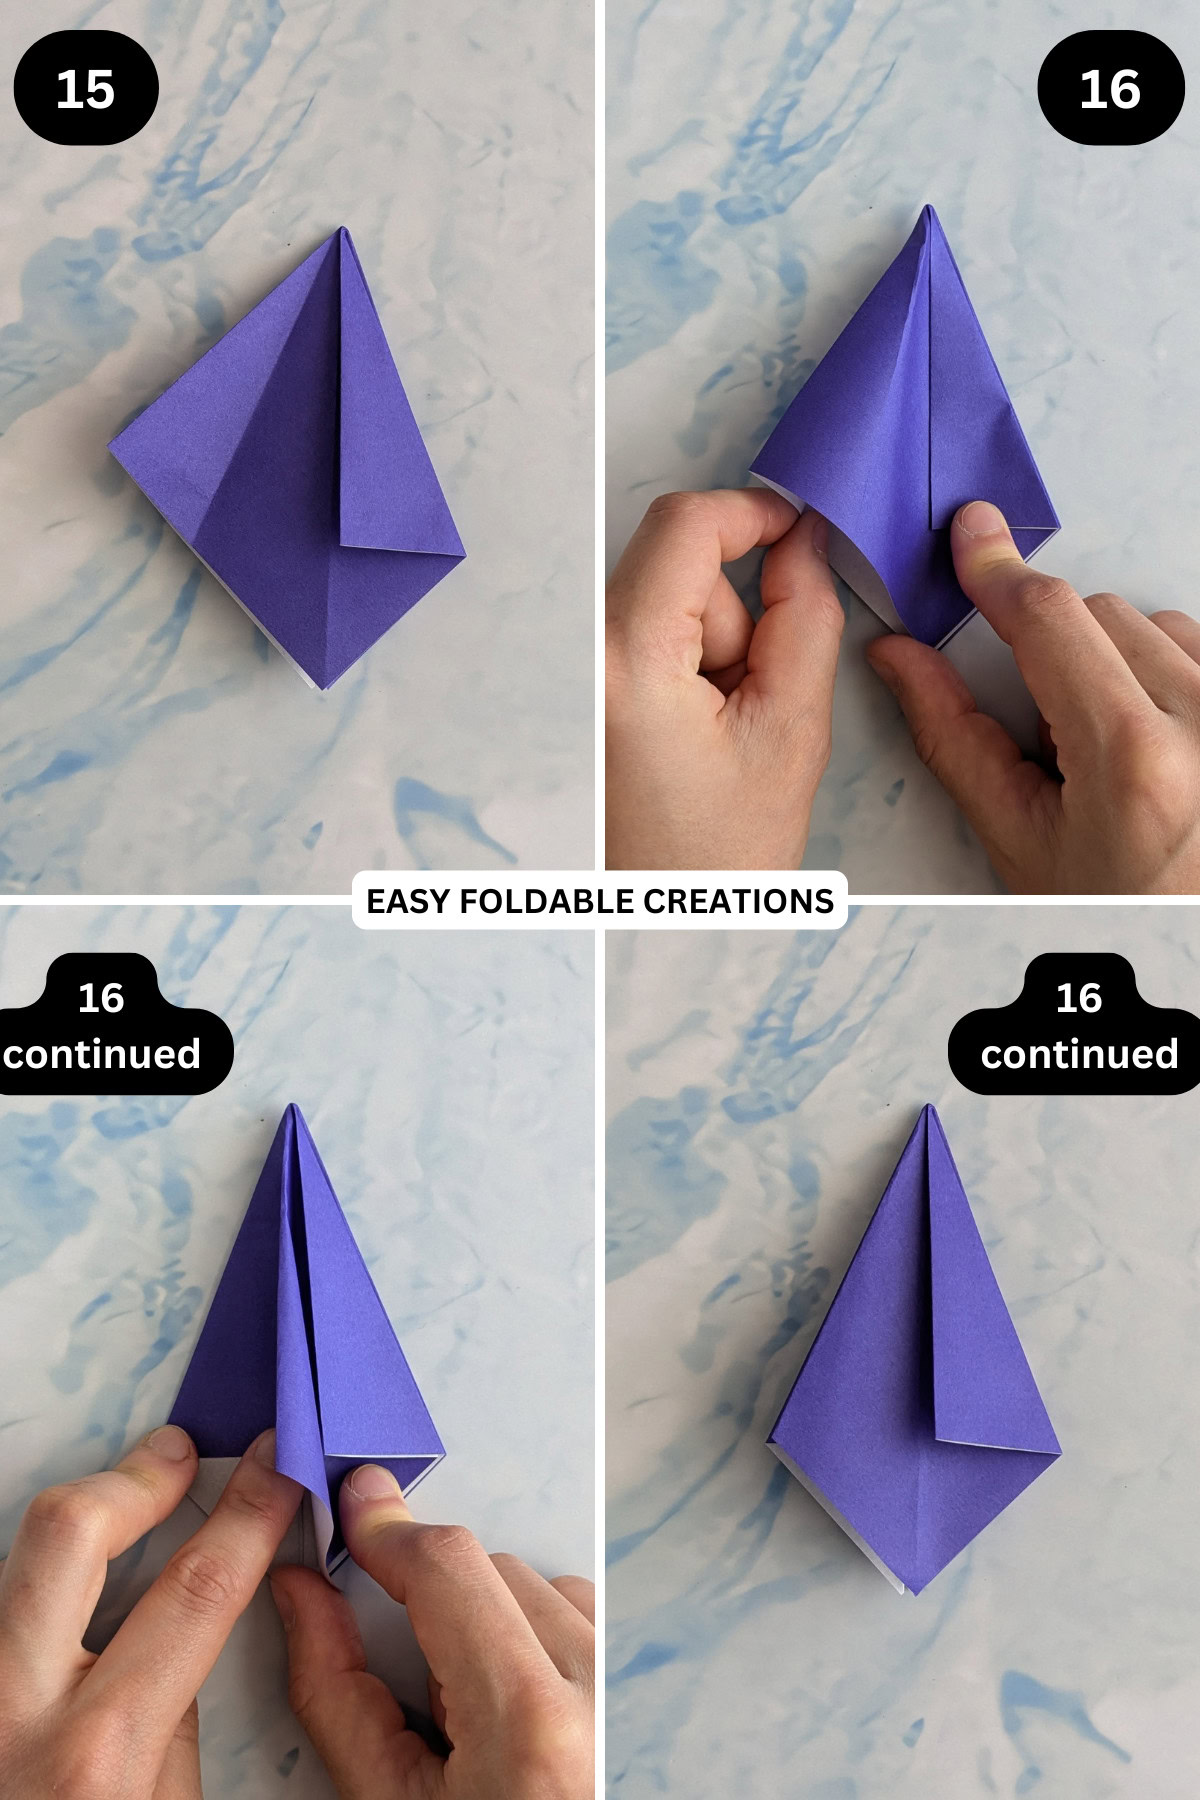
Step 17: Repeat steps 15 and 16 on the right flap.
Step 18: Flip the paper over (keeping the open edge towards you).
Step 19: Repeat step 15 to 17.
Step 20: Fold back the top layer of the open edge to form a triangle.
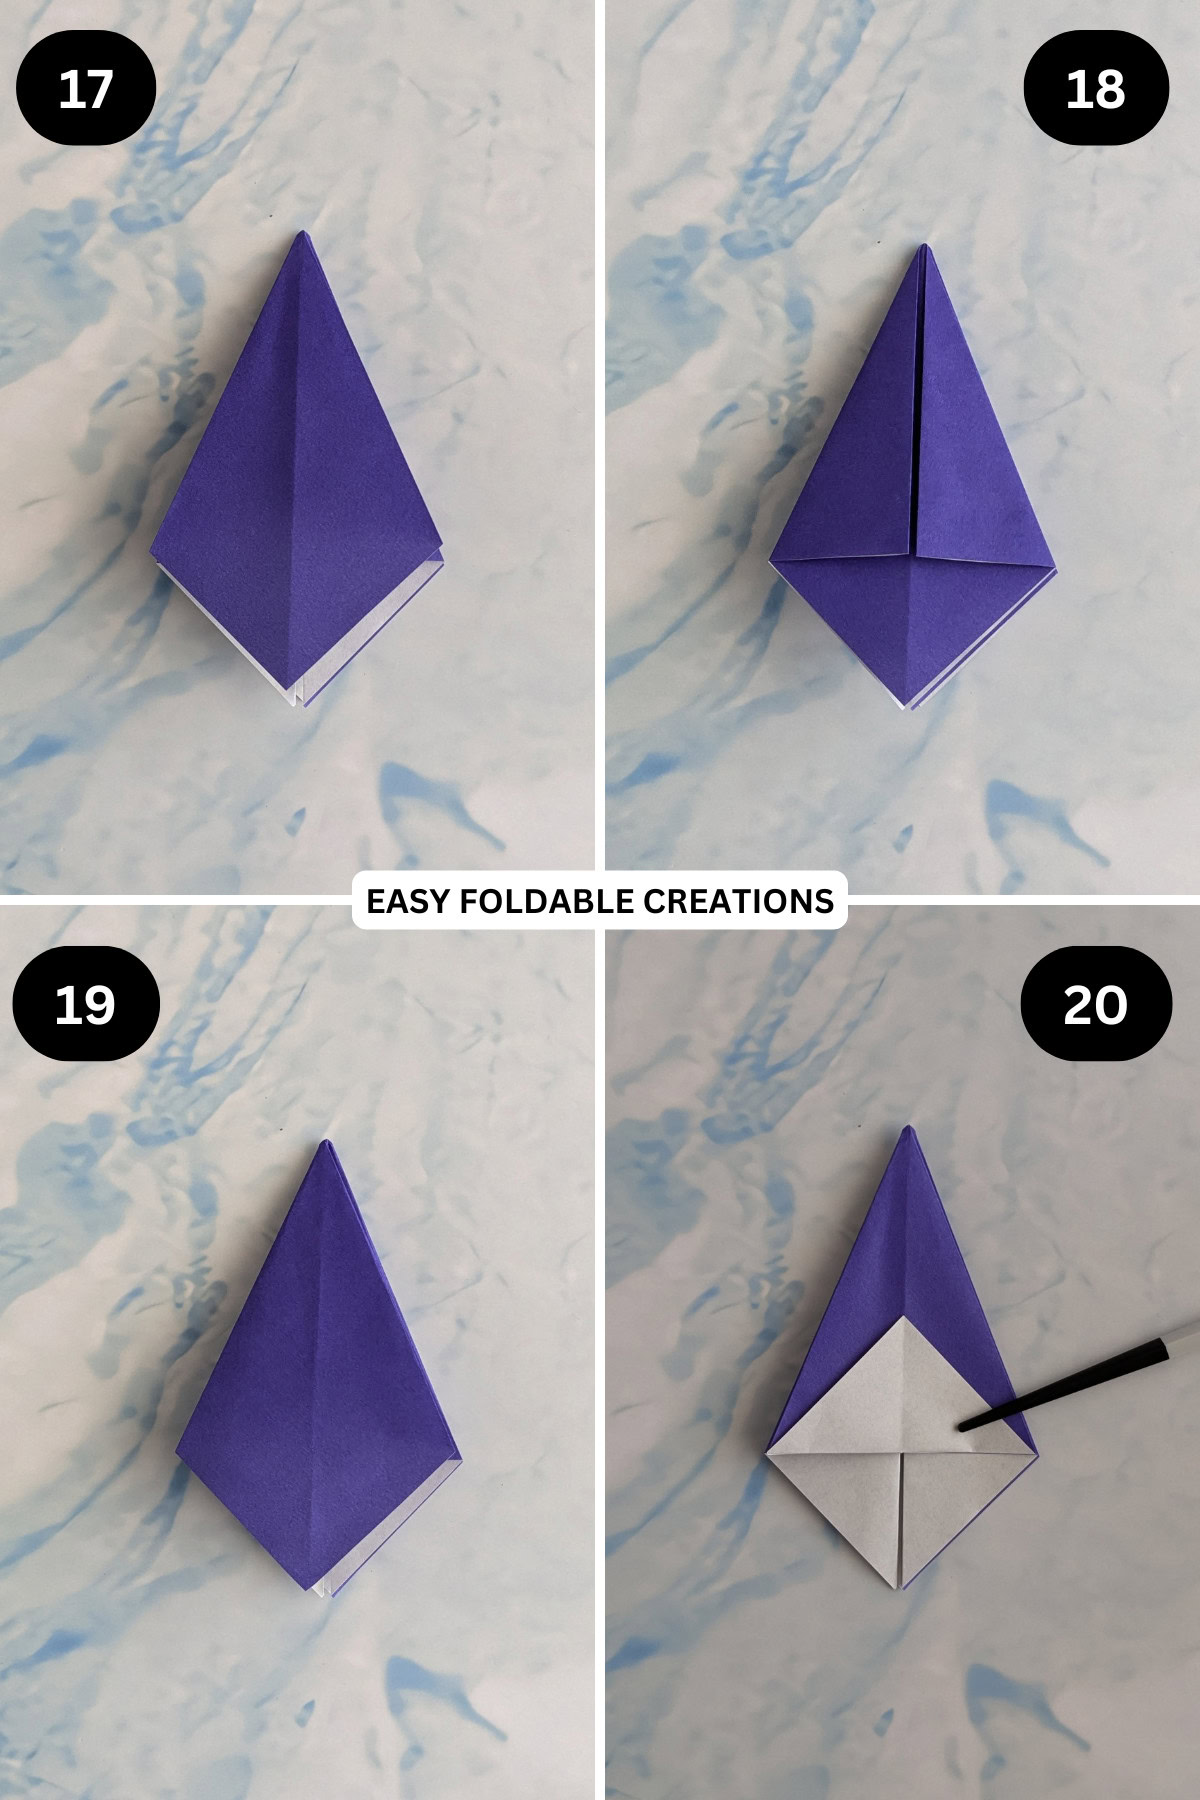
Step 21: Unfold the triangle you made in the previous step and cut along it's folded edge. You should now have a flat edge at the bottom of your paper.
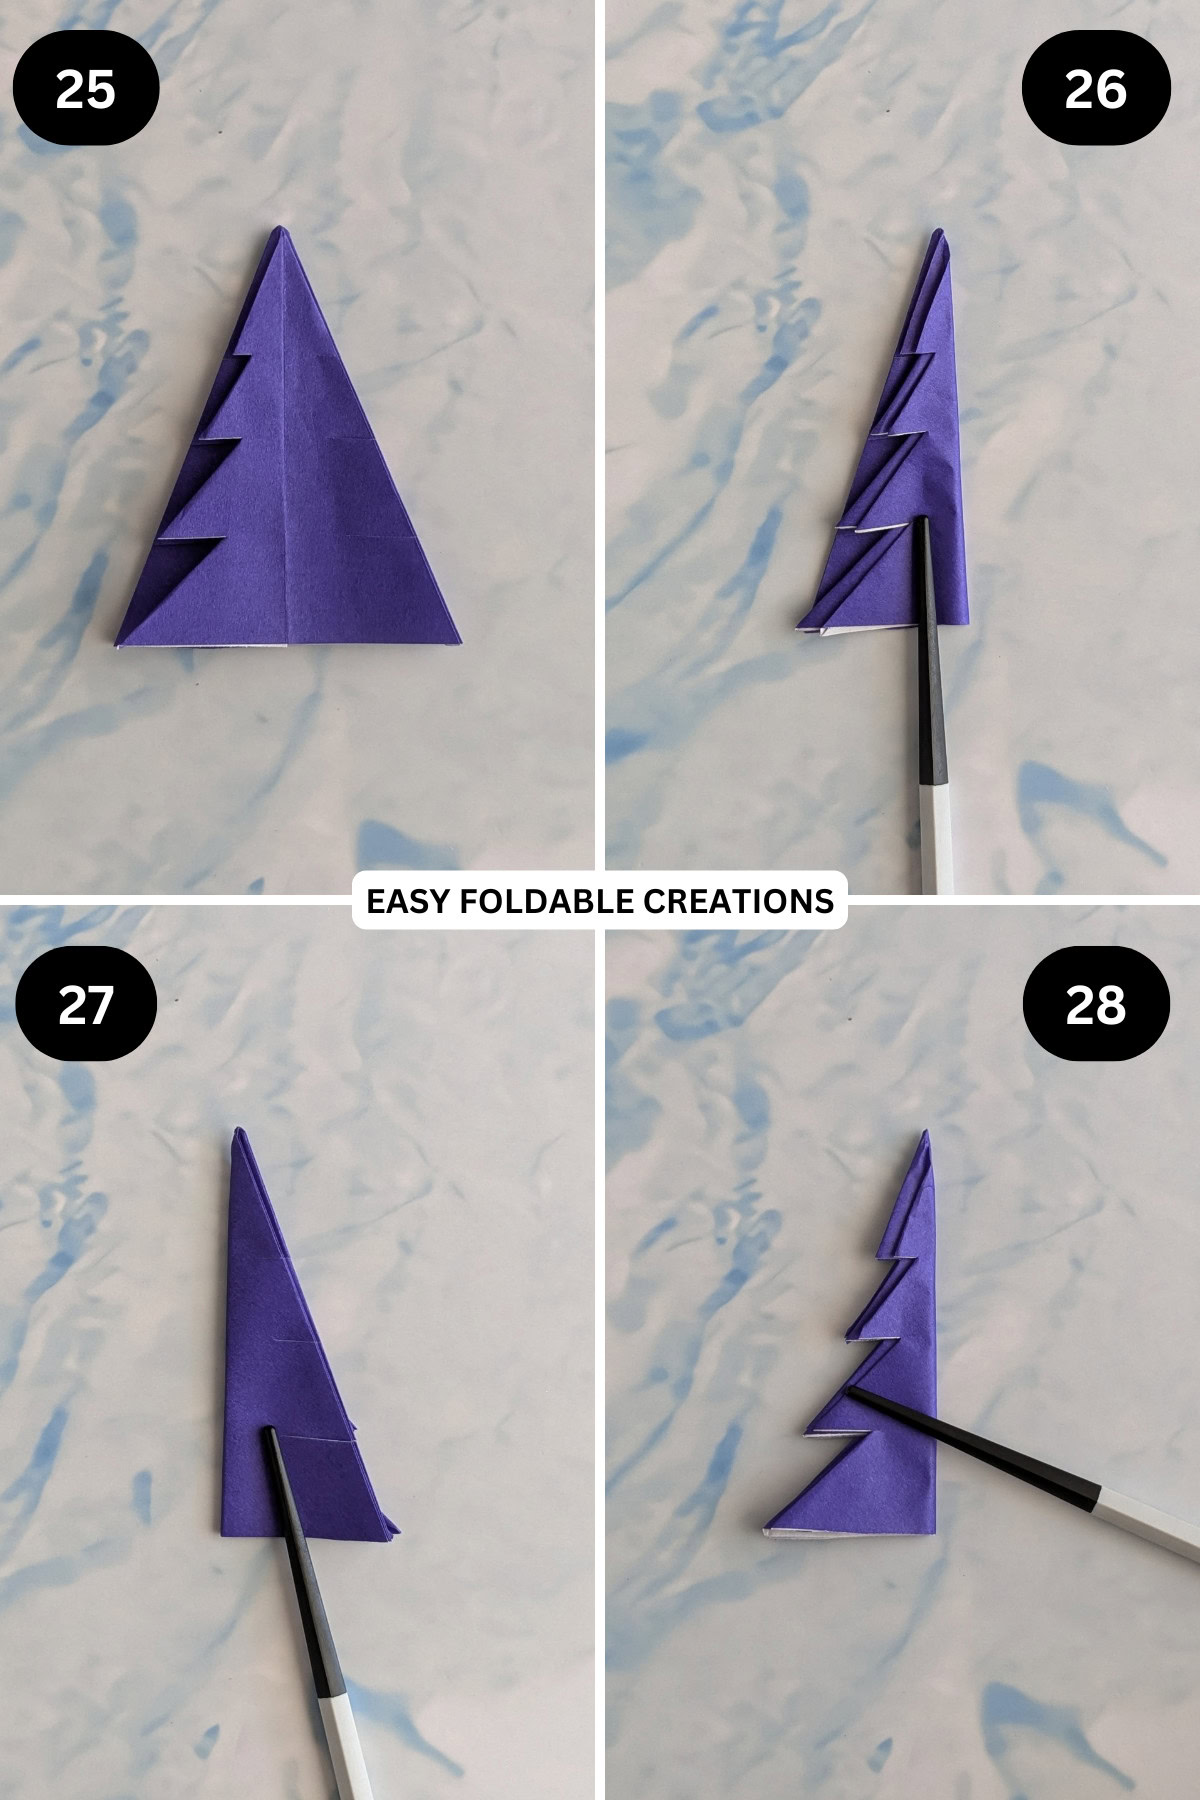
Step 22: Using a pair of scissors, cut 3 horizontal lines on the left side of your triangle. Don't cut all the way through to the other side (see picture).
Step 23: Repeat previous step for the right side, keeping it as symmetrical as possible.
Step 24: Starting on the top layer of the right side, fold each cut line down, making a small triangle.
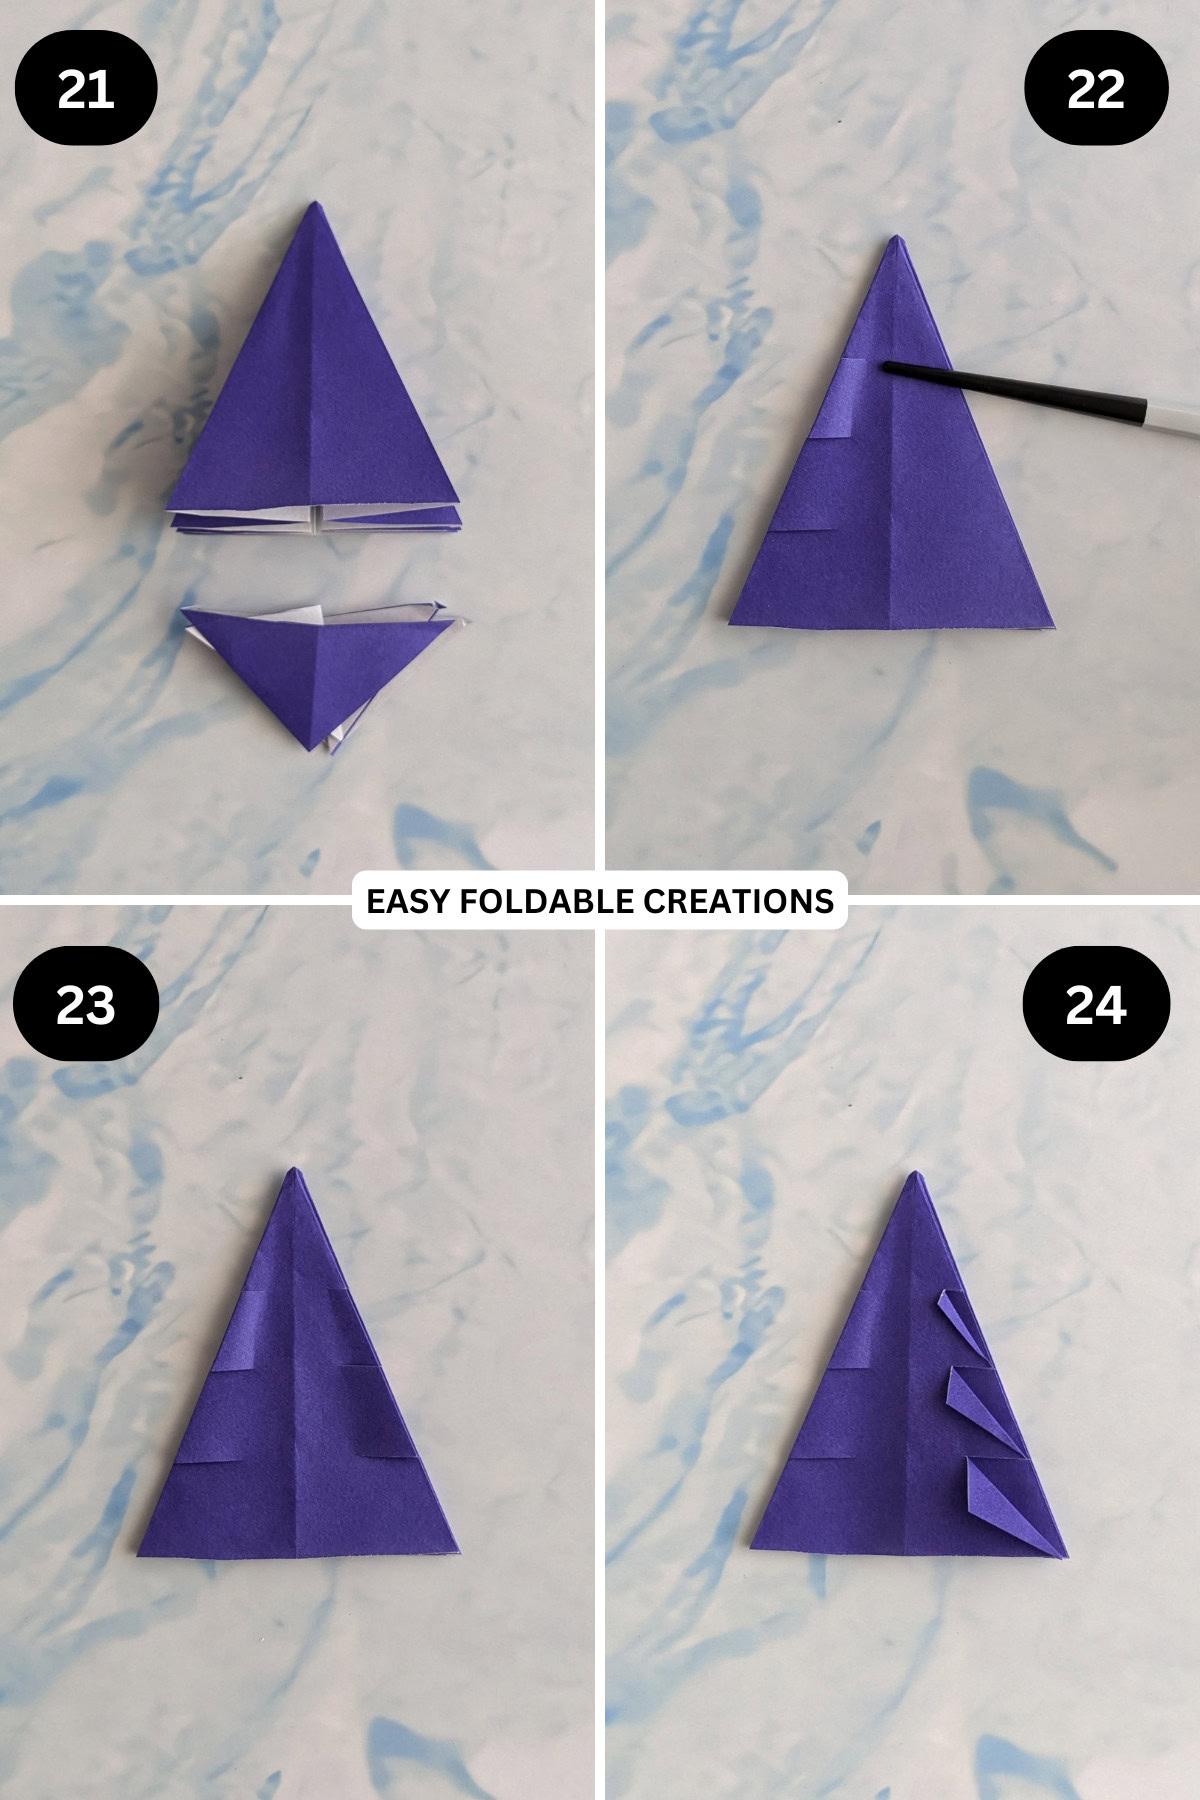
Step 25: Fold the top right layer to the left (like turning a page) and flatten.
Step 26: Repeat previous two (2) steps until all the branches have been folded on the right side.
Step 27: Once you have finished the right side, flip the paper over.
Step 28: Repeat steps 24 to 25 until all the branches have been folded.
✨ You're almost there! ✨
To unlock the final steps of the photo tutorial and complete your pattern, create a free account with Grow.me. below.
Make sure you tick the box to subscribe to our newsletter and stay up to date with the latest patterns, tips, and more!
Once you're signed up, you'll get instant access to finish your project with the photo tutorial and enjoy exclusive content in the future.
Already signed up? Hit the button below and select 'Switch to Log In' to pick up where you left off and finish your project!
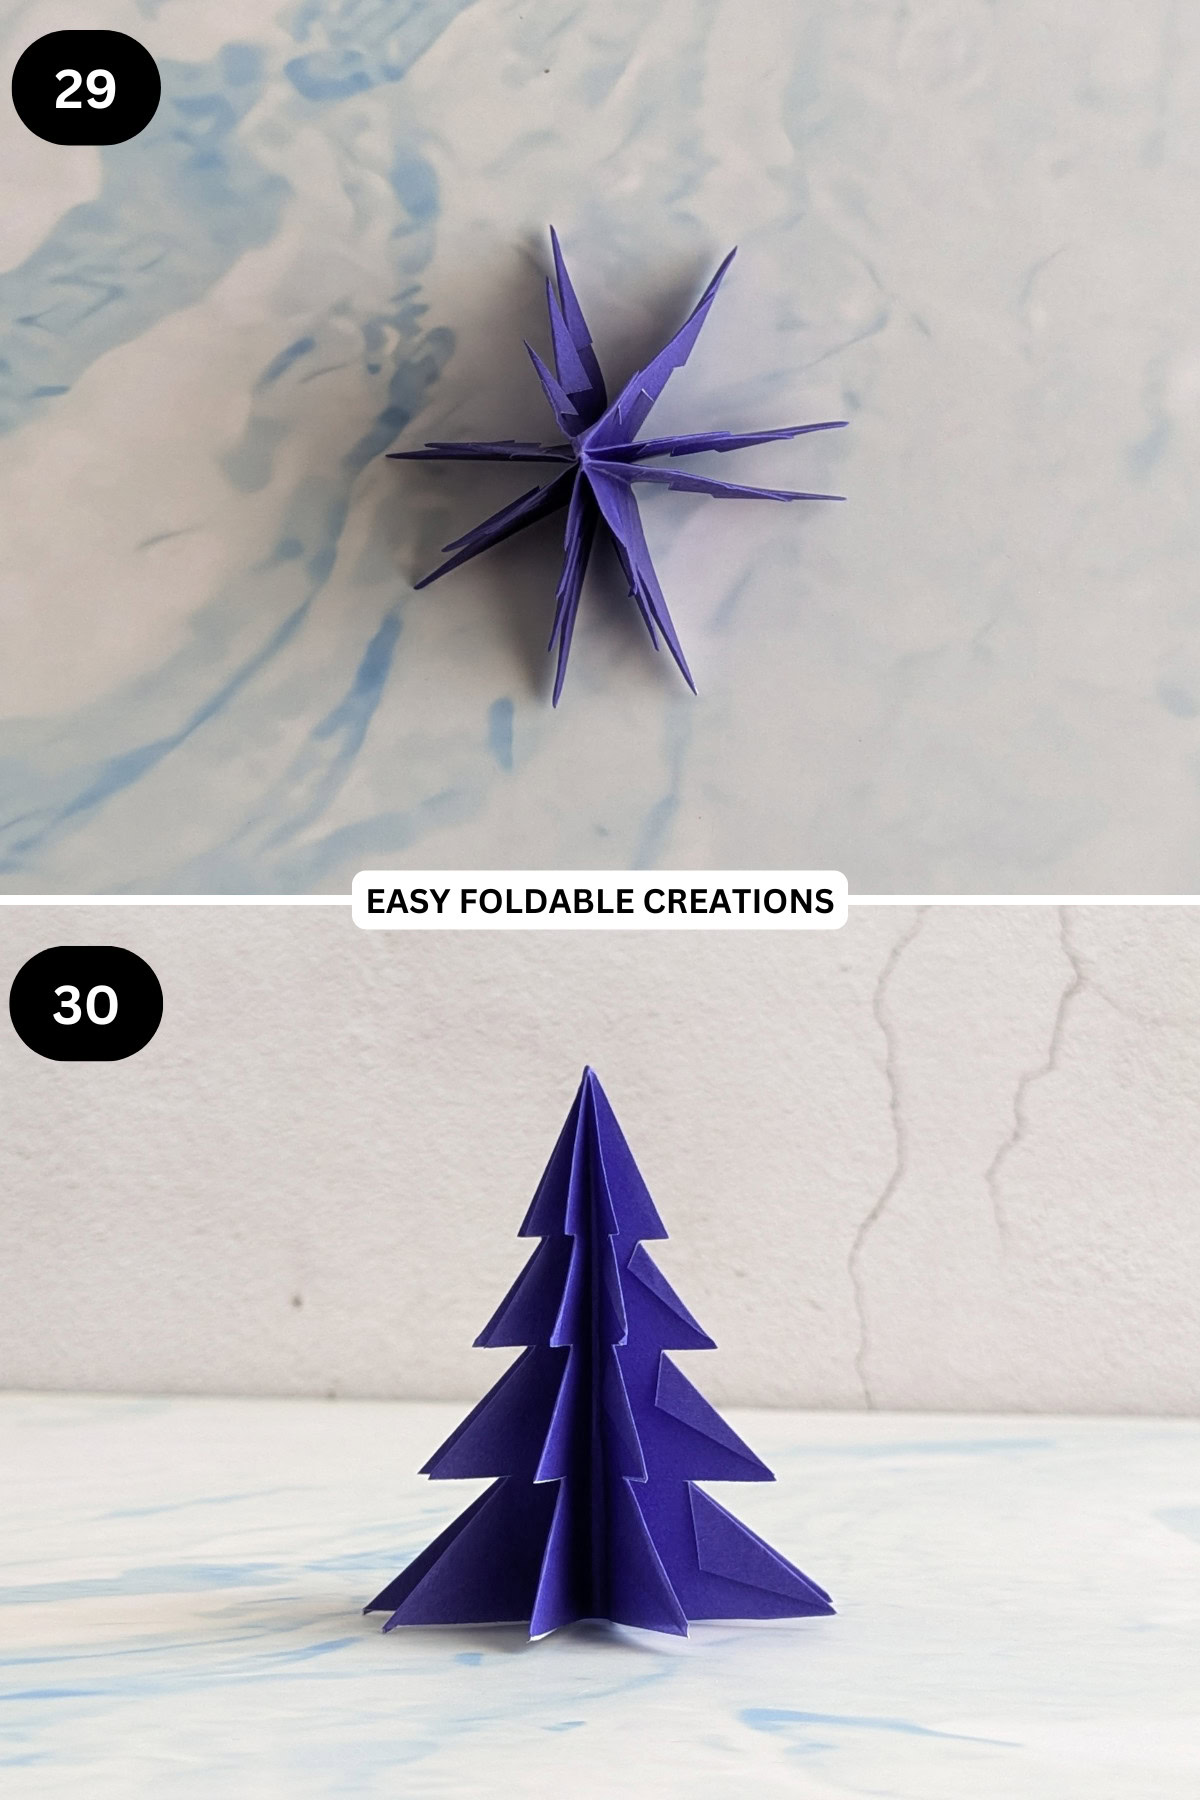
Step 29: Open out your origami tree and stand.
Step 30: Completed 3d origami Christmas tree.
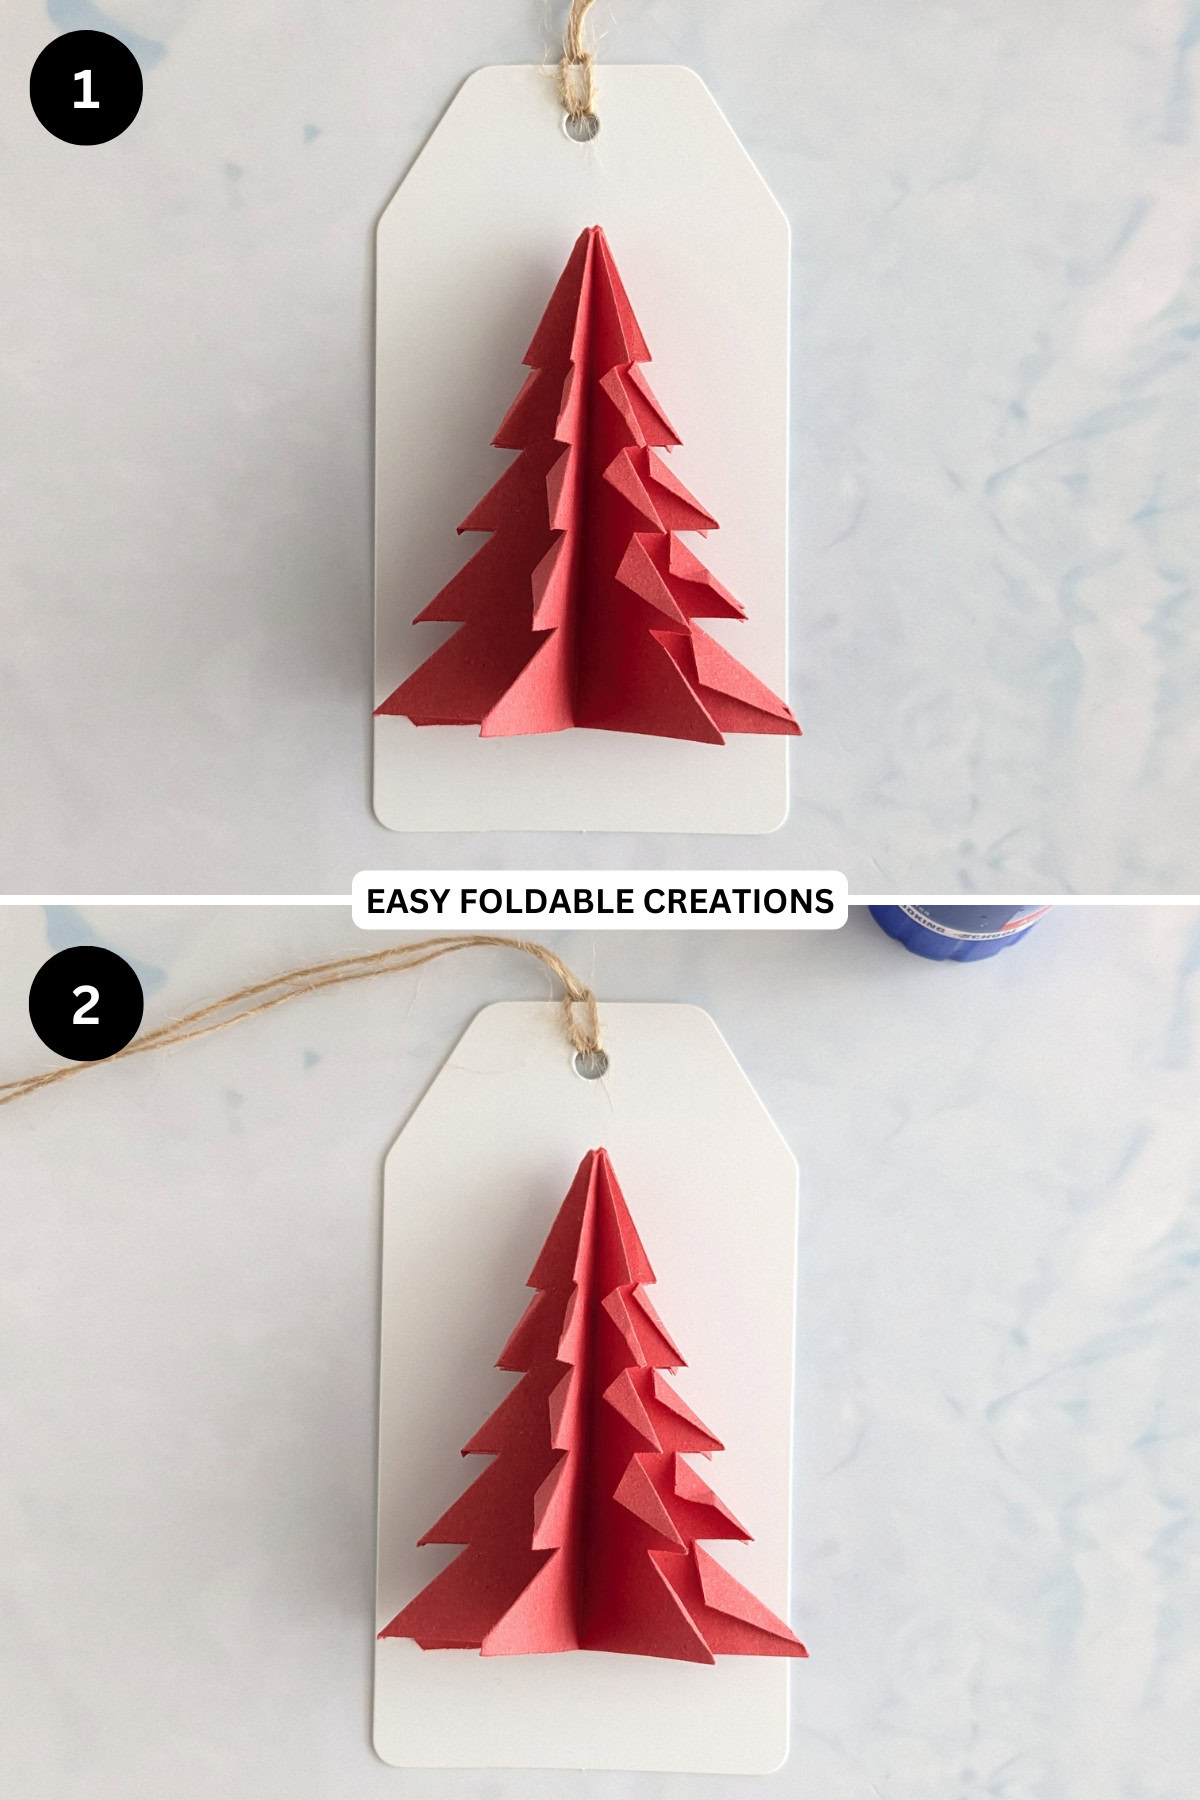
Putting It All Together
Step 1: Position your Christmas tree on your gift tag as desired. Keep in mind if you want to add some writing to the front of your gift tag.
Step 2: Glue your tree onto the gift tag. Optional: add any writing you'd like to your gift tag, like "Merry Christmas."
Tips For Success
Practice folding a few trees before creating your final tag.

Color, Paper Ideas, and Variations
Add embellishments like stickers, glitter, or drawings to personalize each tag.
FAQ
Absolutely! You can adapt the tree design for other occasions by changing the colors and decorations.
Any lightweight paper will do; just ensure it's square for proper folding.
Other Paper Crafts You Might Like To Try:
Helpful Origami Tips
If you're curious to learn more about origami, you might like to look at our basic guides on how to make some common origami folds.
Start with the valley fold and mountain fold-these are the foundation of most origami models.
Once you're comfortable, you might like to try the petal fold for 3D shapes, and explore the bird base and square base for more complex designs.
The water bomb base is also great for creating inflatable or geometric models, like this inflatable origami rabbit.
Useful Paper Craft Terms
Want to learn a little more about paper crafts and origami?
We've made this helpful printable just for you. It explains common terms and helpful tips you might come across when you are folding origami or making a paper craft project.
You can download the useful paper craft terms printable PDF here.
Stay Connected
Made this pattern? Let us know how it went in the comments below!
Pin this post - Pin now to take your paper crafting skills to the next level.
Share on Instagram or Facebook - Capture the beauty of your finished paper craft project and share it on Instagram or Facebook! Tag us @easyfoldablecreations so we can see your work!

Here are some more easy paper crafts you might love to try, like this cat origami box, rectangle box, paper crane, origami wreath, triangle desk organizer, origami hearts, origami heart with bow, simple origami flower, origami bunny, or long heart origami bookmark.
Other Patterns You Might Like To Try:
Looking for other easy patterns like this? Try these:


Kendra says
These are so pretty!