
Add an extra touch of charm to your gift-giving with this beautiful origami heart with a bow-a cute, easy-to-fold paper craft that's perfect for any occasion!

Jump to:
- Why You'll Love This Pattern
- Exclusive Content Just For You
- Skill Level
- Materials Needed
- Video Tutorial
- Instructions
- Tips For Success
- Common Mistakes & How To Avoid Them
- Color, Paper Ideas, and Variations
- FAQ
- Other Paper Crafts You Might Like To Try:
- Helpful Origami Tips
- Useful Paper Craft Terms
- Stay Connected
- Other Patterns You Might Like To Try:
- Comments
This origami heart with a bow combines the classic heart shape with a simple but elegant bow detail, making it a unique and thoughtful decoration for gift-giving occasions like Valentine's Day, Mother's Day, birthdays, or even Christmas.
This paper craft is perfect for adding a personal touch to your notes, cards, or small presents.
You only need a single sheet of paper to fold this 2D paper heart, and with no glue or cutting required, it's a clean, mess-free project that's accessible for crafters of all ages.
The final result is a beautiful, flat design that can be easily attached to a card, framed as a decorative piece, or even added to a scrapbook page.
The bow detail adds an extra layer of sophistication to the heart, giving it a more polished, gift-ready appearance.
Choose colors that fit the occasion-red or pink for Valentine's Day, pastels for Mother's Day, or festive hues for Christmas.
This heart with a bow is also a wonderful homemade craft idea for DIY enthusiasts who want a simple but impactful addition to their paper projects.
Whether you're a beginner or an experienced folder, this origami heart with a bow will add a dash of creativity and thoughtfulness to any project.
Other easy paper hearts you might like to try include these Origami Heart With Wings, Origami Heart Envelope, Heart Origami Bookmark, Origami Lucky Hearts, Blossom Origami Heart, or this useful Heart Origami Box With Lid.

Why You'll Love This Pattern
- Perfect for Gift-Giving: Adds a cute and personal touch to cards, letters, and presents.
- No Tools Needed: No scissors, glue, or extra materials-just a sheet of paper.
- Suitable for All Occasions: Great for Valentine's Day, Mother's Day, birthdays, or as a holiday decoration.
- Beginner-Friendly: An easy pattern that's fun for all skill levels.
Exclusive Content Just For You
Not sure what you want to make next, but feeling a bit creative? Or maybe you've been searching for a pattern that sparks something new. We've got a few ideas waiting for you.
The Fold Collective, Easy Foldable Creations' community, provides you with a growing library of exclusive ad-free video tutorials, printable PDF patterns and more so you can improve your skills and enjoy crafting in your own time.
Skill Level
★★☆☆☆ (Easy)
Materials Needed
One sheet of square paper, ideally 6x6 inches, but you can adjust the size based on your needs
Paper Size Options
- 6x6 inch (15cm x 15cm) paper: Results in approximately 3 inch (7cm) wide heart, a great size for cards or small decorations.
- Larger paper: Use 8x8 inches (20cm x 20cm)or bigger if you want to make a larger heart for framing or as a standalone decoration.
Paper Type & GSM
- For clean, crisp folds, use origami paper or lightweight paper around 60-80 GSM. Heavier paper may result in bulkier folds that don't lie flat.

Video Tutorial
Struggling with a tricky fold or want to see it done in real time?
You're not alone - that's why we created a full step-by-step video tutorial for this design inside The Fold Collective (an Easy Foldable Creations exclusive community).
We guide you through each fold at a pace that's easy to follow, so you can fold along with confidence and enjoy the process.
Joining gives you access to this video tutorial and a growing library of exclusive tutorials - all designed to inspire you, help you improve, and make folding even more fun.
The Fold Collective is more than just exclusive video tutorials and printable PDF patterns.
It's about building a thriving community of paper crafters from all over the world.
If you want to be part of something special, and gain access to a growing library of exclusive tutorials, join The Fold Collective and start folding today.
Prefer the step-by-step photo tutorial instead?
No problem - the full photo guide is waiting just below.
Instructions
Step 1: Start with the color you want your heart to be facing up.
Step 2: Fold the paper in half from top to bottom.
Step 3: Unfold previous step.
Step 4: Fold the paper in half from left to right.

Step 5: Unfold previous step.
Step 6: Flip your paper over.
Step 7: Fold the top right point down to meet the bottom left point.
Step 8: Unfold previous step.

Step 9: Fold the top left point down to meet the bottom right point.
Step 10: Unfold previous step.
Step 11: Following the existing creases, collapse the paper in on itself to form a triangle. To do this, gently pinch the sides of the paper, bringing the top points to meet the bottom points. Crease well.

Step 12: Fold the top point down to meet the bottom edge.
Step 13: Lift the paper up 90 degrees.

Step 14: Gently open out the paper as shown in the picture.

Step 15: Working on the triangle on the left side of the paper: Fold the bottom right edge of the left triangle (shown by the blue arrow below in the image) to align with the top right edge of the triangle (shown by the red arrow below in the image).
Then fold the top point of the edge you just folded down to meet the centre point of the paper.

Step 16: Still working on the triangle on the left side: Fold the small triangle found in the middle down.
Step 17: Now we will do the same thing but on the right triangle.
Working on the triangle on the right side of the paper: Fold the bottom left edge to align with the top left edge of the triangle. Then fold the top point of the edge you just folded up to meet the centre point of the paper.
Step 18: Still working on the triangle on the right side: Fold the small triangle found in the middle down.

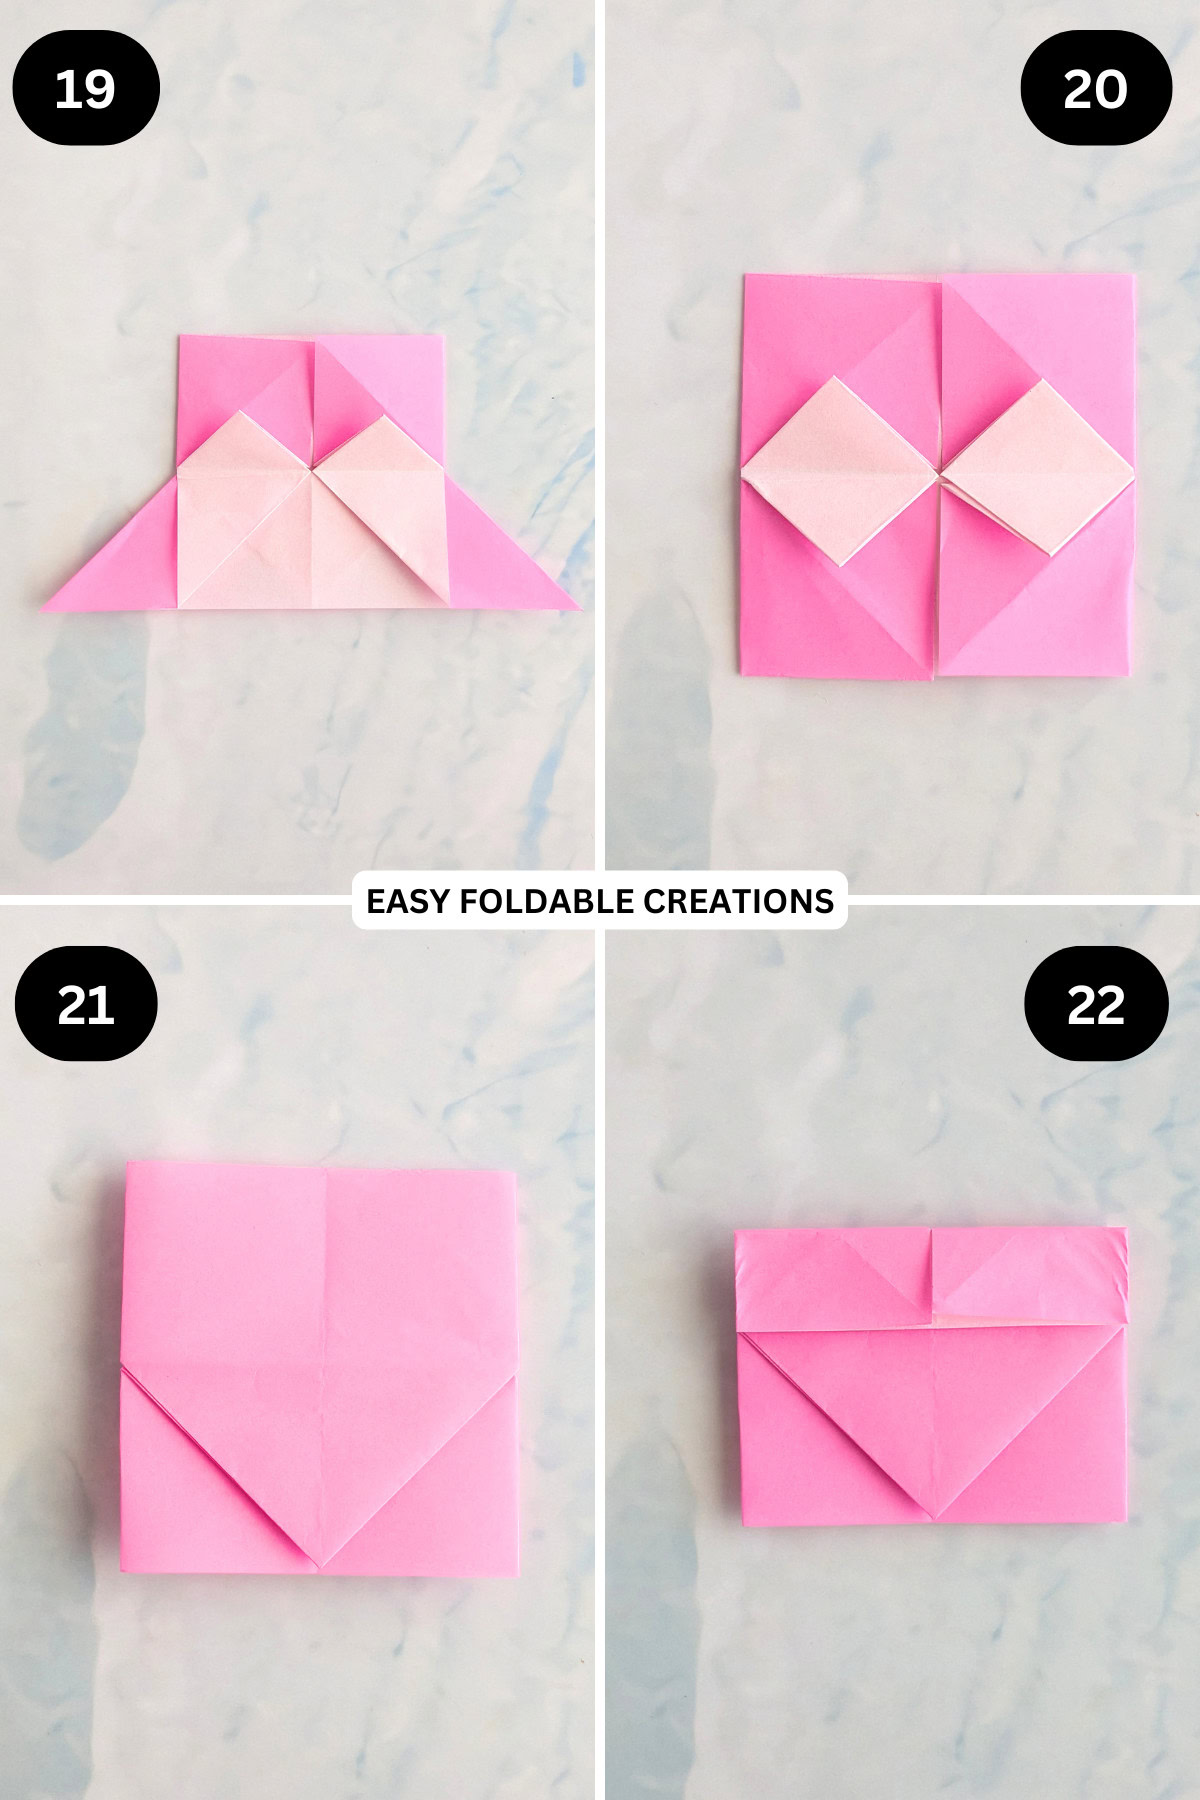
Step 19: Rotate your paper 180 degrees.
Step 20: Repeat steps 15 to 18.
Step 21: Flip your paper over from left to right.
Step 22: Fold the top edge down to meet the middle crease.
Step 23: Lift the top edge you just folded down by 90 degrees.
Step 24: Gently open out the top edge and squash the left and right corners towards the centre.
Step 25: Fold the inner corners of the top down on a diagonal.
Step 26: Fold the top 2 points down slightly.

Step 27: Fold the bottom point (top layer only) up along the middle crease.
Step 28: Fold the bottom left corner up to meet the middle.
Step 29: Fold the bottom right corner up to meet the middle.
Step 30: Unfold previous 2 steps.

✨ You're almost there! ✨
To unlock the final steps of the photo tutorial and complete your pattern, create a free account with Grow.me. below.
Make sure you tick the box to subscribe to our newsletter and stay up to date with the latest patterns, tips, and more!
Once you're signed up, you'll get instant access to finish your project with the photo tutorial and enjoy exclusive content in the future.
Already signed up? Hit the button below and select 'Switch to Log In' to pick up where you left off and finish your project!
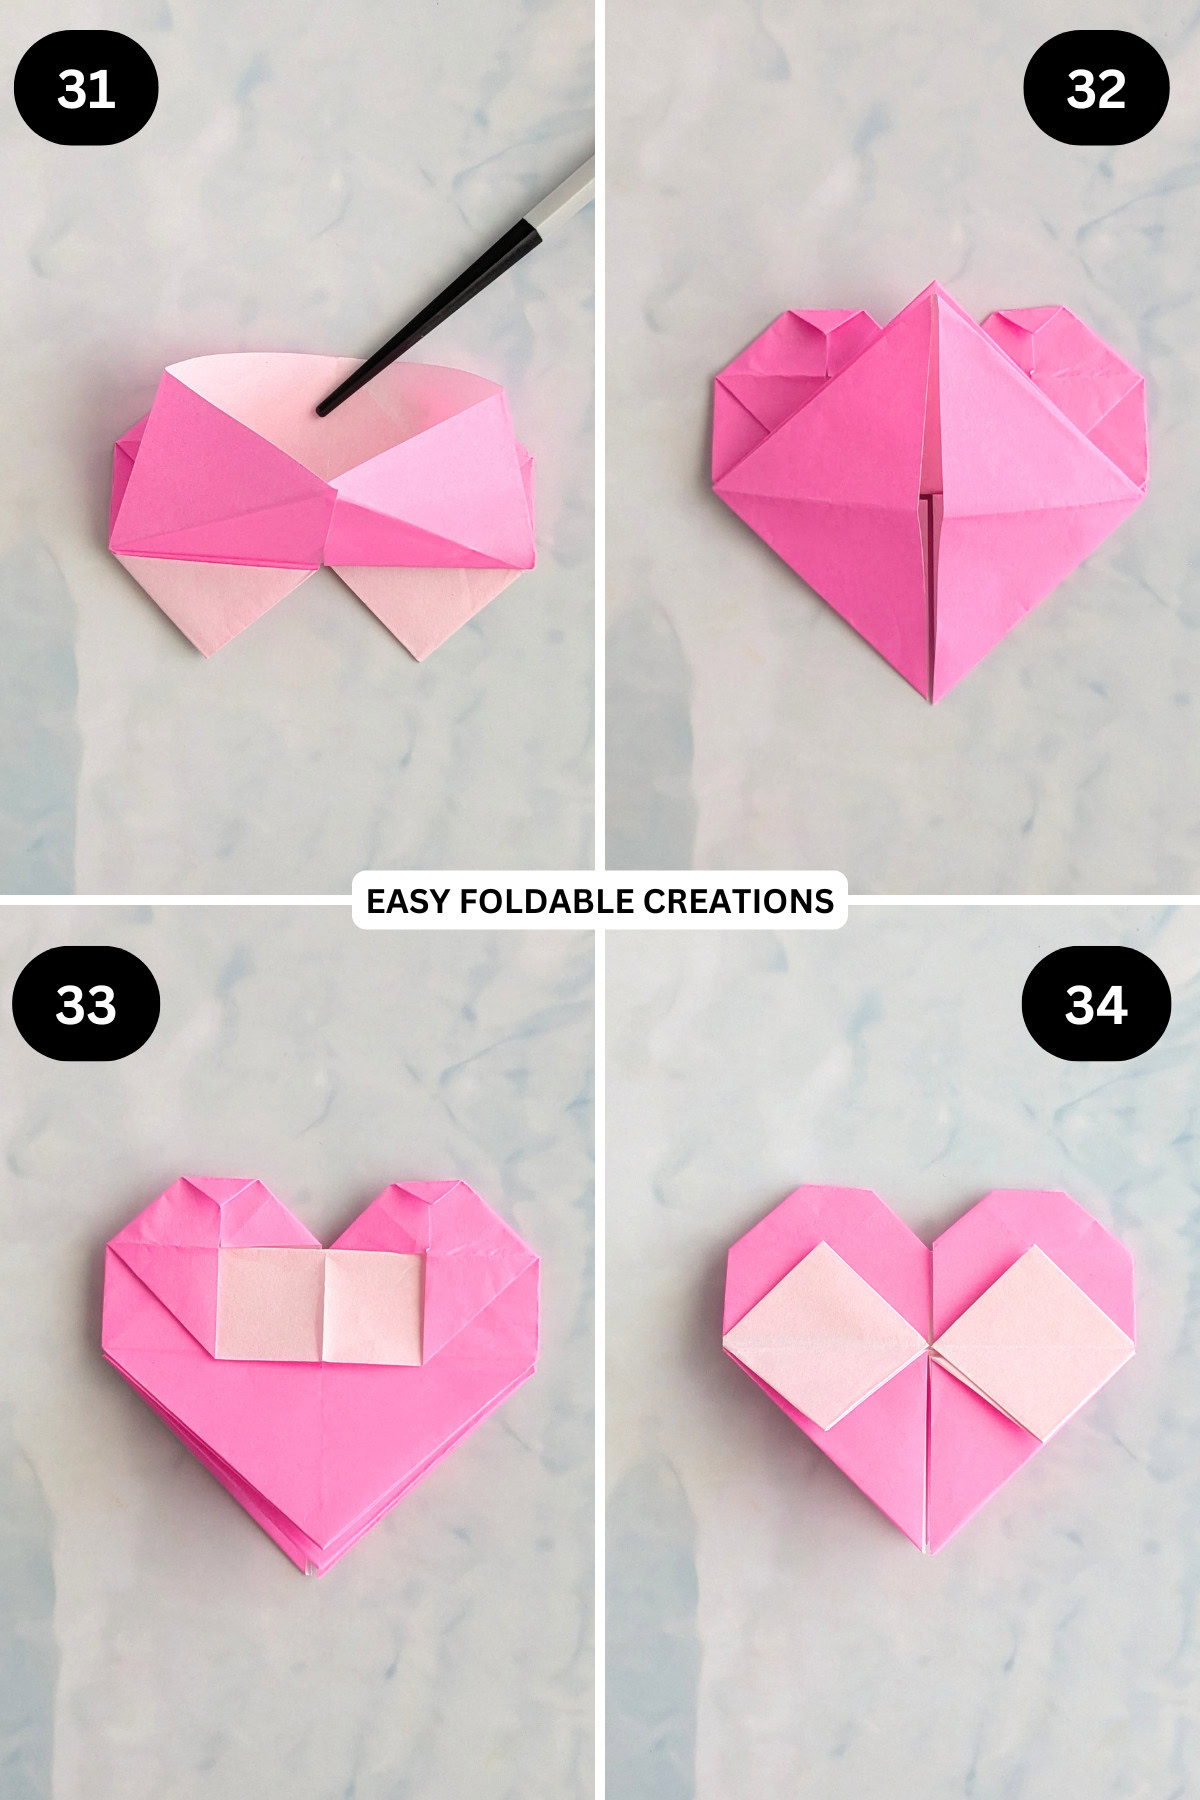
Step 31: Bring the bottom edge of the paper up (top layer only).
Step 32: Refold along the creases you made in steps 27 and 28.
Step 33: Fold the top triangle down.
Step 34: Flip your heart over from left to right.
Step 35: Fold the inner edges (top layer only) of the paper out, aligning their edges with the bottom triangles.
Step 36: Lift the triangles 90 degrees and open them slightly.
Step 37: Gently open out the bottom 2 flaps. Completed origami heart with bow.

Tips For Success
- Use a Bone Folder: This will help make clean, sharp folds, especially around the bow.
- Fold Slowly and Carefully: The bow detail requires some precision; take your time aligning each fold.
- Experiment with Double-Sided Paper: Double-sided paper will add a layered effect, with contrasting colors for the heart and bow.

Common Mistakes & How To Avoid Them
- Misaligned Folds: Be sure to align each fold precisely, especially when forming the bow.
- Paper Tearing: Avoid using thick paper, as it may tear along the creases. Lightweight paper will work best.
- Bulky Bow: Press the bow folds gently to prevent bulkiness, especially if you're using it as a card decoration.
Color, Paper Ideas, and Variations
- Color Themes: Red, pink, or purple work wonderfully for Valentine's Day. Soft pastels look great for Mother's Day, and festive colors like green, red, and gold can make this heart with a bow a beautiful Christmas decoration.
- Patterned Paper: Experiment with patterned or textured paper for a unique look, or use metallic paper for a more elegant finish.
- Personalized Touches: Add a little message on the bow or a small sticker for extra charm. This small addition can add personality and make your origami heart even more special.
FAQ
Yes, but lightweight origami paper or wrapping paper will make folding easier, especially for the bow detail.
If you use regular printer paper, cut it into a square first.
Attach it to a card, include it in a scrapbook, or make a series of these hearts for a lovely garland.
Other Paper Crafts You Might Like To Try:
Helpful Origami Tips
If you're curious to learn more about origami, you might like to look at our basic guides on how to make some common origami folds.
Start with the valley fold and mountain fold-these are the foundation of most origami models.
Once you're comfortable, you might like to try the petal fold for 3D shapes, and explore the bird base and square base for more complex designs.
The water bomb base is also great for creating inflatable or geometric models, like this inflatable origami rabbit.
Useful Paper Craft Terms
Want to learn a little more about paper crafts and origami?
We've made this helpful printable just for you. It explains common terms and helpful tips you might come across when you are folding origami or making a paper craft project.
You can download the useful paper craft terms printable PDF here.
Stay Connected
Made this pattern? Let us know how it went in the comments below!
Pin this post - Pin now to take your paper crafting skills to the next level.
Share on Instagram or Facebook - Capture the beauty of your finished paper craft project and share it on Instagram or Facebook! Tag us @easyfoldablecreations so we can see your work!

Other Patterns You Might Like To Try:
Looking for other easy patterns like this? Try these:


Sherrill says
Is there a video of folding this heart?
Emily says
Hi Sherrill,
Yes, you can find the video tutorial for this origami heart as well as other video tutorials in The Fold Collective (Easy Foldable Creation's new community).