
Give your gifts a fresh, eye-catching look with this easy two toned gift wrapping idea.
Using just two contrasting wrapping papers and a simple finishing touch, your presents will stand out for any occasion!
Jump to:
- Why You'll Love This Pattern
- Exclusive Content Just For You
- Skill Level
- Materials Needed
- Instructions
- Tips For Success
- Common Mistakes & How To Avoid Them
- Color, Paper Ideas, and Variations
- FAQ
- Other Paper Crafts You Might Like To Try:
- Helpful Origami Tips
- Useful Paper Craft Terms
- Stay Connected
- Other Patterns You Might Like To Try:
- Comments
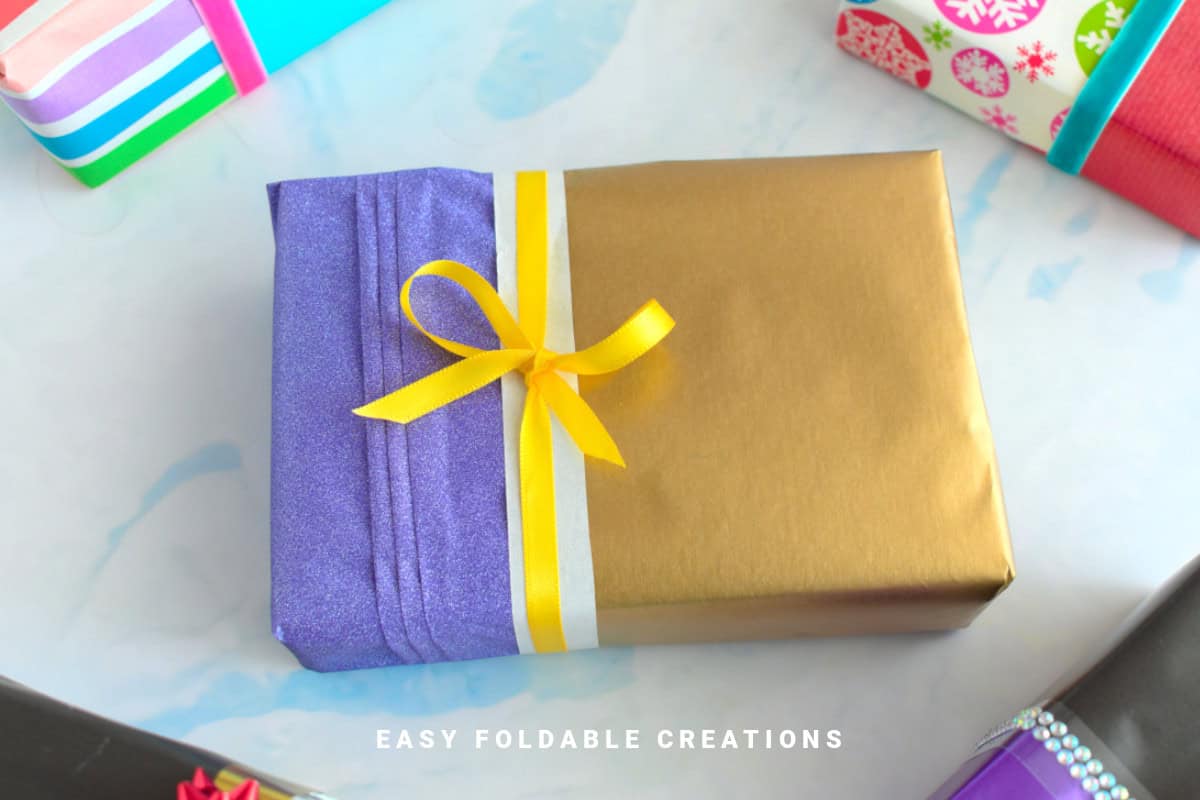
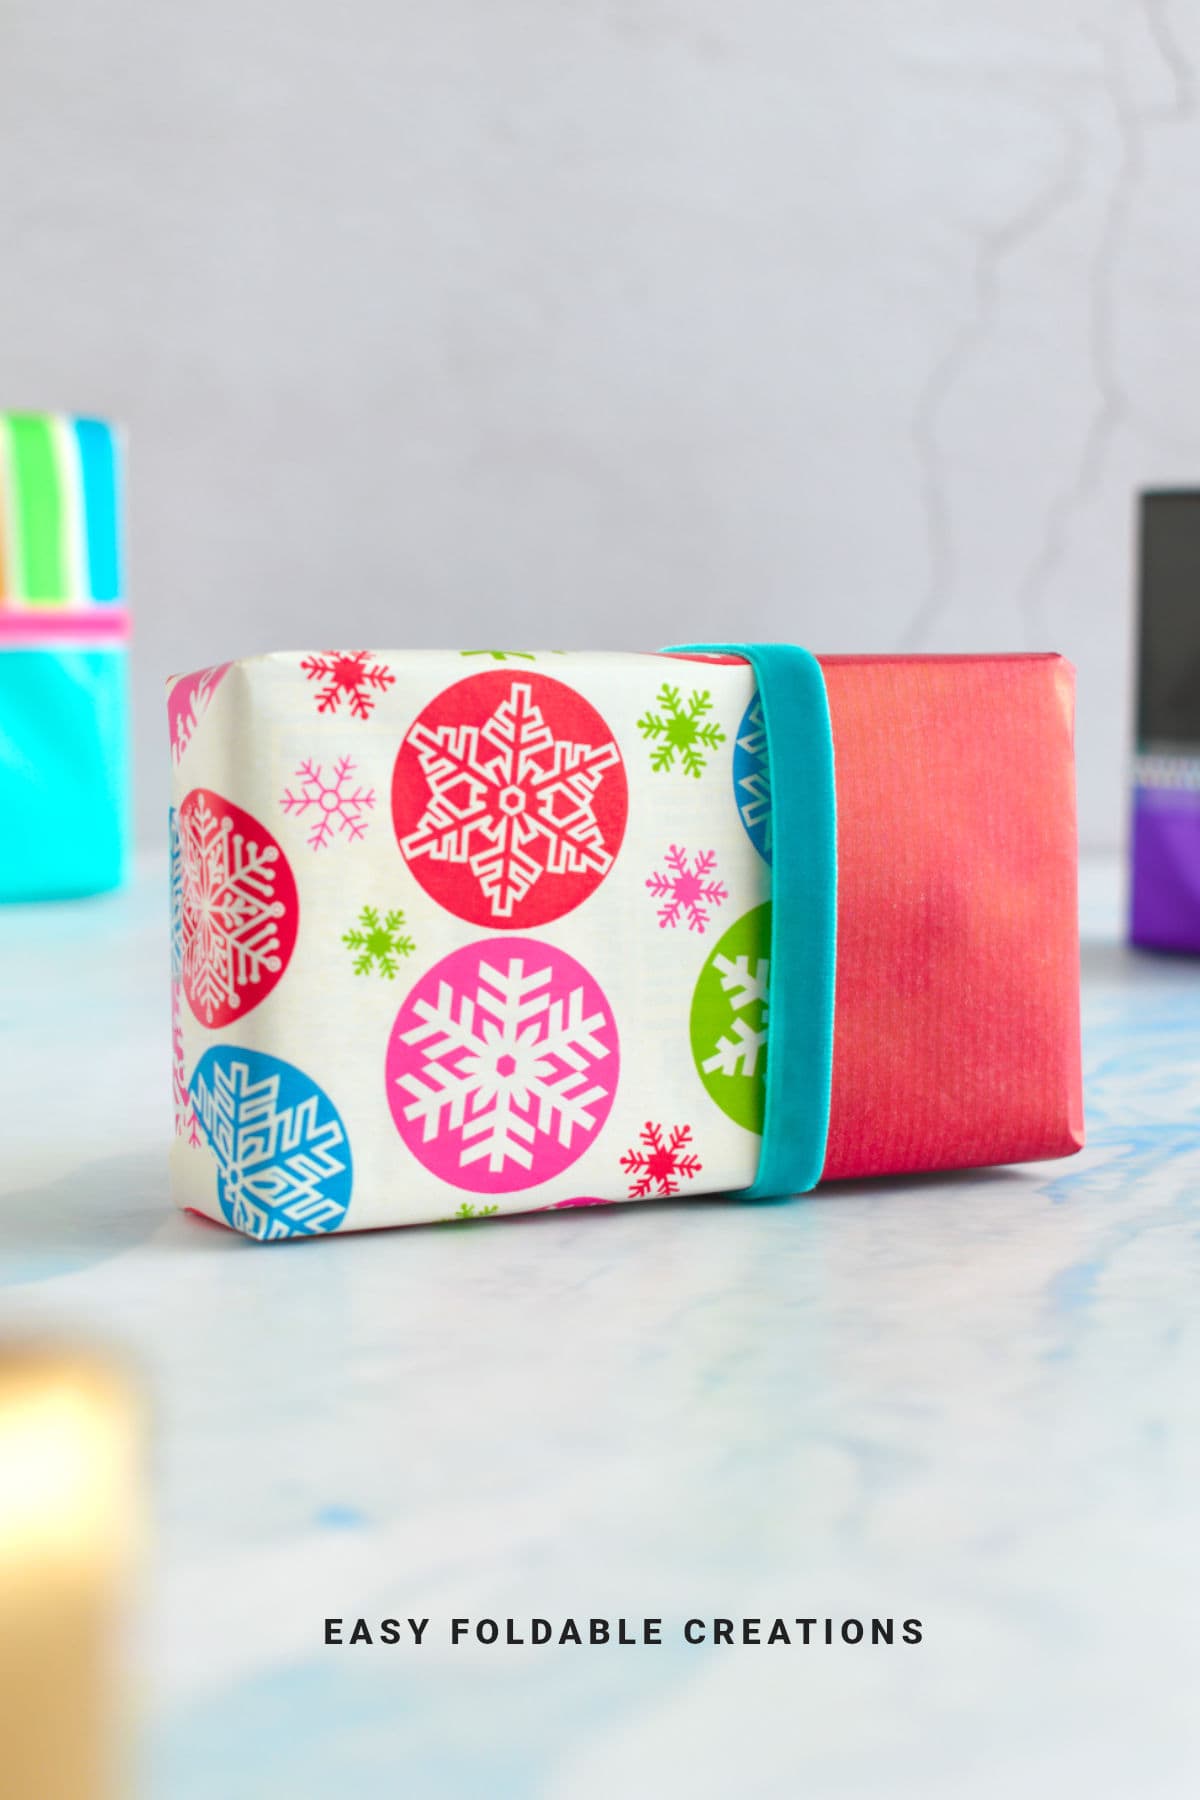
Two toned gift wrapping is a clever and simple way to add style and personality to your presents.
A two-toned gift wrapping idea is a decorative packaging technique that uses two contrasting colors or papers to wrap a gift. It is commonly used for birthdays, celebrations, and stylish gift presentation, and focuses on visual contrast for effect.
By combining two different types or colors of wrapping paper - especially contrasting patterns or shades-you create a bold, beautiful look that instantly elevates any gift.
This technique works perfectly for rectangle, square, or cube-shaped gifts like books, boxes, or even candle sets.
Whether you're wrapping for birthdays, Christmas, wedding gifts, anniversaries, baby shower gifts, or other celebrations, the two toned gift wrapping idea makes your present look thoughtful and polished without requiring extra fancy materials or complicated steps.
Plus, you can customize it to match the recipient's favorite colors or the theme of your event, making each gift truly unique.
For a classic look, try pairing kraft brown paper with white or gold accents - perfect for rustic weddings or cozy Christmas gifts.
Bright, contrasting colors like navy and coral bring a fresh, modern vibe ideal for birthdays or baby showers.
You can also mix metallics with pastels for an elegant touch that suits anniversaries and special celebrations.
Why You'll Love This Pattern
- It's a simple way to make your gifts look professionally wrapped and stylish.
- Uses basic materials you likely already have at home.
- Allows for endless customization with patterns, colors, and textures.
- Works for a variety of gift shapes and sizes.
- Perfect for any occasion, from birthdays to holidays and everything in between.
- The finishing touch-like a ribbon, washi tape, or a paper strip-gives a clean, polished finish.
Exclusive Content Just For You
Not sure what you want to make next, but feeling a bit creative? Or maybe you've been searching for a pattern that sparks something new. We've got a few ideas waiting for you.
The Fold Collective, Easy Foldable Creations' community, provides you with a library of exclusive ad-free video tutorials, printable PDF patterns, helpful tips, and more so you can improve your skills and enjoy crafting in your own time.
Skill Level
★☆☆☆☆ (Easy)
Materials Needed
- Two different types of wrapping paper (choose contrasting colors or patterns)
- Tape (regular or double-sided)
- Scissors
- Ribbon, washi tape, or a strip of wrapping paper to cover the join
- Your gift!
Instructions
Step 1: Using your first wrapping paper: Cut your wrapping paper to size.
You want the bottom edge to have enough that it can fold up just about a quarter of the gift.
Both the left and right sides of the gift should be at least the width and a quarter of the gift (to account for the sides of the gift) and it should be as long as how far up you want it to go (with a little bit extra as you will be covering it slightly with the other gift wrap).
Step 2: Fold the left edge over to cover your gift, then bring the right side of the paper over to cover your gift, overlapping the left slightly.
Tape along the middle of the gift as well as the bottom section. If you want to hide the tape, you could use double sided tape.
Step 3: Using your fingers, run them along the bottom edge of your gift. Then bring the paper down as shown.
Step 4: Straighten out the bottom sides of the paper as shown. Make sure they align with the sides of the gift.
Step 5: Fold the bottom sides in.
Step 6: Next, fold the bottom edge up (note; if you think your bottom edge is a bit too long, you can trim it down slightly) and secure it with tape.
You don't want the bottom edge to go over the top of the gift.
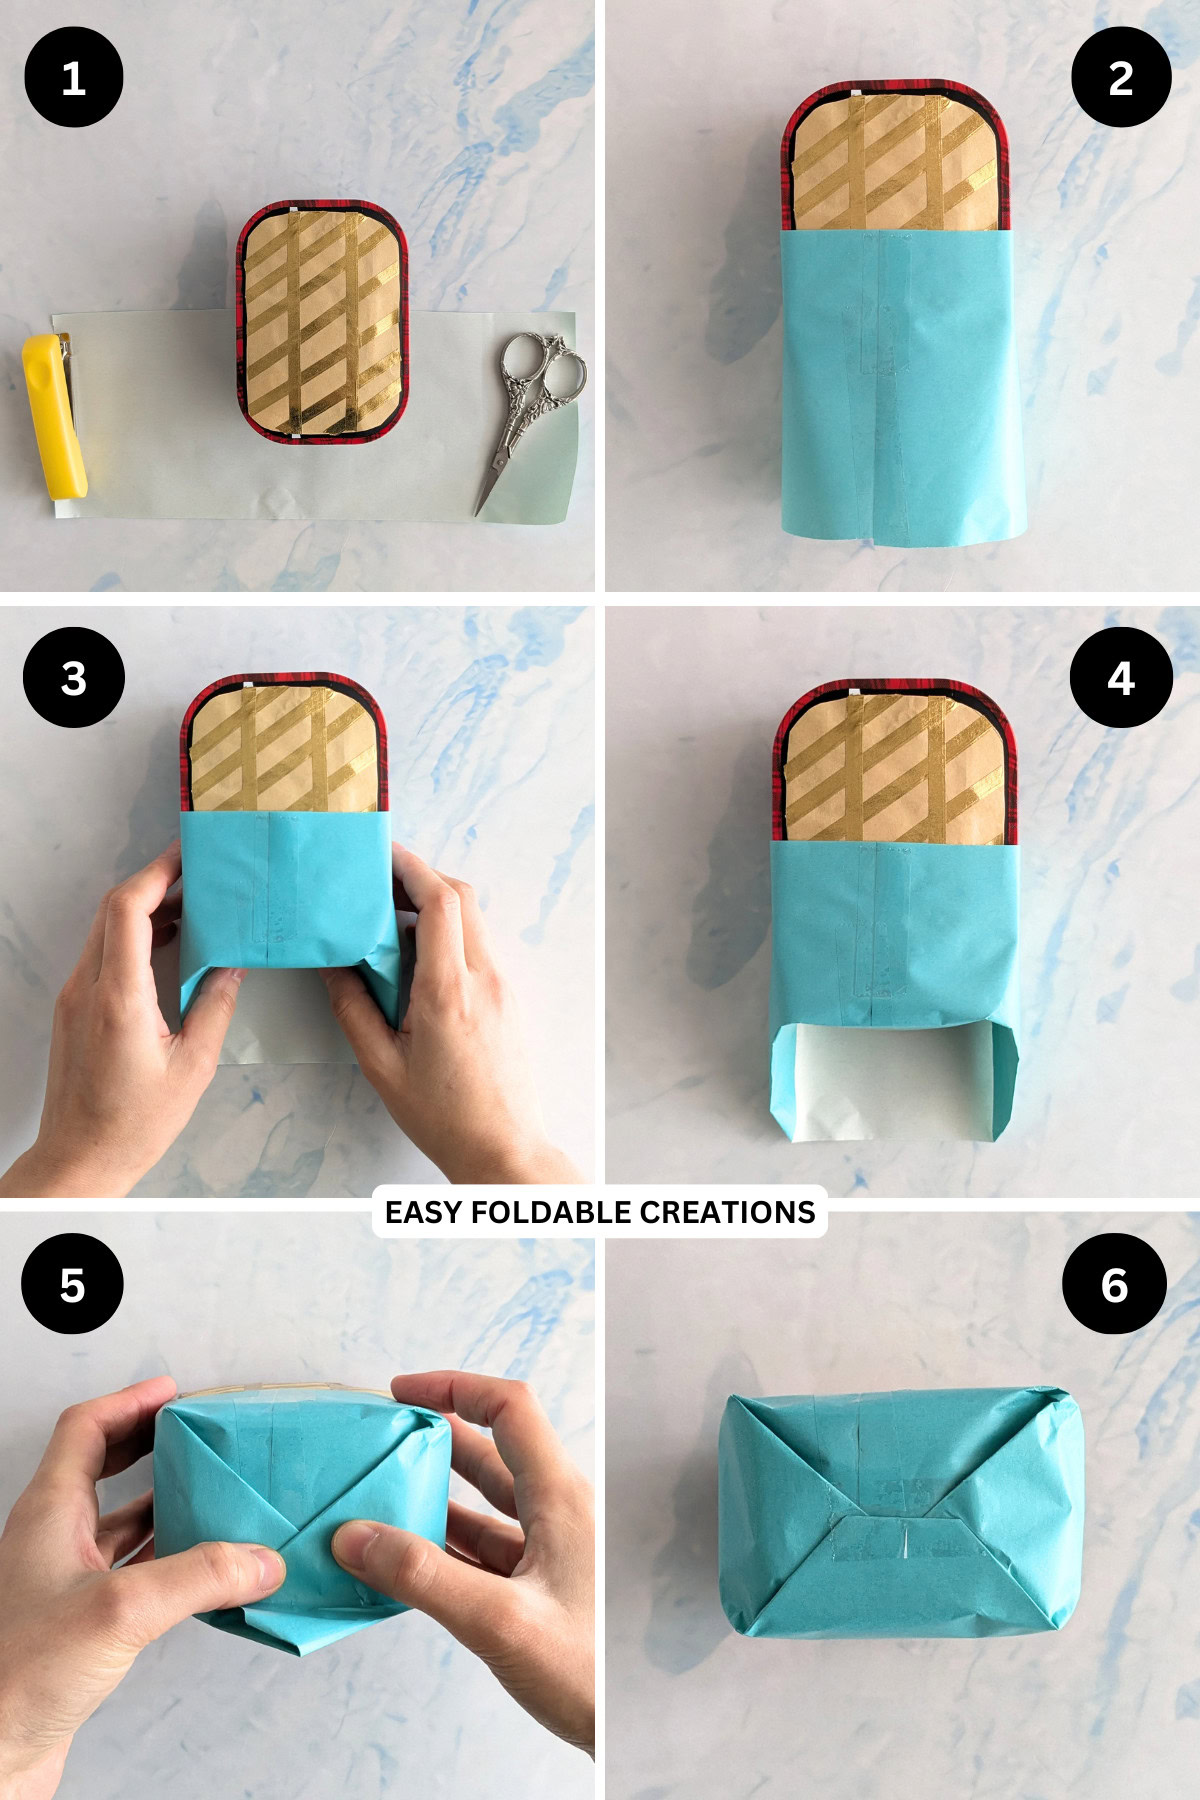
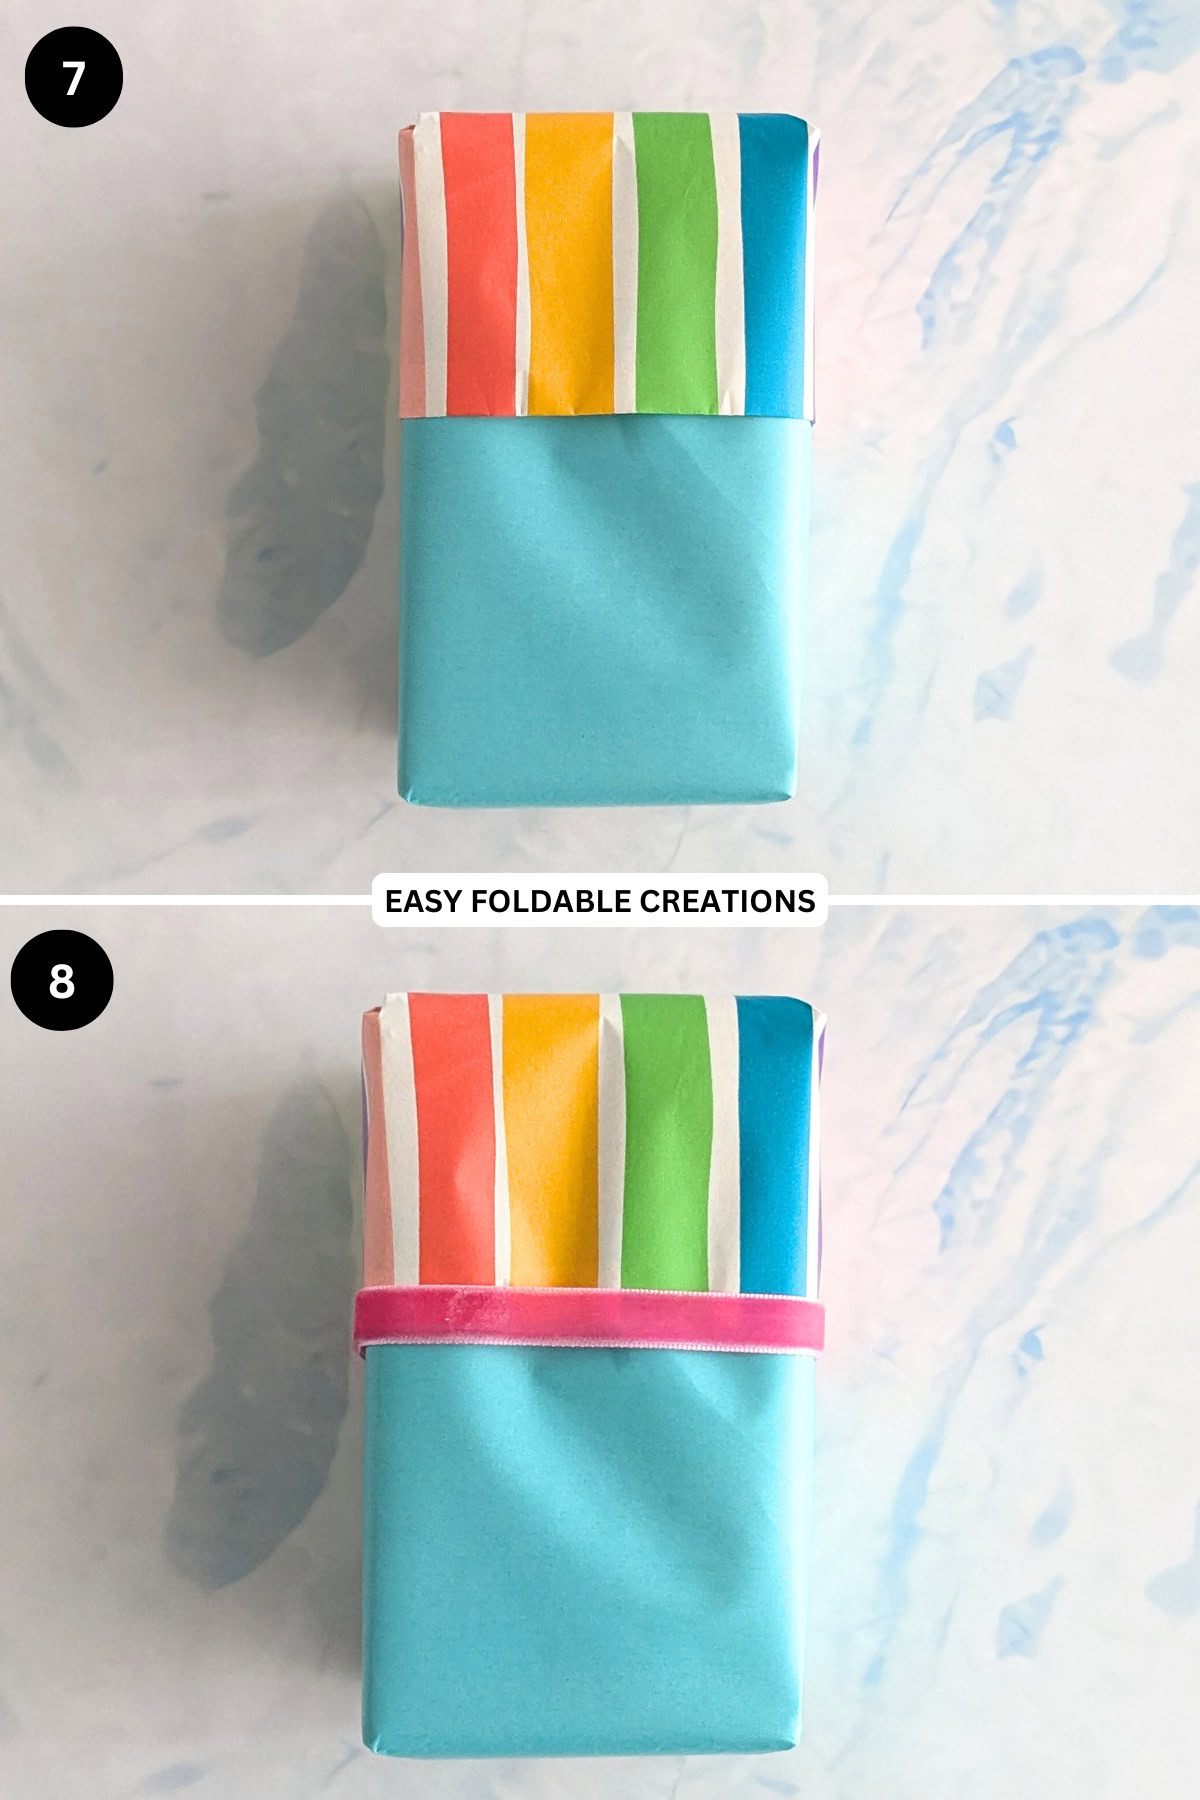
Step 7: Using your second wrapping paper: Cut it to size, overlapping it slightly with the already wrapped part of the gift. Then complete steps 2 to 6.
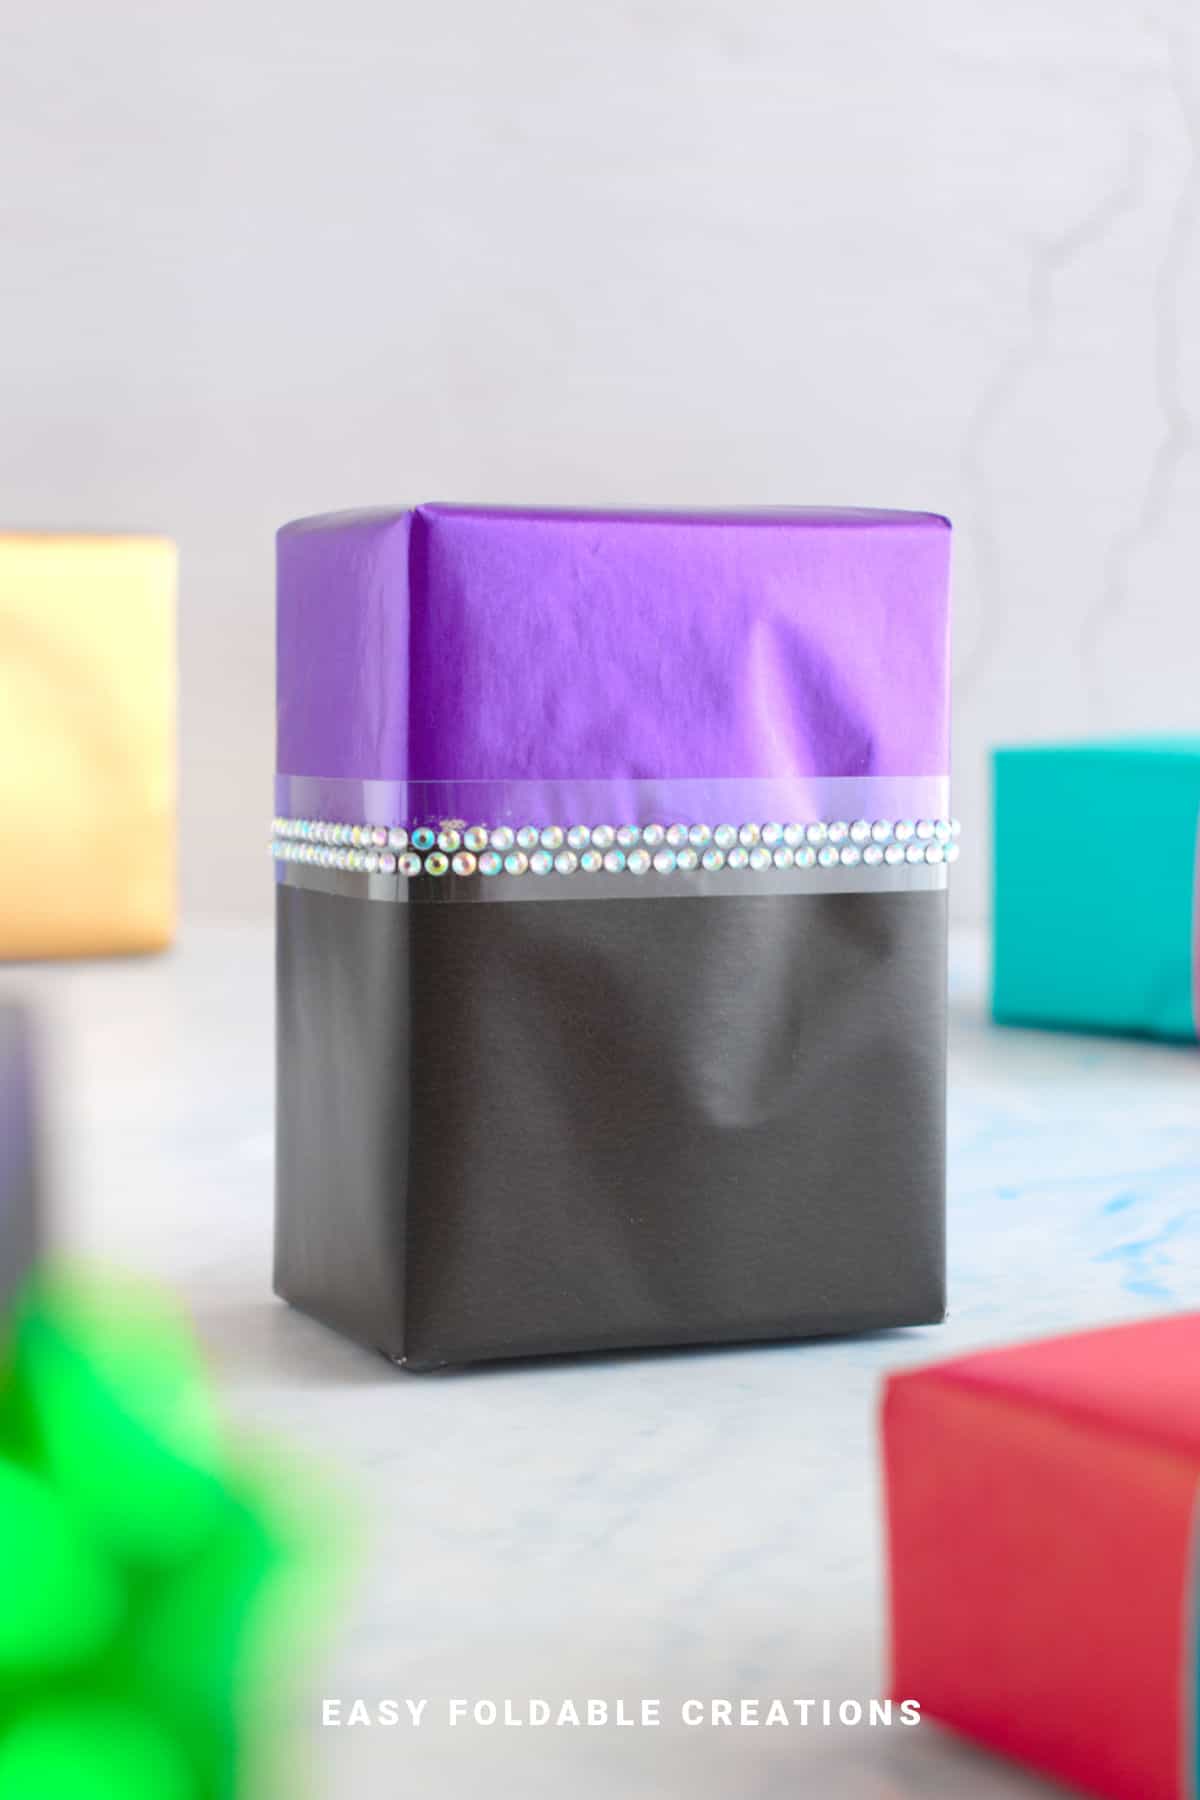
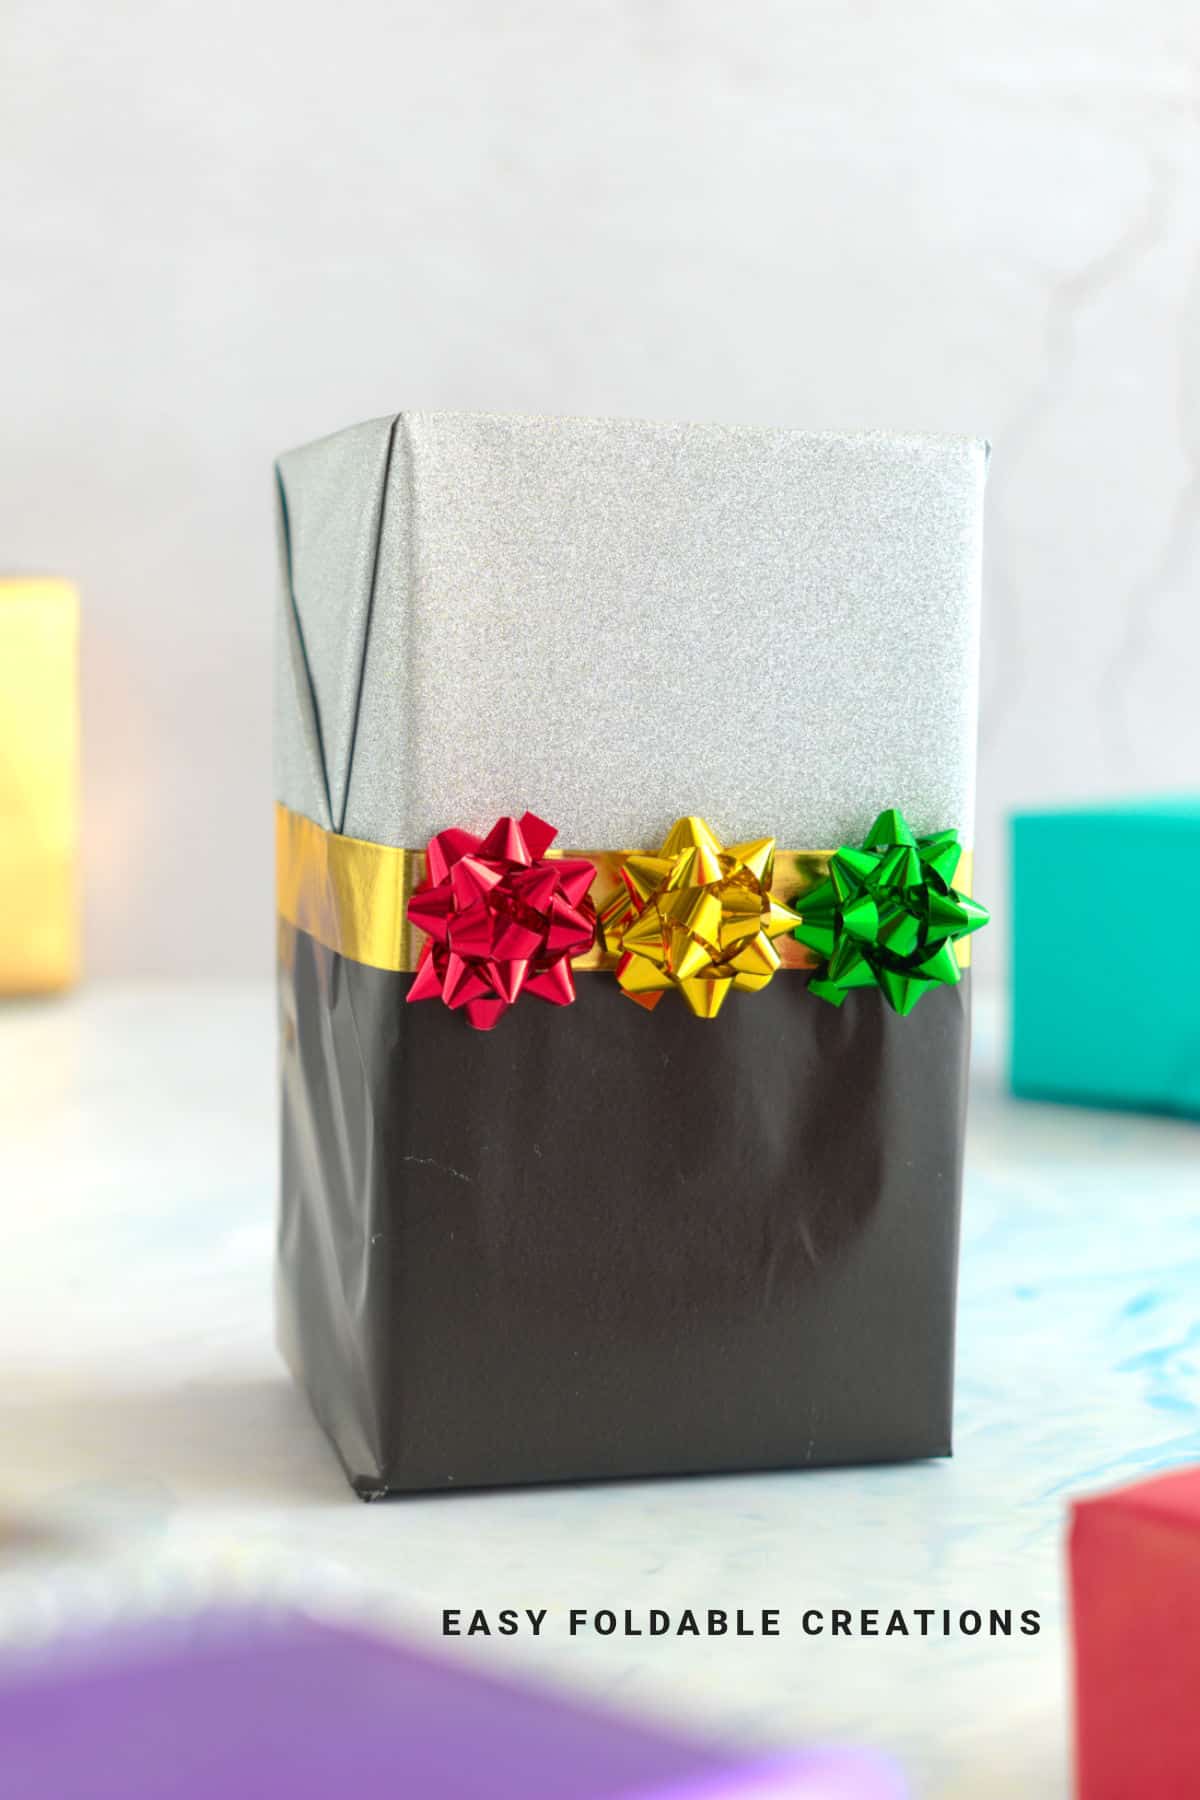
Step 8: To cover the join of the wrapping papers you could use some washi tape, ribbon, or even another strip of wrapping paper. It's up to you.
Decorate your gift as you like. Completed wrapping.
Tips For Success
- Choose wrapping papers that complement each other but contrast enough to stand out.
- Use double-sided tape for a cleaner finish.
- Add a decorative ribbon or washi tape that matches one of the papers for cohesion.
- Keep edges neat by folding carefully before taping.
Common Mistakes & How To Avoid Them
- Using very similar colors: this can make the two toned effect less noticeable. Opt for clear contrasts.
- Wrapping papers that are too thick or too thin: pick papers with similar weights to avoid bunching or tearing.
Color, Paper Ideas, and Variations
- Metallic silver paper combined with deep navy creates a sleek modern look.
- Kraft paper paired with floral print adds rustic charm.
- Glossy red and matte white for Christmas-themed gifts.
- Pastel pink with gold polka dots for baby showers.
- Use textured papers like linen or embossed to add extra dimension.
FAQ
Ideally not. It works best on flat shapes like rectangles or squares. But if you want, you could put the irregular shaped gift in a box and then wrap it in a box.
No, washi tape or a strip of matching paper works just as well and can be easier to apply. It looks neater when you cover the join.
Absolutely. Just make sure you have enough wrapping paper for full coverage and neat folds.
Other Paper Crafts You Might Like To Try:
Helpful Origami Tips
If you're curious to learn more about origami, you might like to look at our basic guides on how to make some common origami folds.
Start with the valley fold and mountain fold-these are the foundation of most origami models.
Once you're comfortable, you might like to try the petal fold for 3D shapes, and explore the bird base and square base for more complex designs.
The water bomb base is also great for creating inflatable or geometric models, like this inflatable origami rabbit.
Useful Paper Craft Terms
Want to learn a little more about paper crafts and origami?
We've made this helpful printable just for you. It explains common terms and helpful tips you might come across when you are folding origami or making a paper craft project.
You can download the useful paper craft terms printable PDF here.
Stay Connected
Made this pattern? Let us know how it went in the comments below!
Pin this post - Pin now to take your paper crafting skills to the next level.
Share on Instagram or Facebook - Capture the beauty of your finished paper craft project and share it on Instagram or Facebook! Tag us @easyfoldablecreations so we can see your work!
Other Patterns You Might Like To Try:
Looking for other easy patterns like this? Try these:
- DIY Wedding Table Number Ideas Using Paper
- DIY Paper Wedding Place Card Ideas You Can Make Yourself
- Gift Wrapping Topper Ideas
- Last Minute Gift Wrapping Ideas That Still Look Beautiful and Thoughtful
- Gift Wrapping Ideas For Oddly Shaped Gifts
- DIY Gift Box Ideas
- Restaurant Style Napkin Folding Ideas You Can Do At Home
- Crown Napkin Fold


Comments
No Comments