
Looking for a simple yet festive DIY project?
This easy Christmas origami ornament is fun to fold, quick to make, and a lovely way to add a handmade touch to your tree.
Great for kids, adults, and anyone who loves easy paper crafts!
Jump to:
- Why You'll Love This Pattern
- Exclusive Content Just For You
- Skill Level
- Materials Needed
- Video Tutorial
- Instructions
- Tips For Success
- Color, Paper Ideas, and Variations
- FAQ
- Other Paper Crafts You Might Like To Try:
- Helpful Origami Tips
- Useful Paper Craft Terms
- Stay Connected
- Other Patterns You Might Like To Try:
- Comments
Looking to add a creative, handmade twist to your Christmas decorations this year?
This easy Christmas origami ornament is a quick, fun, and satisfying project that anyone can try-no fancy supplies or experience required.
Whether you're new to paper folding or just want a relaxing craft to do while sipping hot cocoa, this one is perfect for you.
With just one sheet of paper and a few simple materials, you can create a festive ornament that's ideal for all sorts of holiday uses.
Hang a few on your tree, use them as unique gift toppers, string several together to make a garland, or even set them at each place setting on your Christmas table.
They also make a sweet and simple gift to tuck into a card or hand out to classmates and coworkers.
This is a great craft for all ages too-kids will love picking their paper and seeing their ornament take shape.
Plus, it's an easy way to repurpose old wrapping paper or make use of extra craft supplies you've got lying around.
Whether you're going for something bright and fun or traditional and cozy, this project is endlessly adaptable.
And while these are perfect for Christmas, you could easily adapt them for other occasions too-try pink and red versions for Valentine's Day, pastel shades for Easter, purple and green for Halloween, or even metallics for weddings and New Year's celebrations.
However you style it, this little paper ornament is a simple way to bring some joy to your seasonal crafting.
Other easy to make Christmas paper crafts you might like to try include this cute origami Santa, Christmas stocking napkin fold, easy 2D origami Christmas tree, or lucky star origami Christmas tree.

Why You'll Love This Pattern
- Beginner-friendly - No special skills needed, just some simple folding and a few supplies.
- Quick and satisfying - Makes a beautiful result in very little time.
- Customizable - Choose any paper style or size to match your theme.
- Great for tree decorations, gifts, garlands, or party favours.
- Kid-friendly - Easy enough for little hands with a bit of help.
- Budget-friendly - A lovely way to decorate using what you already have.
Exclusive Content Just For You
Not sure what you want to make next, but feeling a bit creative? Or maybe you've been searching for a pattern that sparks something new. We've got a few ideas waiting for you.
The Fold Collective, Easy Foldable Creations' community, provides you with a growing library of exclusive ad-free video tutorials, printable PDF patterns and more so you can improve your skills and enjoy crafting in your own time.
Skill Level
Difficulty: ★★☆☆☆ (Easy)
Materials Needed
- 1 sheet of paper (origami paper, wrapping paper, or craft paper)
- Tape or glue
- Ribbon or string (for hanging)
| Paper Size | Final Origami Ornament Size | |
| Small Origami Ornament | 3 inches x 3 inches (7.5 cm x 7.5 cm) | 1 inch x 1.5 inches (2.5 cm x 3 cm) |
| Medium Origami Ornament | 6 inches x 6 inches (15 cm x 15 cm ) | 2 inches x 3 inches (5 cm x 7.5 cm) |
| Large Origami Ornament | 8 inches x 8 inches (20 cm x 20 cm) | 3 inches x 4 inches (7.5 cm x 10.5 cm) |

Video Tutorial
Struggling with a tricky fold or want to see it done in real time?
You're not alone - that's why we created a full step-by-step video tutorial for this design inside The Fold Collective (an Easy Foldable Creations exclusive community).
We guide you through each fold at a pace that's easy to follow, so you can fold along with confidence and enjoy the process.
Joining gives you access to this video tutorial and a growing library of exclusive tutorials - all designed to inspire you, help you improve, and make folding even more fun.
The Fold Collective is more than just exclusive video tutorials and printable PDF patterns.
It's about building a thriving community of paper crafters from all over the world.
If you want to be part of something special, and gain access to a growing library of exclusive tutorials, join The Fold Collective and start folding today.
Prefer the step-by-step photo tutorial instead?
No problem - the full photo guide is waiting just below.
Instructions
Step 1: Start with the color you want on the main part of your bauble to be facing down.
Step 2: Fold the top edge down to meet the bottom edge.
Step 3: Unfold previous step.
Step 4: Fold the bottom edge up to meet the middle crease.

Step 5: Unfold previous step.
Step 6: Fold the bottom edge up once again, but this time to meet the crease you made in step 4.
Step 7: Unfold previous step.
Step 8: Rotate your paper 180 degrees so the creases you just made are now on the top. Then, repeat steps 4 to 7.

Step 9: Rotate your paper 90 degrees as shown. Your creases should now run vertically.
Step 10: Fold the bottom edge up to meet the top edge.
Step 11: Unfold previous step.
Step 12: Fold both the top edge and bottom edge to meet the middle crease (the one you made in step 10.

Step 13: Unfold previous step.
Step 14: Flip your paper over from left to right.
Step 15: Fold the bottom edge up to meet the line shown (1st horizontal crease from the top)

Step 16: Fold the same flap down along the line shown.
Step 17: Fold the top edge down to meet the bottom edge.

Step 18: Fold the same flap up along the line shown.
Step 19: Flip your paper over and arrange it to sit as shown.
Step 20: Fold the bottom edge up along the 1st horizontal crease from the bottom.

Step 21: Open out the bottom section as shown.
Step 22: Fold the top flap (on the bottom section) down again.
Step 23: Fold inner right corner of the bottom section in on a diagonal to meet the middle crease.

Step 24: Fold the outer right corner of the bottom section in to meet the line shown.
Step 25: Repeat previous 2 steps for the left side.

Step 26: Fold the bottom section up along the line shown. Once folded, apply some glue to the points to hold the paper in place.
Step 27: Fold the bottom edge up once more to meet the line shown
Step 28: Unfold previous step.

✨ You're almost there! ✨
To unlock the final steps of the photo tutorial and complete your pattern, create a free account with Grow.me. below.
Make sure you tick the box to subscribe to our newsletter and stay up to date with the latest patterns, tips, and more!
Once you're signed up, you'll get instant access to finish your project with the photo tutorial and enjoy exclusive content in the future.
Already signed up? Hit the button below and select 'Switch to Log In' to pick up where you left off and finish your project!
Step 29: Repeat steps 20 to 28 for the top edge.
Step 30: Flip your paper over from left to right.
Step 31: Fold all corners in to meet the middle. Then arrange the paper to sit as shown.
Step 32: Fold both the left and right points in as shown. Once folded, apply a bit of glue underneath to hold the paper in place.

Step 33: Attach a string or ribbon to the back of your ornament so you can hang it.
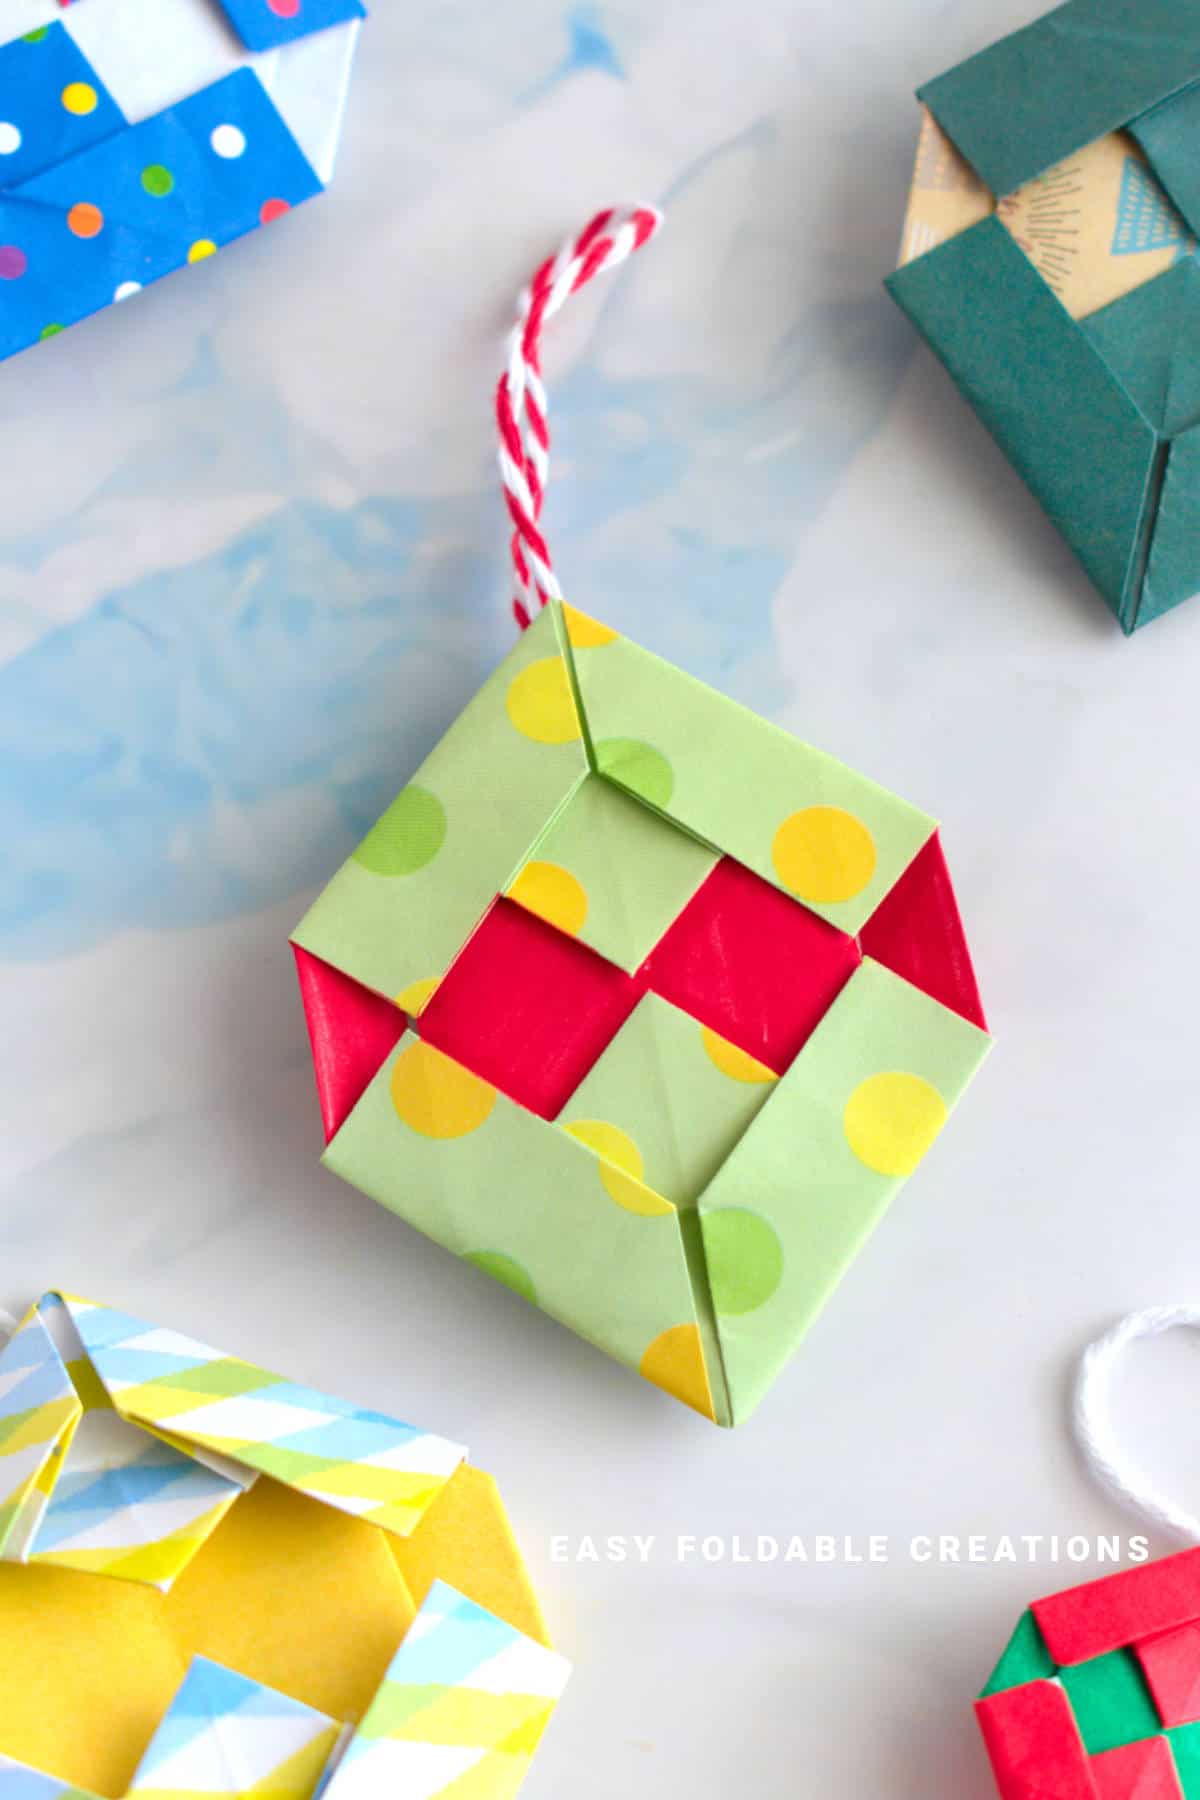
Step 34: Flip your paper over from left to right. Completed ornament.
Tip: if you want the back of your ornament to look neater, trace around the ornament and cut out a piece of paper. Then glue that piece onto the back. Or, you could make another ornament in the same size and glue that on the back instead.

Tips For Success
- If you're using thicker paper, crease your folds firmly for a clean finish.
- Wrapping paper works well and gives a festive look, but be gentle-it can tear easily.
- Try double-sided paper for a nice contrast when the ornament hangs.
- Add small decorations like glitter glue, stickers, or handwritten messages.
- You can scale the ornament up or down depending on the size of your paper.
- If your ornament comes apart, you may need to add a bit of glue or double sided tape (this could happen if you use paper that is too thick).

Color, Paper Ideas, and Variations
- Traditional Christmas prints - Use classic red, green, gold, or plaid wrapping paper.
- Try kraft paper, black and white, or muted tones for a minimalist feel.
- Recycled paper - Old book pages, music sheets, or magazine paper work beautifully too.
- Kid-friendly options - Let kids decorate plain paper first, then fold into an ornament.
- Mini version - Use smaller square paper to make tiny ornaments for garlands.
- Different holidays - Switch the color scheme to fit Valentine's Day, Easter, or even birthdays.
FAQ
Yes! It's a great choice for practice or if you're crafting with kids.
Not at all-any square sheet of paper will do. Wrapping paper works great for a festive touch.
Definitely! Just supervise with scissors or any sharp folds. You can also pre-crease or prep the paper.
You can glue or tape a ribbon or string to the top, or punch a small hole if needed.
Other Paper Crafts You Might Like To Try:
Helpful Origami Tips
If you're curious to learn more about origami, you might like to look at our basic guides on how to make some common origami folds.
Start with the valley fold and mountain fold-these are the foundation of most origami models.
Once you're comfortable, you might like to try the petal fold for 3D shapes, and explore the bird base and square base for more complex designs.
The water bomb base is also great for creating inflatable or geometric models, like this inflatable origami rabbit.
Useful Paper Craft Terms
Want to learn a little more about paper crafts and origami?
We've made this helpful printable just for you. It explains common terms and helpful tips you might come across when you are folding origami or making a paper craft project.
You can download the useful paper craft terms printable PDF here.
Stay Connected
Made this pattern? Let us know how it went in the comments below!
Pin this post - Pin now to take your paper crafting skills to the next level.
Share on Instagram or Facebook - Capture the beauty of your finished paper craft project and share it on Instagram or Facebook! Tag us @easyfoldablecreations so we can see your work!

Other Patterns You Might Like To Try:
Looking for other easy patterns like this? Try these:


Carla vdM says
What a fun christmas element to fold, thank you for the clear step-by-step on how to make it.
Emily says
You're welcome!