
Turn an ordinary paper gift bag into a fun and clever shirt-shaped gift bag!
This quick DIY is perfect for Father's Day, birthdays, or even Christmas gifts and adds a personal, creative twist to your wrapping-no need for fancy tools or loads of time.

Jump to:
- Why You'll Love This Pattern
- Exclusive Content Just For You
- Skill Level
- Materials Needed
- Instructions
- Tips For Success
- Common Mistakes & How To Avoid Them
- Color, Paper Ideas, and Variations
- FAQ
- Other Paper Crafts You Might Like To Try:
- Helpful Origami Tips
- Useful Paper Craft Terms
- Stay Connected
- Other Patterns You Might Like To Try:
- Comments
Need a unique and easy gift wrapping idea that's fun, fast, and totally charming? This diy shirt gift bag is just the project.
All you need is a standard pre-made paper gift bag (the kind with handles, often used as loot or party favor bags), a pair of scissors, and a few minutes.
With just a couple of folds and cuts, you'll turn an ordinary gift bag into a clever shirt-shaped bag-collar and all!
This project is especially great for Father's Day, birthdays, and holidays like Christmas, when you want to add a little personality to your gift presentation.
Depending on the size of the gift bag you're using, it's perfect for all kinds of gifts-think shirts, ties, socks, small books, even gadgets or sweet treats. It's a fantastic idea if you're short on time but still want something memorable.
And don't worry-this one doesn't require crafting expertise or any glue or tape (unless you want to add extra embellishments).
It's a great last-minute gift wrapping solution, but you can also prep a few in advance and have them ready to go when you need them.

Why You'll Love This Pattern
- Quick and easy - You can make this in under 5 minutes with basic materials.
- No glue required - Just scissors and a pre-made bag.
- Perfect for any occasion - Ideal for Father's Day, birthdays, Christmas, and teacher gifts.
- Fun and creative - Turns a plain gift bag into a clever "shirt" with personality.
- Customizable - Use patterned or plain bags to create different shirt "styles" - you can even add buttons or a mini tie!
Exclusive Content Just For You
Not sure what you want to make next, but feeling a bit creative? Or maybe you've been searching for a pattern that sparks something new. We've got a few ideas waiting for you.
The Fold Collective, Easy Foldable Creations' community, provides you with a growing library of exclusive ad-free video tutorials, printable PDF patterns and more so you can improve your skills and enjoy crafting in your own time.
Skill Level
★☆☆☆☆ (Very Easy)
Materials Needed
- Paper Gift Bag With Handles (party favor bag, loot bag)
- Scissors
- Decorations of choice: e.g. stickers, markers, buttons
Instructions
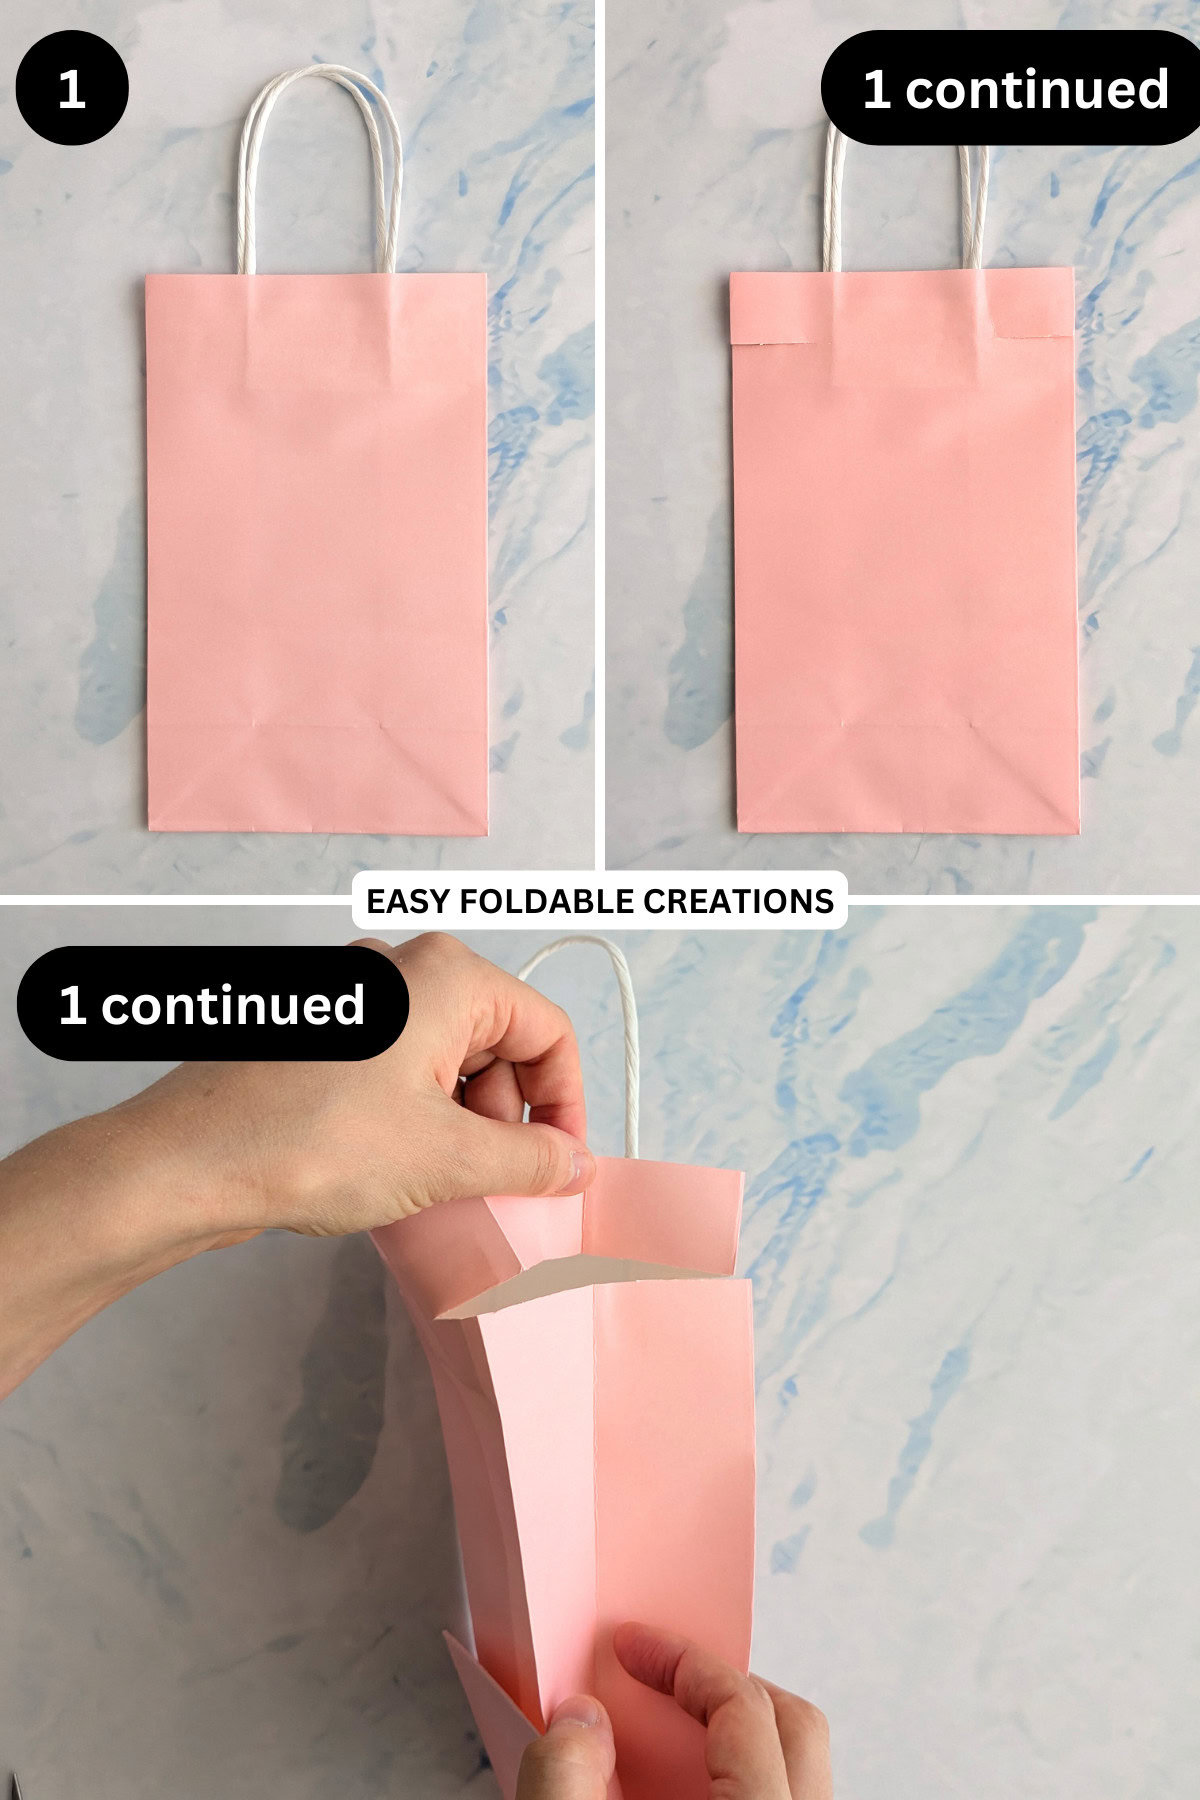
Step 1: Start with the front of your bag facing up. We will start by making the collar of the shirt.
Cut along the top as shown (leaving a gap of about 1 inch (2.5 cm) from the top edge). Note: if you are using a large paper bag, you may like to leave a bit more of a gap from the top edge.
You want to make sure you don't cut into your handles. Once cut, slightly open the sides of your bag, and make sure that the sides are cut all the way through as shown.
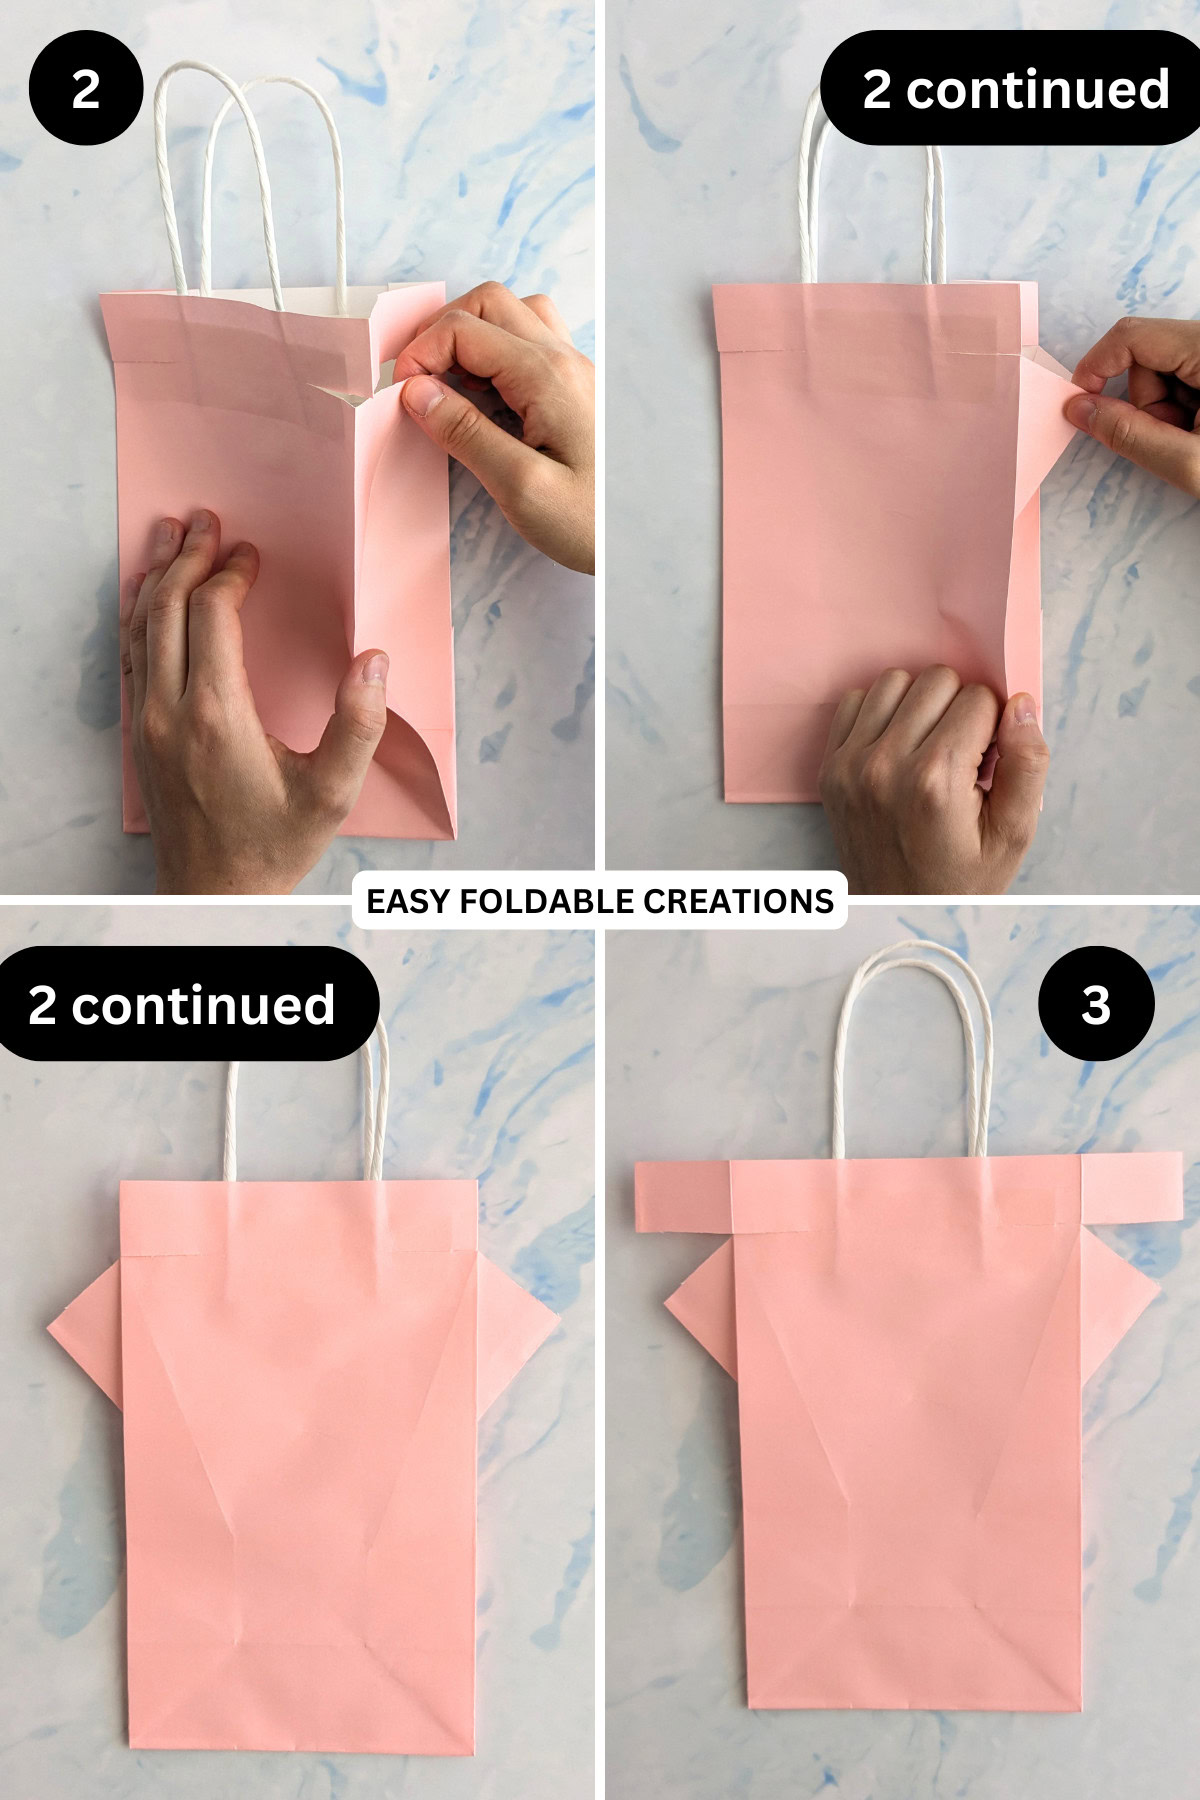
Step 2: With your bag sides still slightly open, push out the sides of the bag on an angle. This will form the sleeves of the shirt. You want to keep both sides as symmetrical as possible.
Step 3: Open out the collar as shown.
✨ You're almost there! ✨
To unlock the final steps of the photo tutorial and complete your pattern, create a free account with Grow.me. below.
Make sure you tick the box to subscribe to our newsletter and stay up to date with the latest patterns, tips, and more!
Once you're signed up, you'll get instant access to finish your project with the photo tutorial and enjoy exclusive content in the future.
Already signed up? Hit the button below and select 'Switch to Log In' to pick up where you left off and finish your project!
Step 4: Fold each side of the collar down on an angle as shown.
Step 5: If you want to decorate your bag (e.g. with buttons, markers, stickers, and so on) do so now.
Step 6: Open out your bag and stand it up. Then, fill it with what you want.
Step 7: To close the bag, pinch the top sides closed (making sure the sleeves still stick out). Then, insert one side of the collar into the other. Completed paper shirt bag.
If you are after the pattern for the paper tie as shown in the images, you can make it yourself!

Tips For Success
- If you can only get plain colored gift bags but want to decorate your shirt, you could glue some patterened or colored paper over the bag before you start.
- Use bags with a bit of structure - Slightly thicker paper bags hold their shape better once you cut the collar.
- Match the "shirt" to the occasion - Try plaid or striped bags for a classic look, or bold colors for festive holidays.
- Make in advance - Fold and prep several in different colors so you always have one ready to go.
- Try small bags for treats - Mini gift bags make great shirt-style treat holders for events and party favors.

Common Mistakes & How To Avoid Them
- Cutting too low for the collar - Be sure to make shallow cuts at the top so the collar flap folds neatly without tearing.
- Using flimsy bags - Bags that are too thin might crumple when cut. Choose ones with a bit of weight to the paper.
Color, Paper Ideas, and Variations
- Plaid or striped gift bags - Mimic the look of a real button-down shirt.
- Solid colors - Use classic white or light blue for a more "formal" shirt look.
- Bright or patterned bags - Great for kids' birthdays or fun holiday gifts.
- Add faux buttons - Use stickers or marker dots down the front for a cute touch.
- Make a "tuxedo" version - Use black or navy bags and add a mini paper bowtie!
FAQ
Yes! If you don't have a bag with handles, you can still make this diy shirt gift bag.
As long as you have a gift bag that fits your gift, yes! This works best for clothing items, books, small gadgets, and accessories.
Absolutely! You could add a gift tag under the collar.
Other Paper Crafts You Might Like To Try:
Helpful Origami Tips
If you're curious to learn more about origami, you might like to look at our basic guides on how to make some common origami folds.
Start with the valley fold and mountain fold-these are the foundation of most origami models.
Once you're comfortable, you might like to try the petal fold for 3D shapes, and explore the bird base and square base for more complex designs.
The water bomb base is also great for creating inflatable or geometric models, like this inflatable origami rabbit.
Useful Paper Craft Terms
Want to learn a little more about paper crafts and origami?
We've made this helpful printable just for you. It explains common terms and helpful tips you might come across when you are folding origami or making a paper craft project.
You can download the useful paper craft terms printable PDF here.
Stay Connected
Made this pattern? Let us know how it went in the comments below!
Pin this post - Pin now to take your paper crafting skills to the next level.
Share on Instagram or Facebook - Capture the beauty of your finished paper craft project and share it on Instagram or Facebook! Tag us @easyfoldablecreations so we can see your work!

Other Patterns You Might Like To Try:
Looking for other easy patterns like this? Try these:


Comments
No Comments