
The origami rabbit ear fold is a useful origami technique that helps create pointed features like ears, tails, and legs.
It's a key fold in many animal models, including the origami mouse.
By learning this fold, you'll be able to add more structure and detail to your designs.
Let's go through the steps together!

Jump to:
The rabbit ear fold is one of the most important folds in origami, especially for creating pointed shapes.
It's often used in animal models, giving them ears, tails, or even limbs.
While it may seem tricky at first, once you get the hang of it, you'll find it easy to apply to different designs.
This fold involves a combination of valley folds and mountain folds to form a small, triangular flap that sticks up-just like a rabbit's ear!
One of the most common models that uses this fold is the origami mouse, where the rabbit ear technique helps shape the mouse's ears.
If you're just starting out, be sure to check out our collection of easy origami for beginners for simpler folds before moving on to this one.
Now, let's break down the steps for creating a clean and crisp rabbit ear fold.

Exclusive Content Just For You
Not sure what you want to make next, but feeling a bit creative? Or maybe you've been searching for a pattern that sparks something new. We've got a few ideas waiting for you.
The Fold Collective, Easy Foldable Creations' community, provides you with a growing library of exclusive ad-free video tutorials, printable PDF patterns and more so you can improve your skills and enjoy crafting in your own time.
Skill Level
★★☆☆☆ (Easy)
Materials Needed
1 square sheet of origami paper
Instructions
Step 1: Start with the color you want on the outside facing down. Arrange your paper to sit like a diamond shape.
Step 2: Fold the left point to meet the right point.
Step 3: Unfold previous step.
Step 4: Fold the top point down to meet the bottom point.
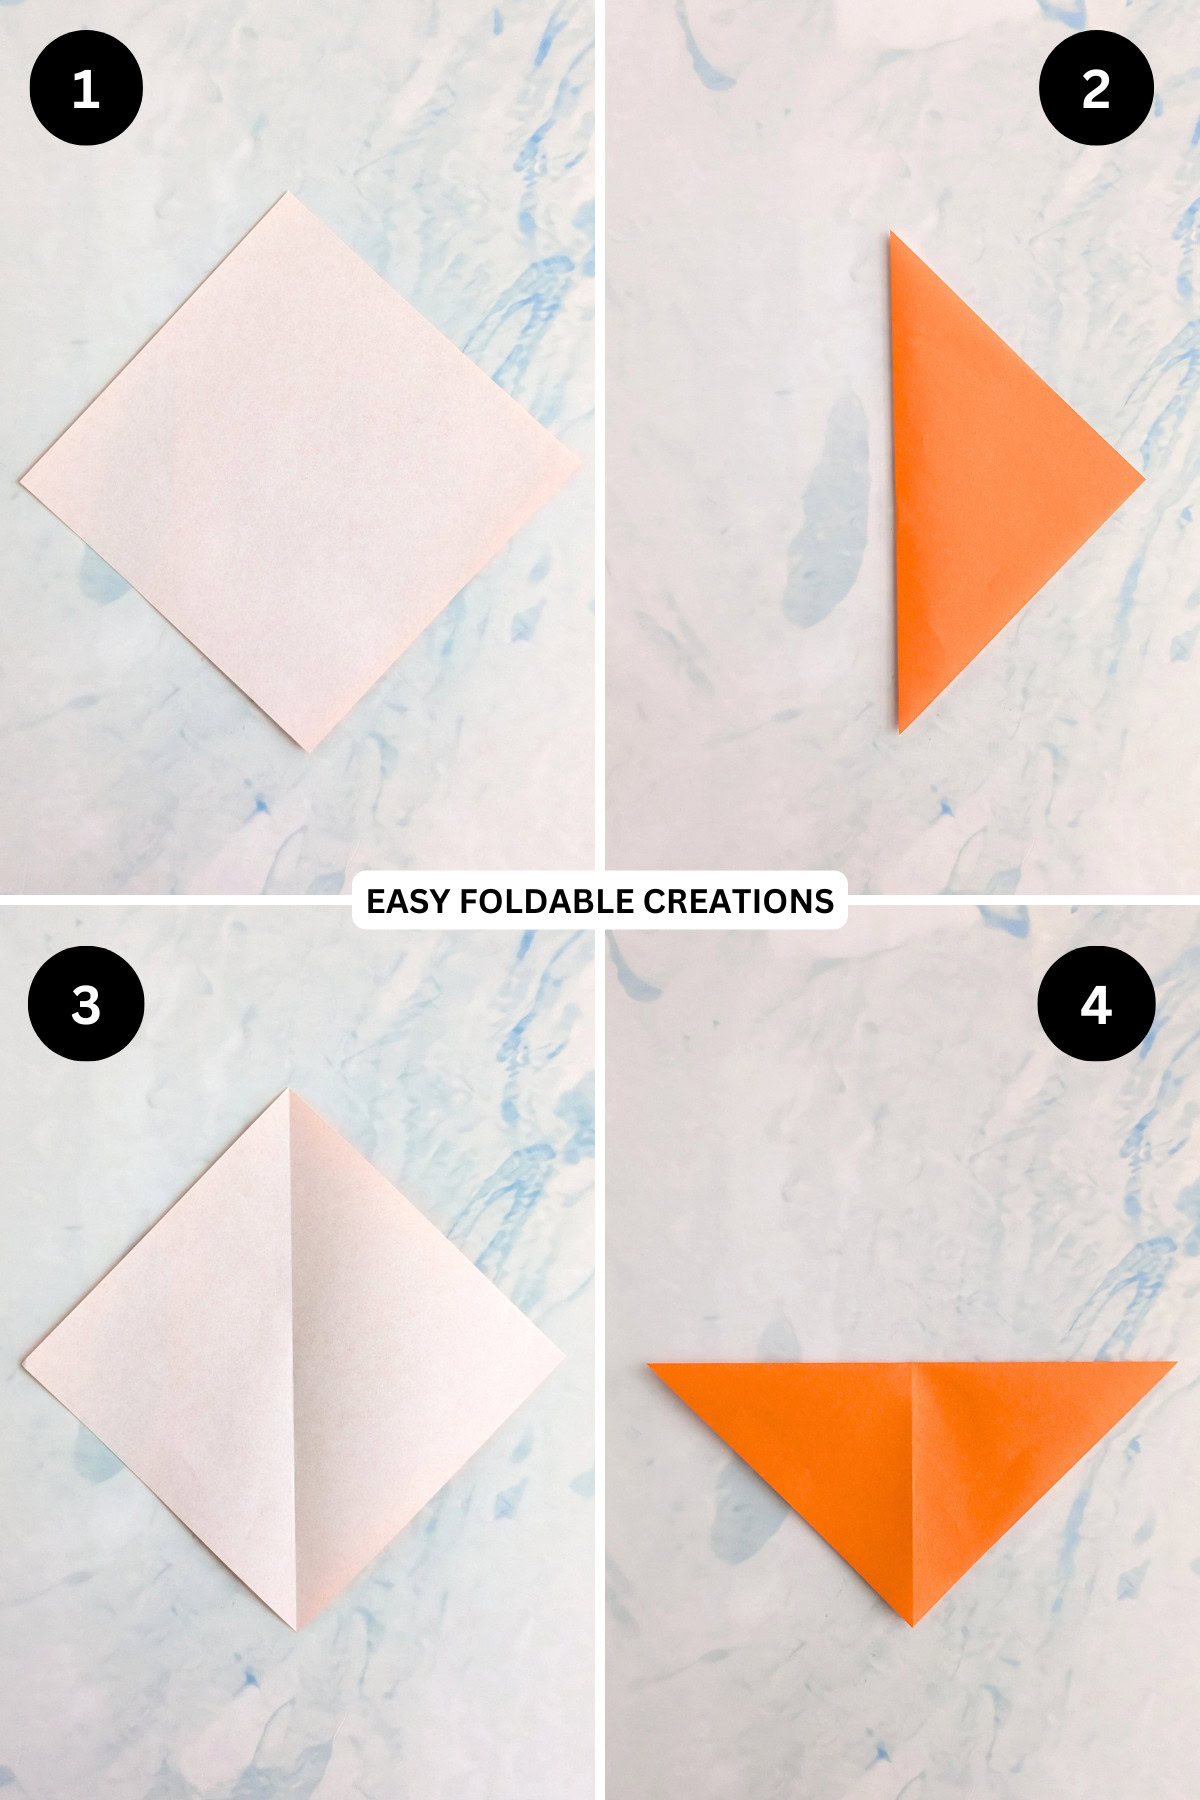
Step 5: Unfold previous step.
Step 6: Fold the bottom left edge up to meet the horizontal centre crease.
Step 7: Unfold previous step.
Step 8: Fold the bottom right edge up to meet the horizontal centre crease.
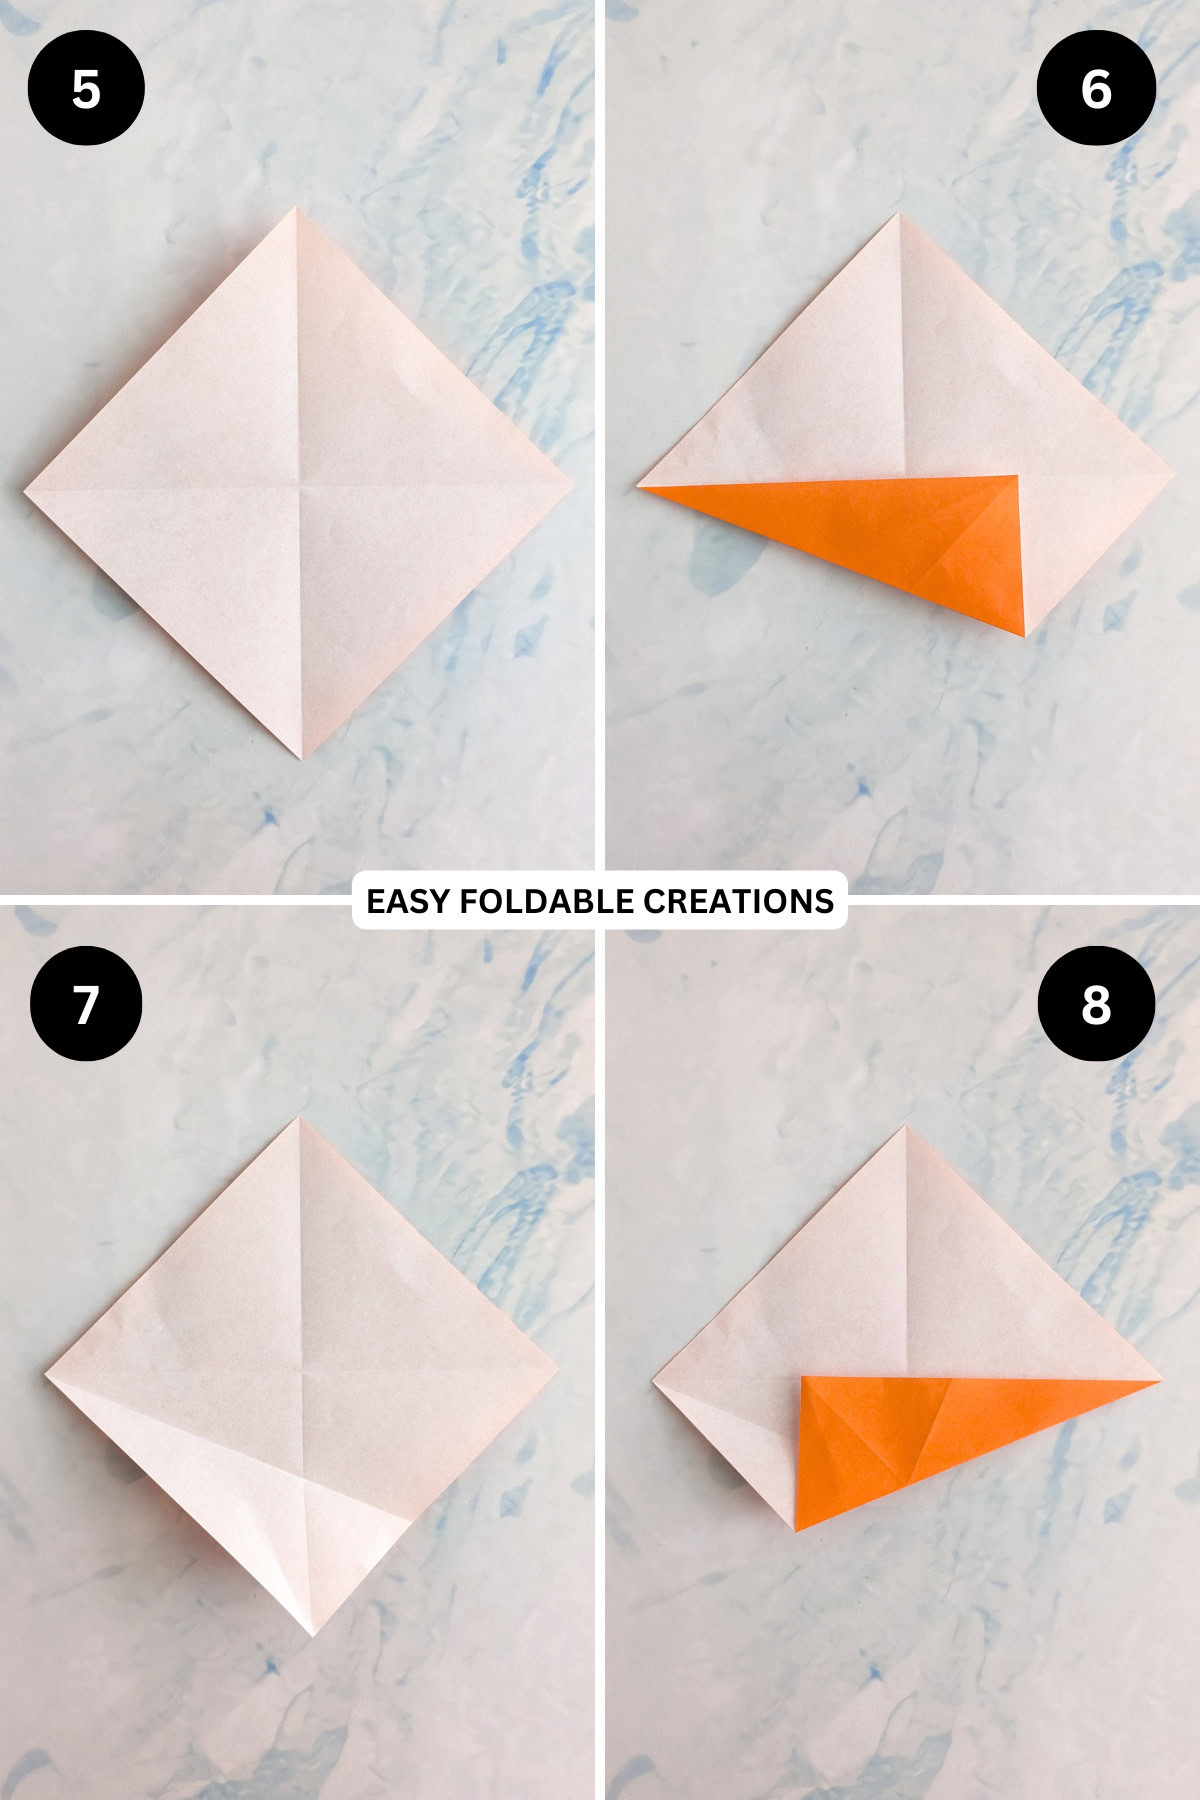
Step 9: Unfold previous step.
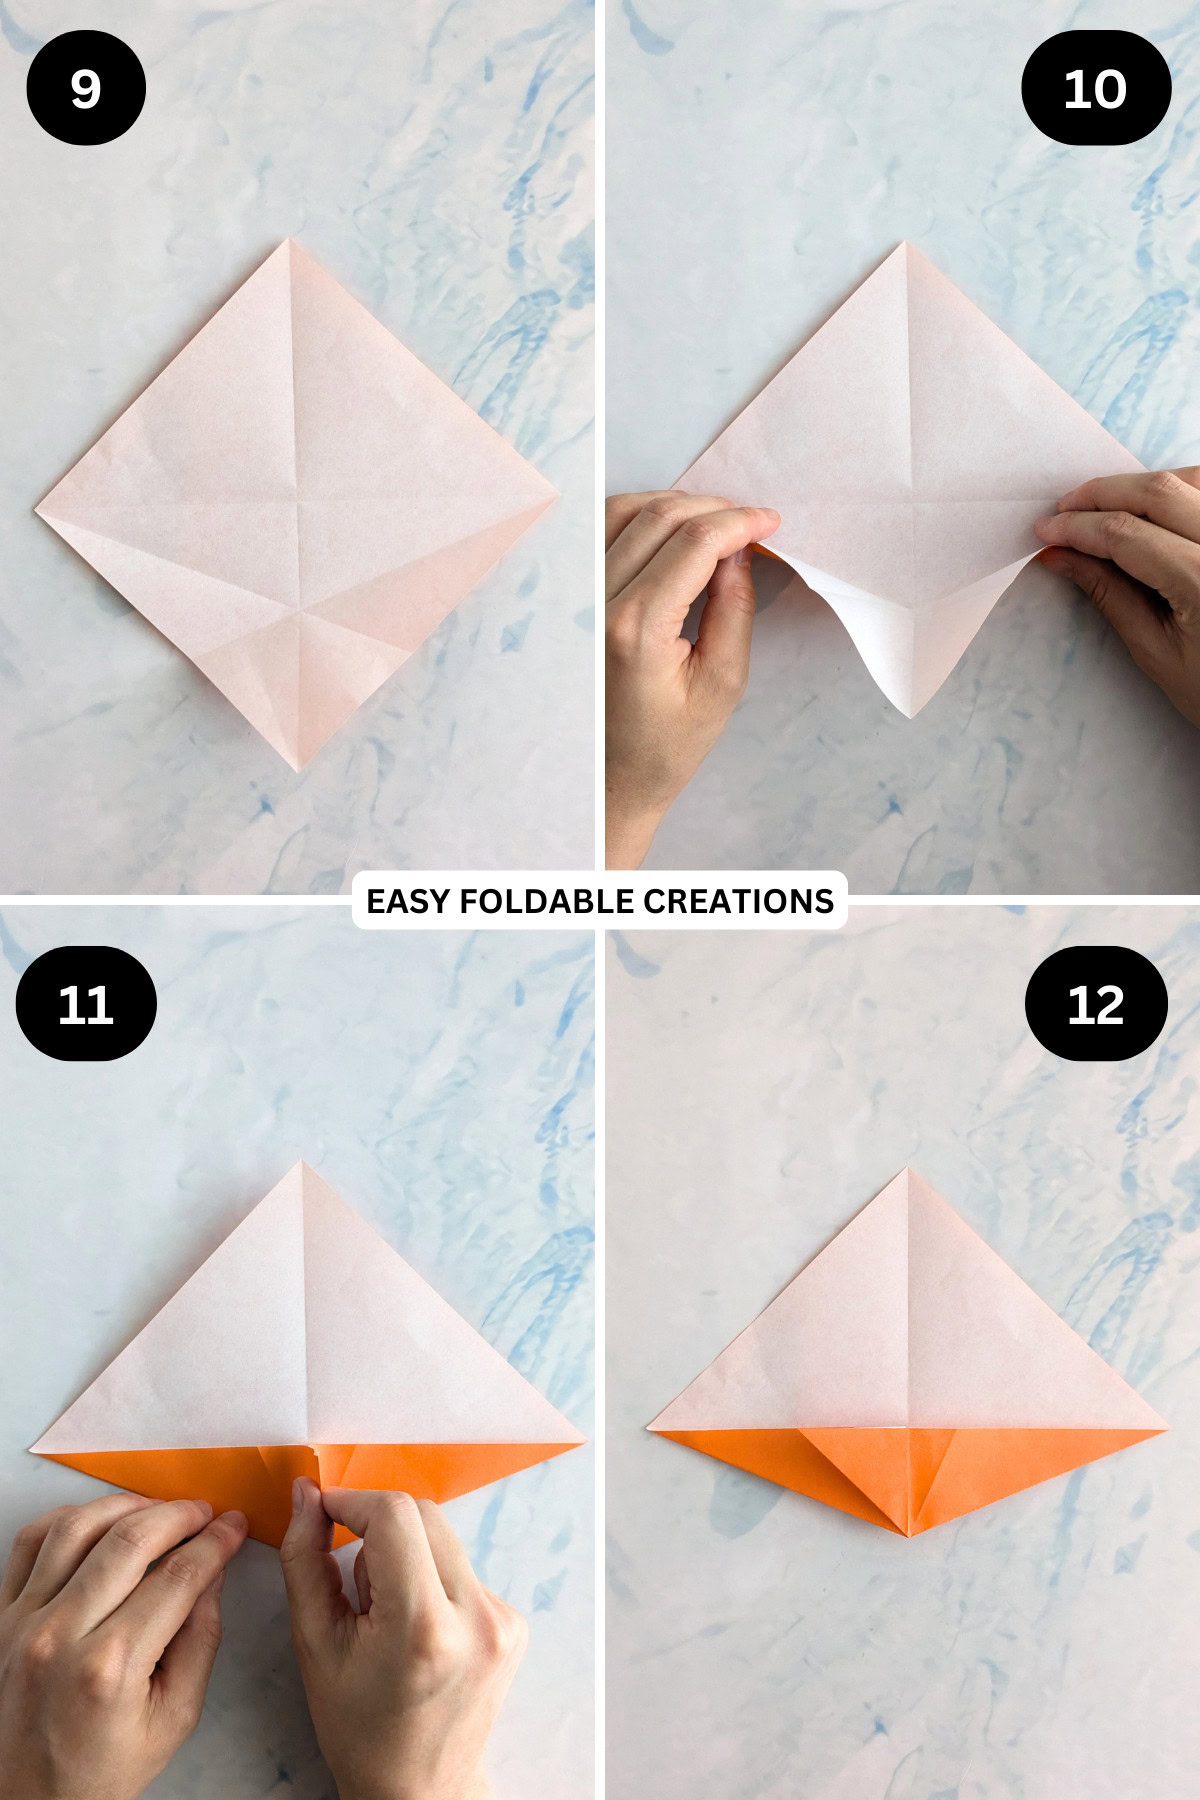
Step 10: Lift both the bottom left and right edges up along the creases up made in step 6 and 8. The bottom part of the paper will start to collapse on itself as shown.
Step 11: Bring both edges together as shown.
Step 12: Fold the upper flap (formed by bringing the two bottom edges together) flat to the left. Completed rabbit ear fold.
Common Uses
The rabbit ear fold is widely used in origami, especially for animal models like:
- Origami Mouse - This design uses the rabbit ear fold to create the mouse's distinctive ears.

Related Folds
Once you've mastered the rabbit ear fold, try these next:
- Petal Fold - Another essential fold that helps create pointed and layered shapes.
- Bird Base - A base that features multiple rabbit ear folds in its structure.
- Blintz Fold - A folding technique where all four corners are folded to the center.
Helpful Origami Tips
If you're curious to learn more about origami, you might like to look at our basic guides on how to make some common origami folds.
Start with the valley fold and mountain fold-these are the foundation of most origami models.
Once you're comfortable, you might like to try the petal fold for 3D shapes, and explore the bird base and square base for more complex designs.
The water bomb base is also great for creating inflatable or geometric models, like this inflatable origami rabbit.
Useful Paper Craft Terms
Want to learn a little more about paper crafts and origami?
We've made this helpful printable just for you. It explains common terms and helpful tips you might come across when you are folding origami or making a paper craft project.
You can download the useful paper craft terms printable PDF here.
Stay Connected
Made this pattern? Let us know how it went in the comments below!
Pin this post - Pin now to take your paper crafting skills to the next level.
Share on Instagram or Facebook - Capture the beauty of your finished paper craft project and share it on Instagram or Facebook! Tag us @easyfoldablecreations so we can see your work!

Other Patterns You Might Like To Try:
Looking for other easy patterns like this? Try these:


Comments
No Comments