
Practical, fun, and easy to fold, the origami phone stand is a simple DIY project that's both functional and stylish. Perfect for desks, bedside tables, or gift ideas.
Perfect for watching videos or video calls, this design combines function with creativity.

Jump to:
This origami phone stand is a clever and practical design that allows you to prop up your phone for hands-free use.
This simple yet effective paper craft is perfect for watching videos, making video calls, or even just keeping your device within reach on your desk.
With just a square sheet of paper, you can create a functional accessory that's both stylish and useful.
This origami project is not only great for personal use but also makes for a thoughtful gift for friends and family, especially for those who enjoy DIY crafts or are always on the go.
You can customize your phone stand using colorful or patterned paper to match your personal style or home decor.
As you follow the step-by-step instructions, you'll not only learn how to fold this practical design but also gain confidence in your origami skills.
Let's dive into the step-by-step instructions on how to make an origami phone stand!

Why You'll Love This Pattern
- Simple to make, ideal for beginners and experienced folders alike.
- Practical design that enhances your viewing experience.
- Customizable with various colors and patterns to suit your style.
- Great for gifts or personal use, making it a versatile project.
- A fun way to incorporate traditional origami into your daily life.
Exclusive Content Just For You
Not sure what you want to make next, but feeling a bit creative? Or maybe you've been searching for a pattern that sparks something new. We've got a few ideas waiting for you.
The Fold Collective, Easy Foldable Creations' community, provides you with a growing library of exclusive ad-free video tutorials, printable PDF patterns and more so you can improve your skills and enjoy crafting in your own time.
Skill Level
Difficulty: ★☆☆☆☆ (Very Easy)
Materials Needed
- Square paper: A 6x6-inch sheet works well for a standard phone stand. You can also experiment with larger squares (8x8 or 10x10 inches) for a sturdier design.
- Type of paper: Lightweight cardstock (160-200 gsm) or regular origami paper is best. Thicker paper provides more stability for your phone stand.
- Note: We used a 6x6-inch sheet for our origami phone stand, but feel free to try different sizes to create stands that fit your phone perfectly.
Instructions
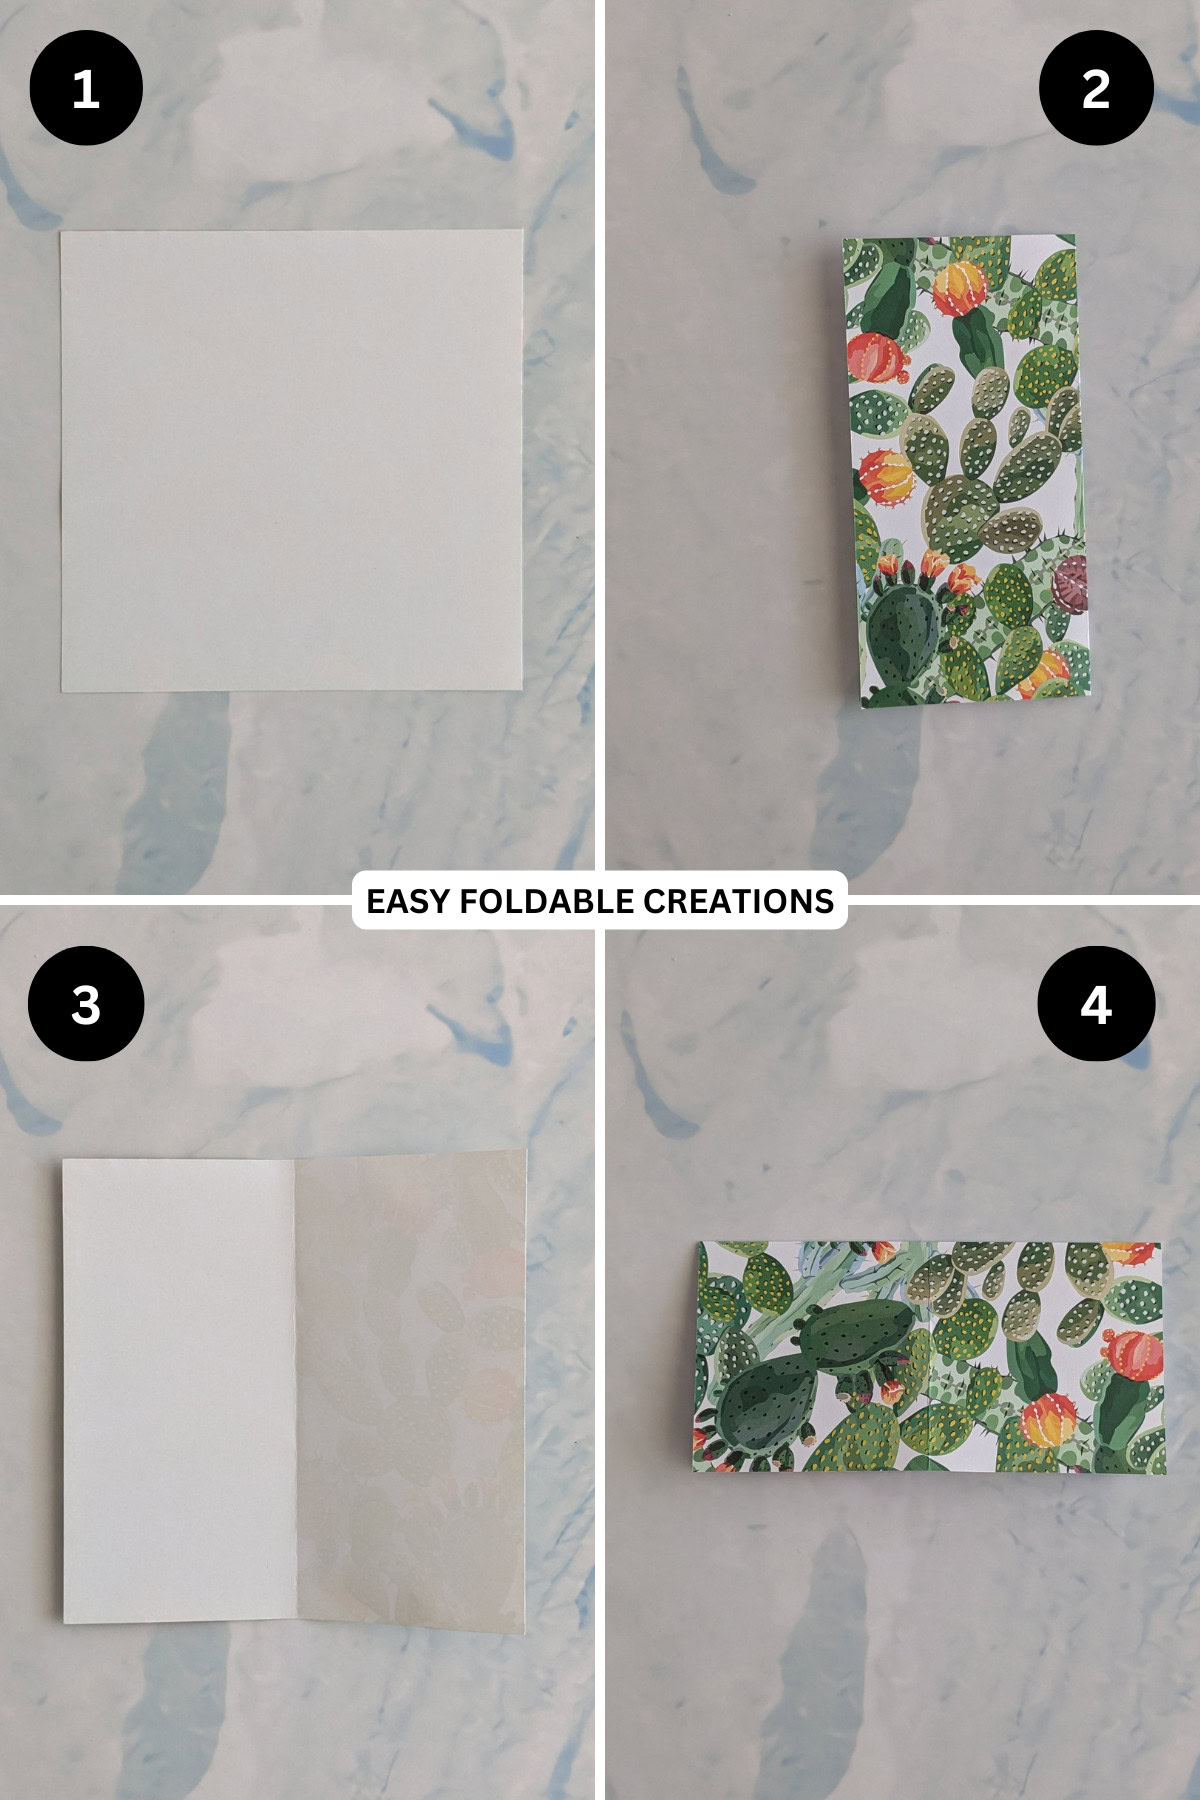
Step 1: Start with the color you want your phone stand to be facing down.
Step 2: Fold the square in half from left to right.
Step 3: Unfold previous step.
Step 4: Fold in half from top to bottom.
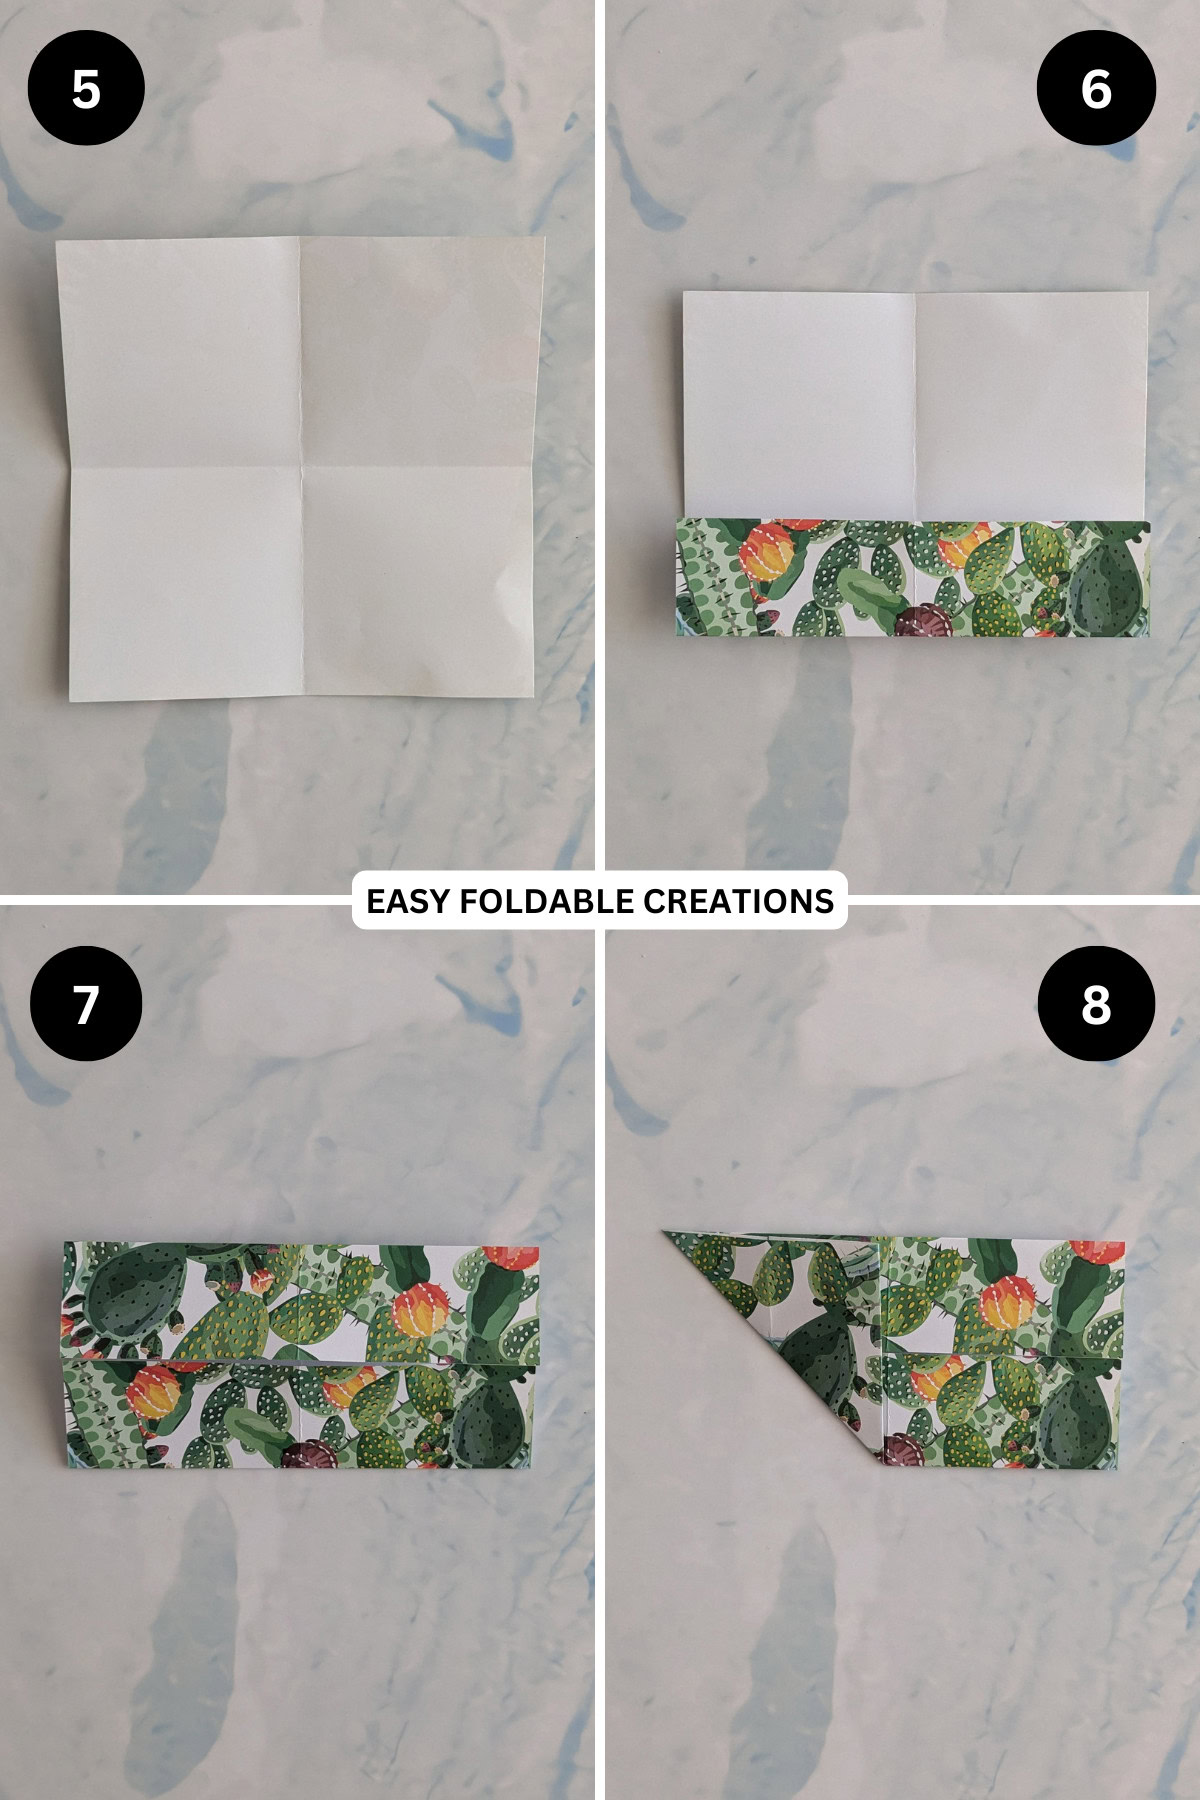
Step 5: Unfold previous step.
Step 6: Fold the bottom edge to meet the centre crease.
Step 7: Fold the top edge down to meet the centre crease.
Step 8: Fold the bottom left corner up to meet the top edge.
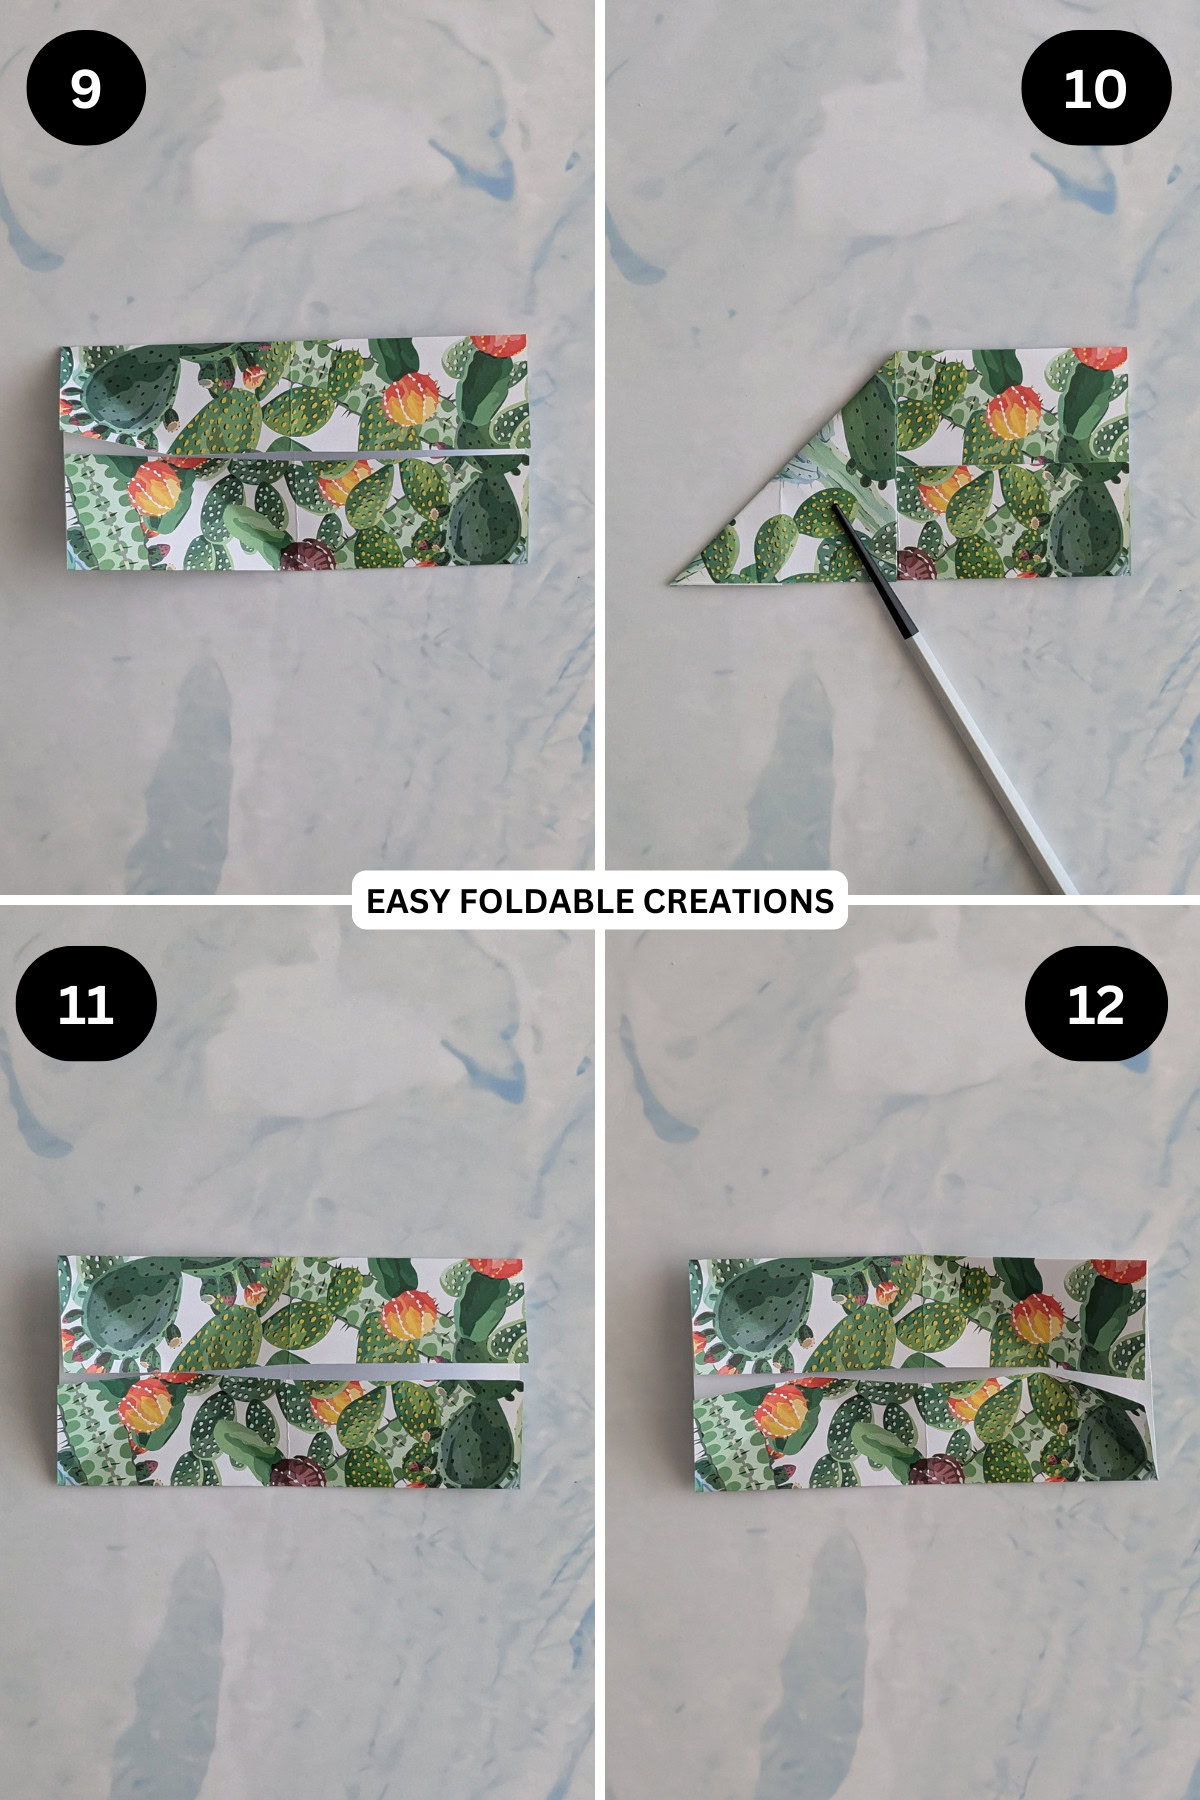
Step 9: Unfold previous step.
Step 10: Fold the top left corner down to the bottom edge.
Step 11: Unfold previous step.
Step 12: Repeat steps 8 to 11 for the right side.
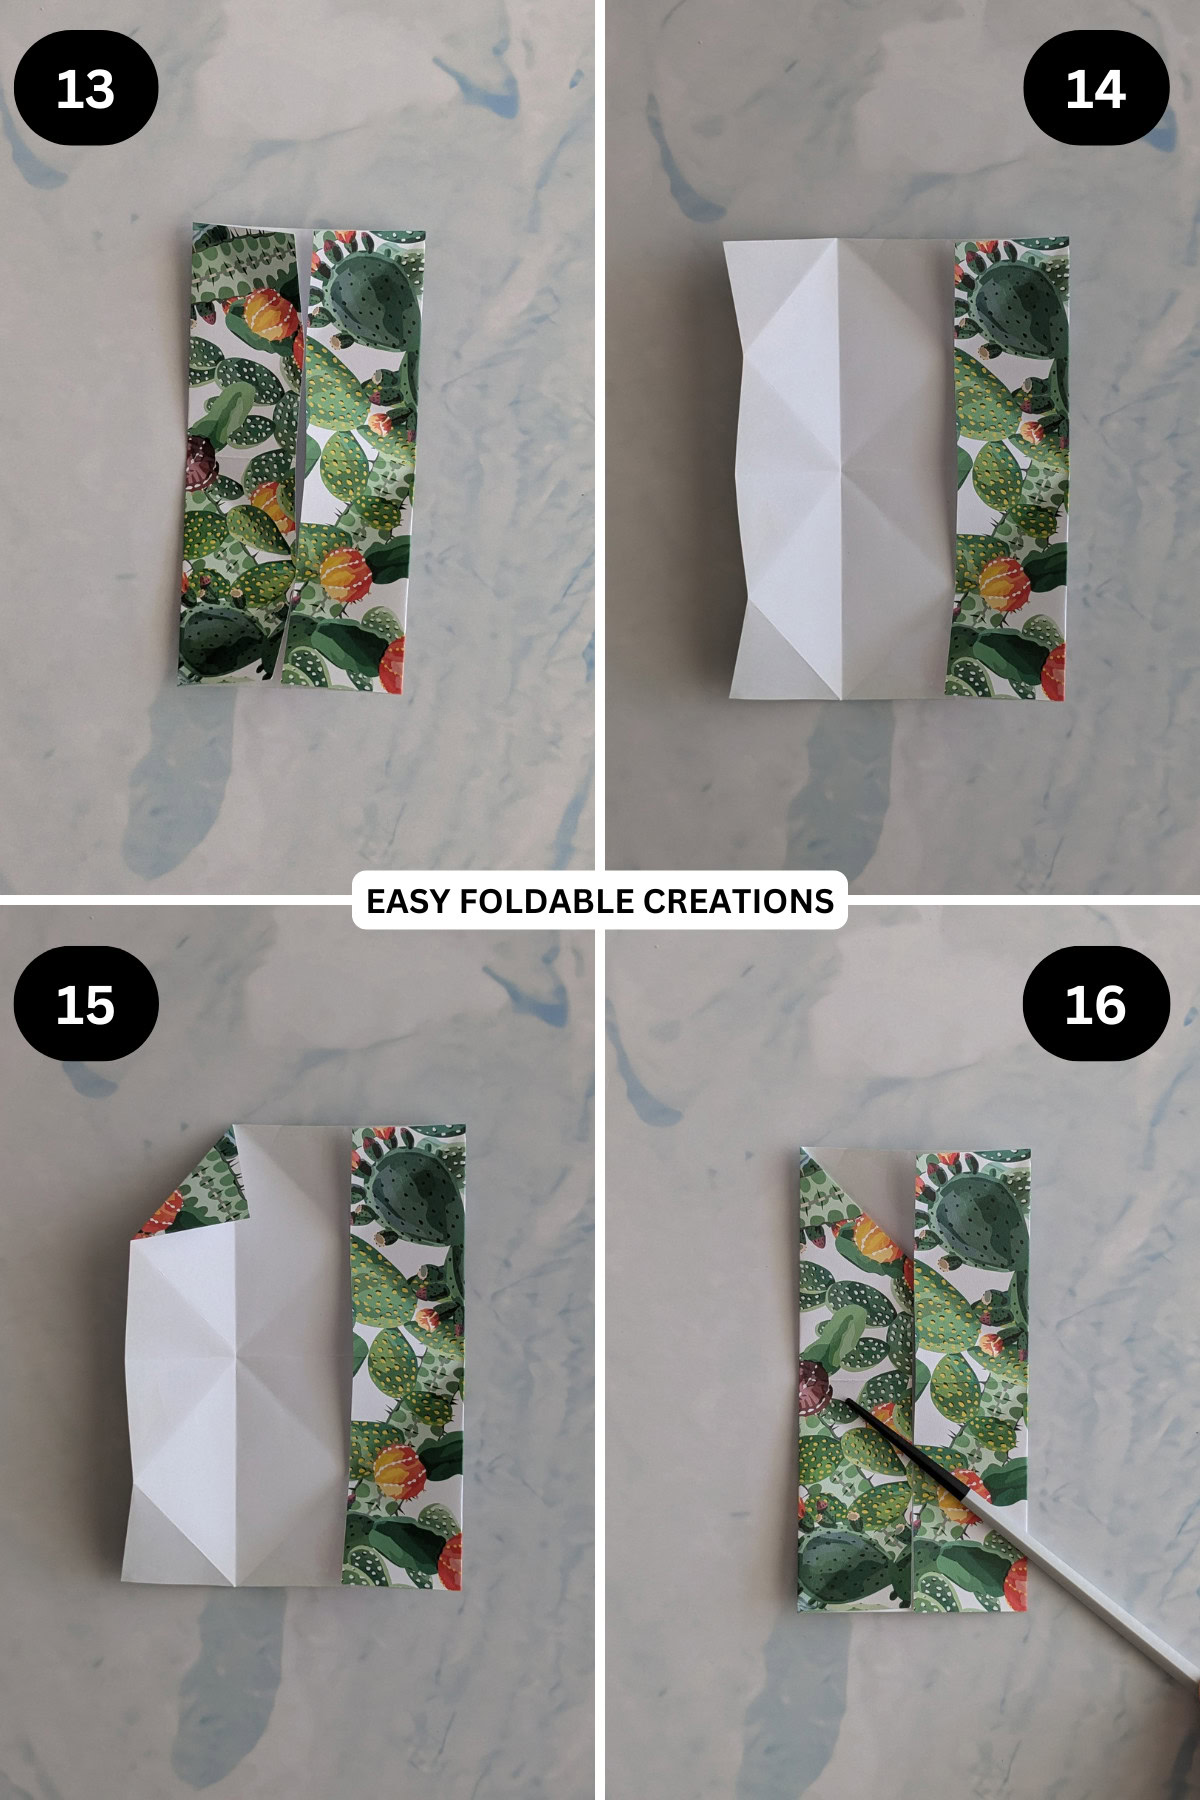
Step 13: Rotate the paper 90 degrees.
Step 14: Open out the left side of the paper.
Step 15: Fold the top left corner inward, matching the existing creases.
Step 16: Fold the left side to meet the middle crease again.
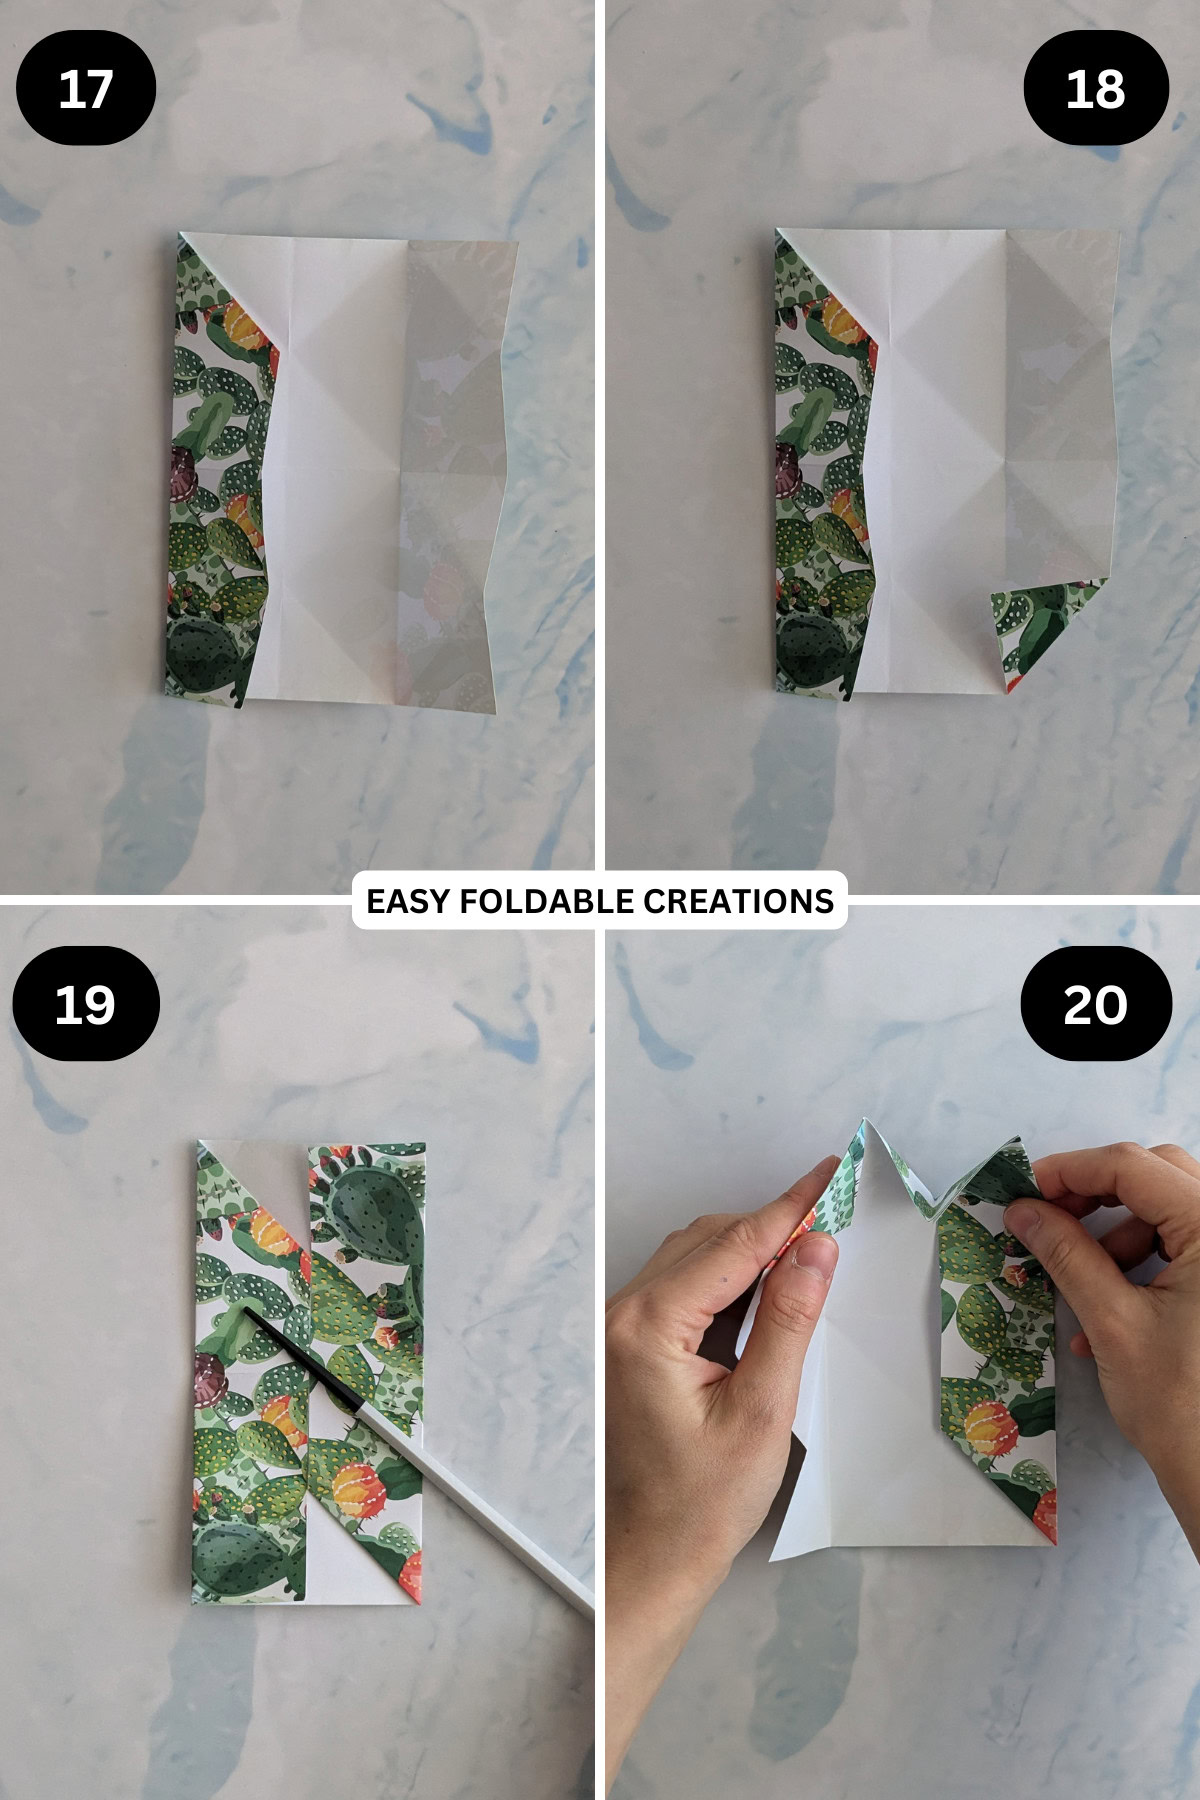
Step 17: Open out the right side of the paper.
Step 18: Fold the bottom right corner inward, matching the existing creases.
Step 19: Fold the right side of the paper to meet the centre crease once again.
Step 20: Slightly open up the left side of the paper and pinch the top triangle together so the back edges meet. Crease the back edge well.
✨ You're almost there! ✨
To unlock the final steps of the photo tutorial and complete your pattern, create a free account with Grow.me. below.
Make sure you tick the box to subscribe to our newsletter and stay up to date with the latest patterns, tips, and more!
Once you're signed up, you'll get instant access to finish your project with the photo tutorial and enjoy exclusive content in the future.
Already signed up? Hit the button below and select 'Switch to Log In' to pick up where you left off and finish your project!
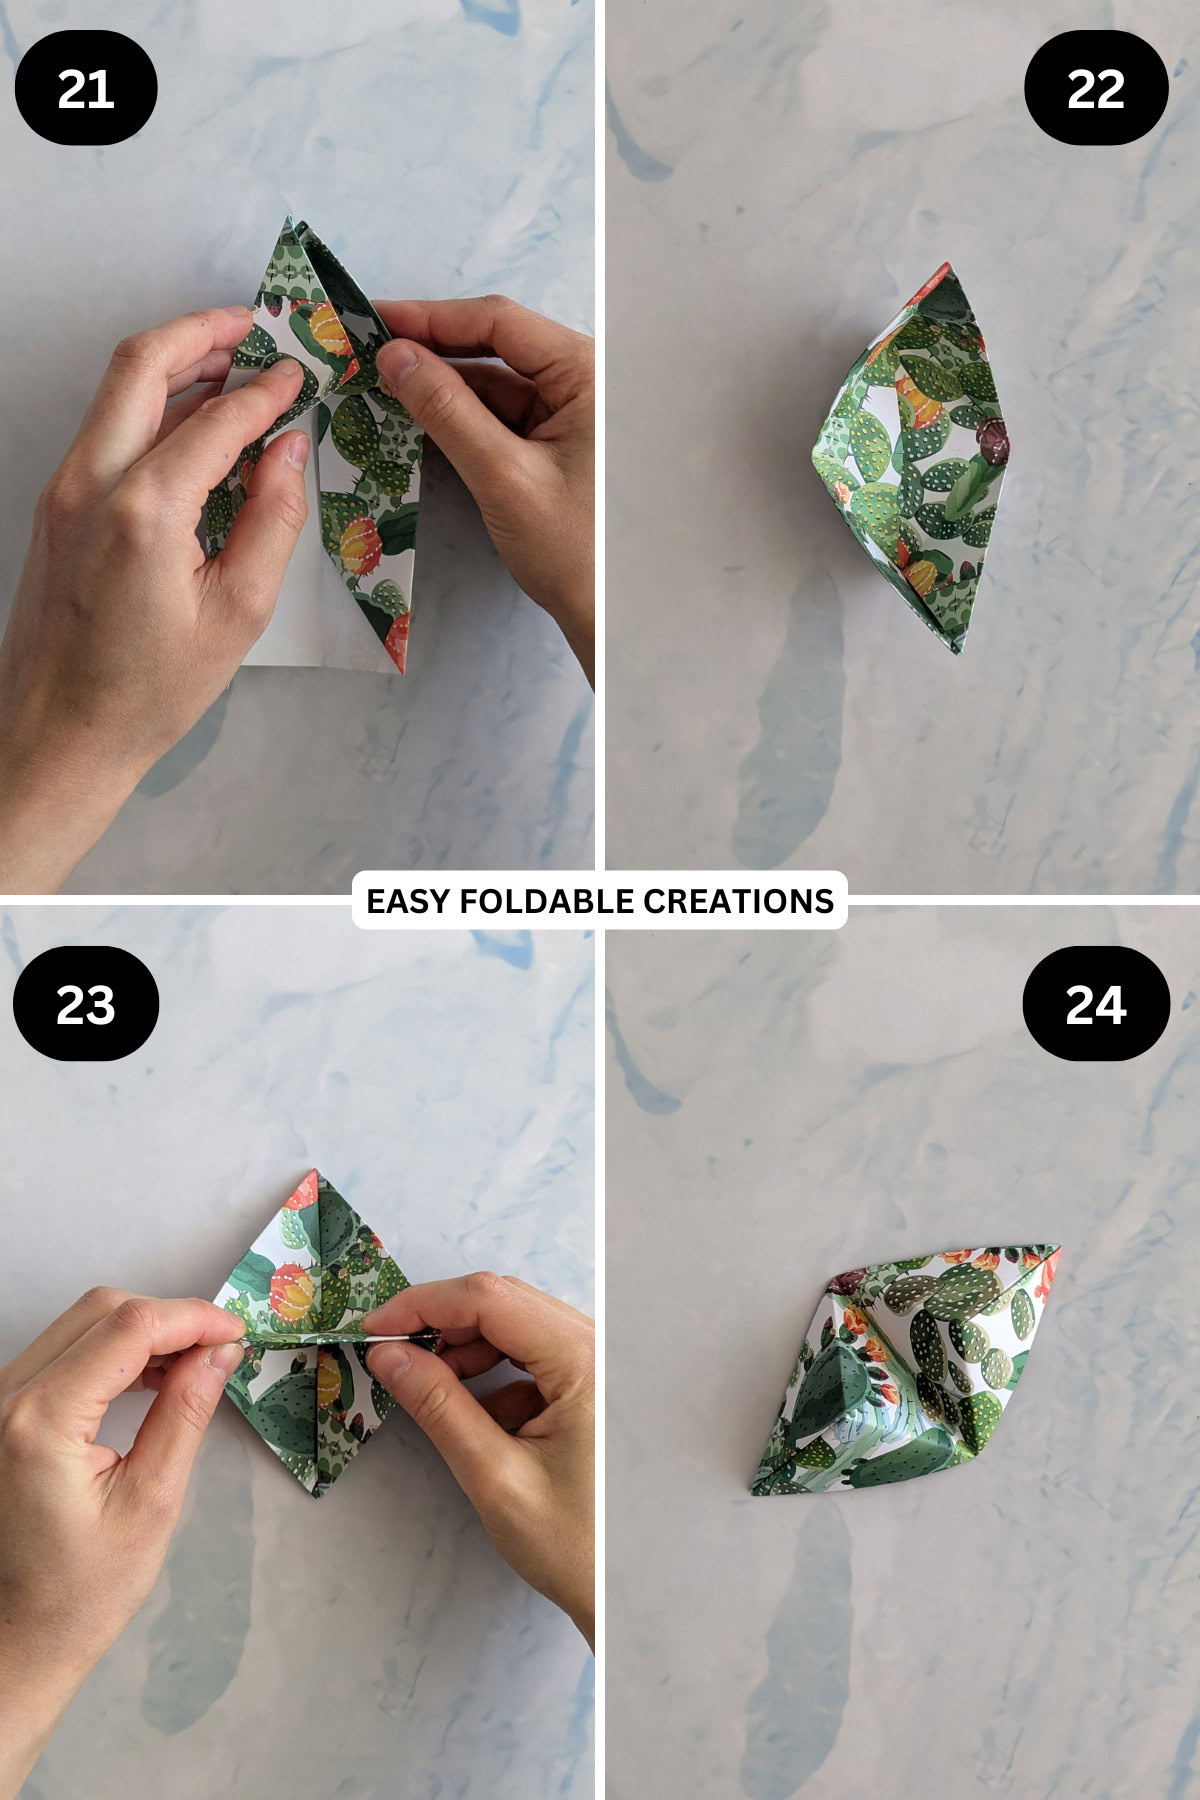
Step 21: Tuck the centre piece under the left side of the paper. You should now have a triangle that stands up.
Step 22: Repeat steps 20 and 21 for the bottom of the paper.
Step 23: Pinch and crease the centre fold.
Step 24: Flip the paper over. Completed origami phone stand.
Common Mistakes & How To Avoid Them
If your origami phone stand falls apart when you put your phone on it, you may have used paper that is too thin.
Thicker paper will better support your phone.

Other Paper Crafts You Might Like To Try:
Helpful Origami Tips
If you're curious to learn more about origami, you might like to look at our basic guides on how to make some common origami folds.
Start with the valley fold and mountain fold-these are the foundation of most origami models.
Once you're comfortable, you might like to try the petal fold for 3D shapes, and explore the bird base and square base for more complex designs.
The water bomb base is also great for creating inflatable or geometric models, like this inflatable origami rabbit.
Useful Paper Craft Terms
Want to learn a little more about paper crafts and origami?
We've made this helpful printable just for you. It explains common terms and helpful tips you might come across when you are folding origami or making a paper craft project.
You can download the useful paper craft terms printable PDF here.
Stay Connected
Made this pattern? Let us know how it went in the comments below!
Pin this post - Pin now to take your paper crafting skills to the next level.
Share on Instagram or Facebook - Capture the beauty of your finished paper craft project and share it on Instagram or Facebook! Tag us @easyfoldablecreations so we can see your work!

Other Patterns You Might Like To Try:
Looking for other easy patterns like this? Try these:
- Beautiful Wedding Gift Wrapping Ideas
- Creative Origami Ideas For Weddings
- DIY Paper Flowers for Wedding Decorations
- DIY Paper Wedding Favor Ideas Guests Will Love
- Easy Paper Crafts for Weddings
- DIY Wedding Favor Boxes and Bags
- DIY Paper Wedding Decorations for Your Big Day
- Wedding Napkin Folding Ideas For Elegant Tables


Anna says
Made this a few days ago and had to come back. It's super easy to make and fits my phone perfectly too!