
Bring a touch of seasonal charm to your table with this beautiful maple leaf napkin folding idea.
Perfect for fall dinners, Thanksgiving gatherings, and even Christmas celebrations, this simple paper craft adds an elegant accent to any place setting.
Jump to:
- Why You'll Love This Pattern
- Exclusive Content Just For You
- Skill Level
- Materials Needed
- Instructions
- Tips For Success
- Common Mistakes & How To Avoid Them
- Color, Paper Ideas, and Variations
- FAQ
- Other Paper Crafts You Might Like To Try:
- Helpful Origami Tips
- Useful Paper Craft Terms
- Stay Connected
- Other Patterns You Might Like To Try:
- Comments
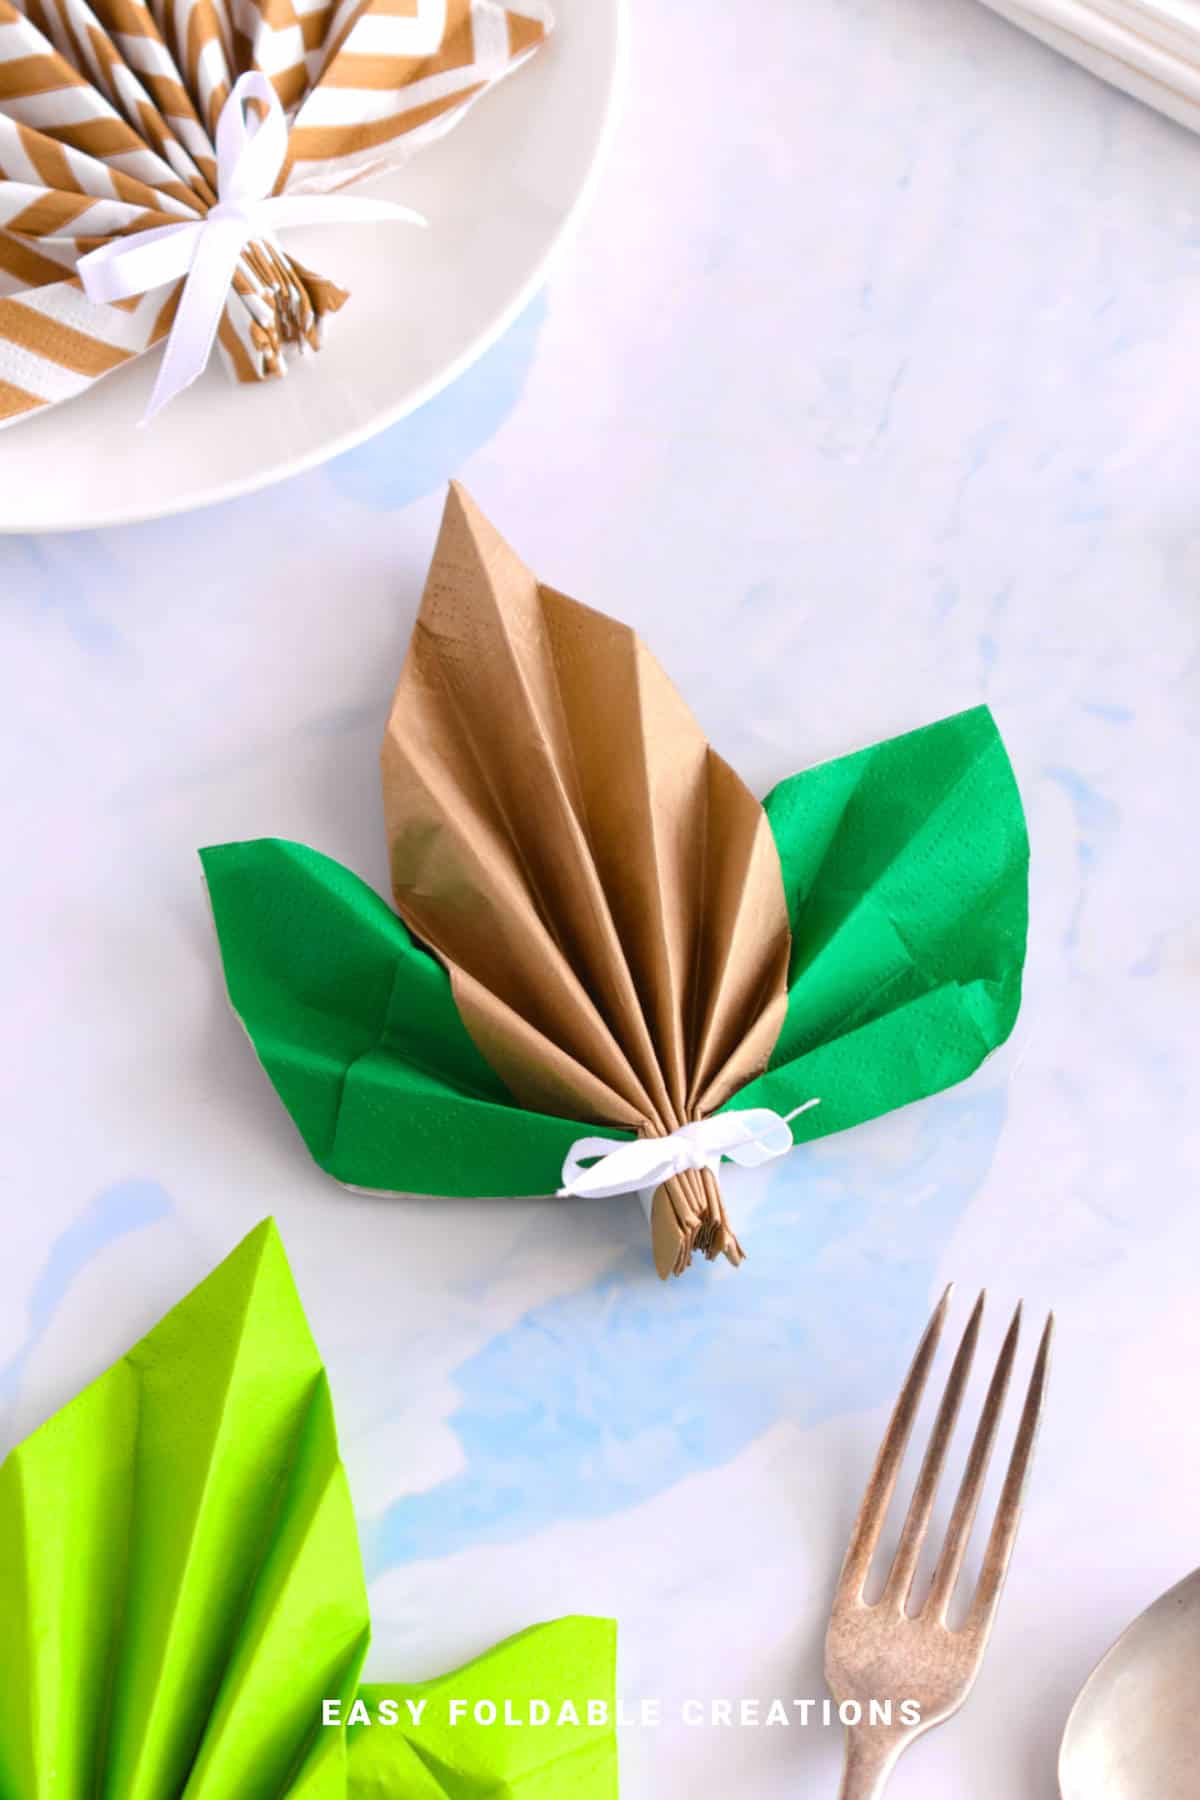
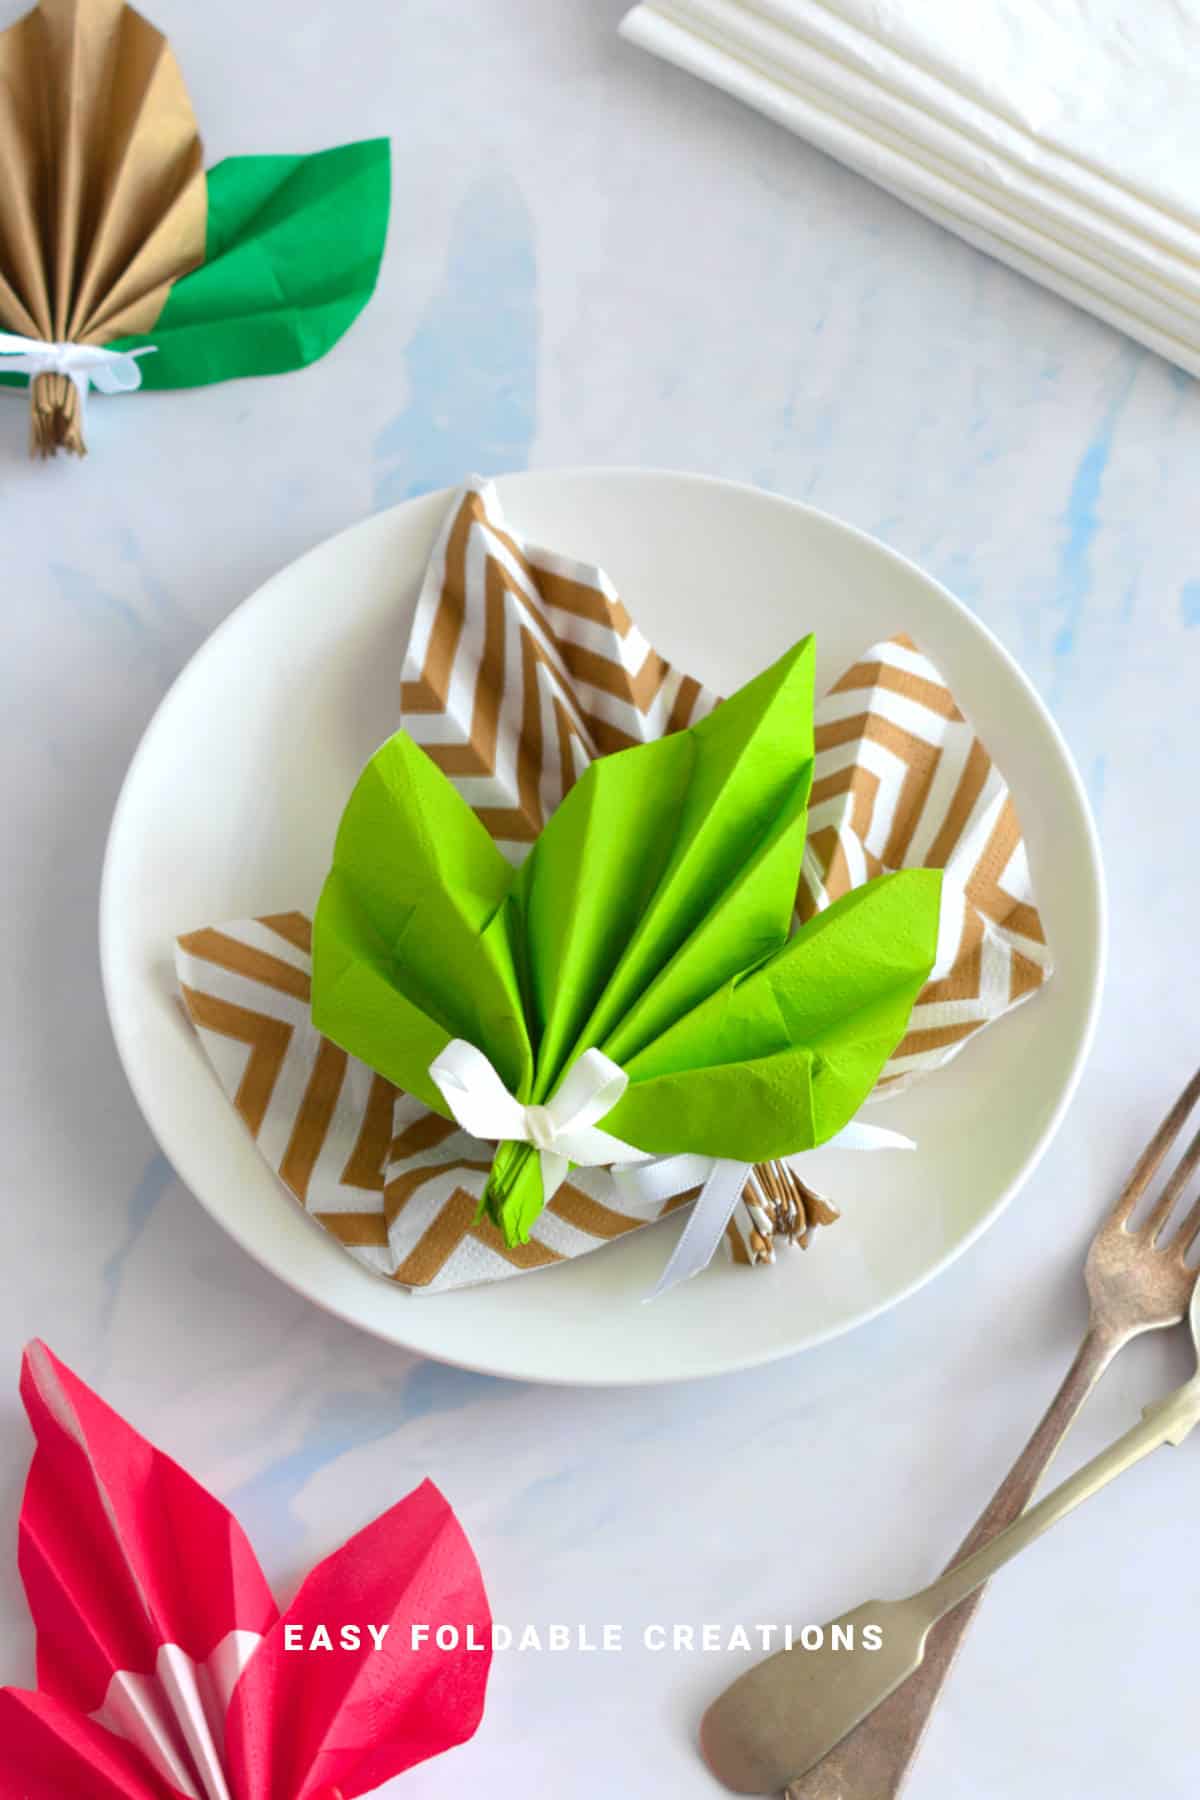
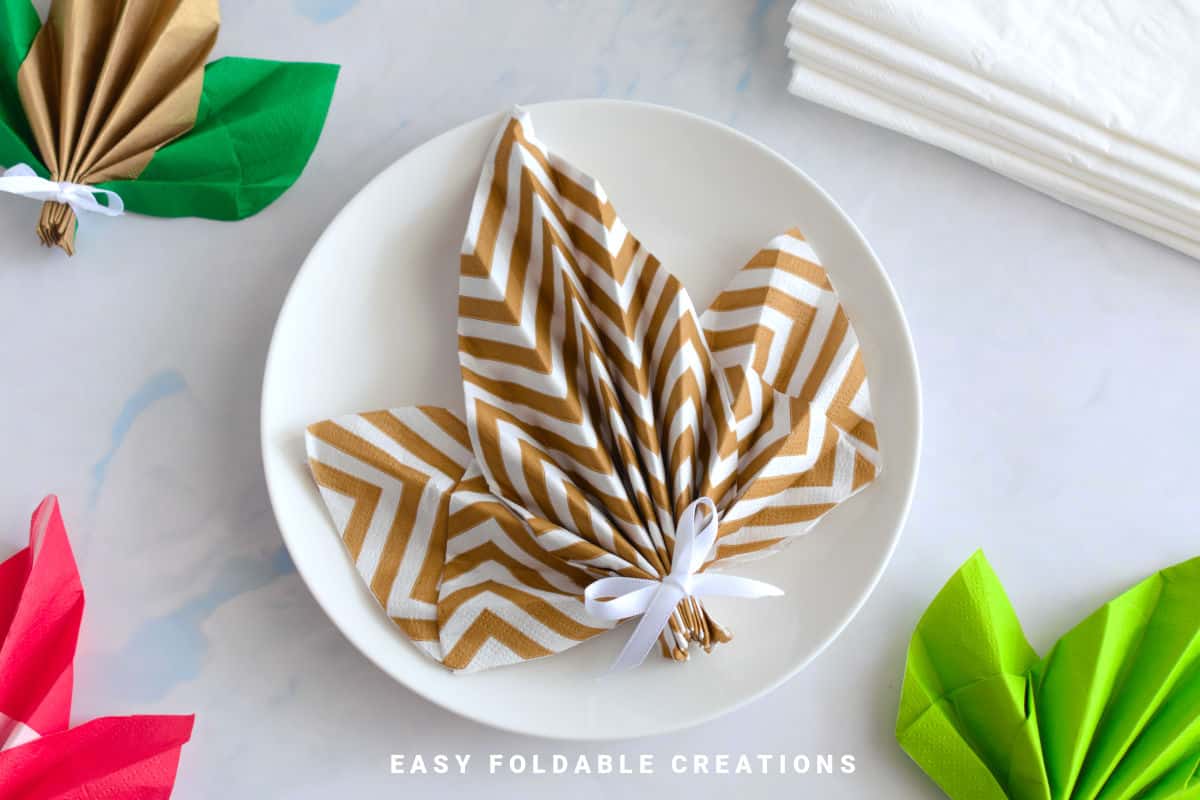
Add a natural and sophisticated touch to your table décor with this maple leaf napkin folding idea.
It's an easy way to dress up your table for special occasions like Thanksgiving, Christmas dinner, fall harvest parties, or even autumn weddings.
Whether you use crisp paper napkins the folded leaf shape creates a warm, inviting atmosphere that guests will love.
This napkin folding design works especially well for holiday meals and family gatherings when you want something that looks thoughtful without being too complicated.
With just a few simple folds and a bit of practice, you can create stunning leaf shapes in minutes. It's also a wonderful addition to buffet tables, formal place settings at weddings, or casual autumn brunches.
If you're new to napkin folding or paper crafts, don't worry-this step by step tutorial is beginner-friendly and requires no special tools.
Plus, the design is versatile enough to pair with different napkin colors and styles, making it easy to coordinate with your overall theme for any occasion.
Why You'll Love This Pattern
- A beautiful way to add seasonal flair to your table décor
- Perfect for fall dinners, Thanksgiving, Christmas, and other holiday gatherings
- Works with paper napkins for flexible styling
- A quick, easy paper craft that looks impressive in any setting
- Step by step instructions make it simple for beginners and fun for experienced crafters
- Make these maple leaf napkin folds in advance.
Exclusive Content Just For You
Not sure what you want to make next, but feeling a bit creative? Or maybe you've been searching for a pattern that sparks something new. We've got a few ideas waiting for you.
The Fold Collective, Easy Foldable Creations' community, provides you with a growing library of exclusive ad-free video tutorials, printable PDF patterns and more so you can improve your skills and enjoy crafting in your own time.
Skill Level
★★☆☆☆ (Easy)
Materials Needed
- Standard square paper napkins
- Satin Ribbon or small peg
Instructions
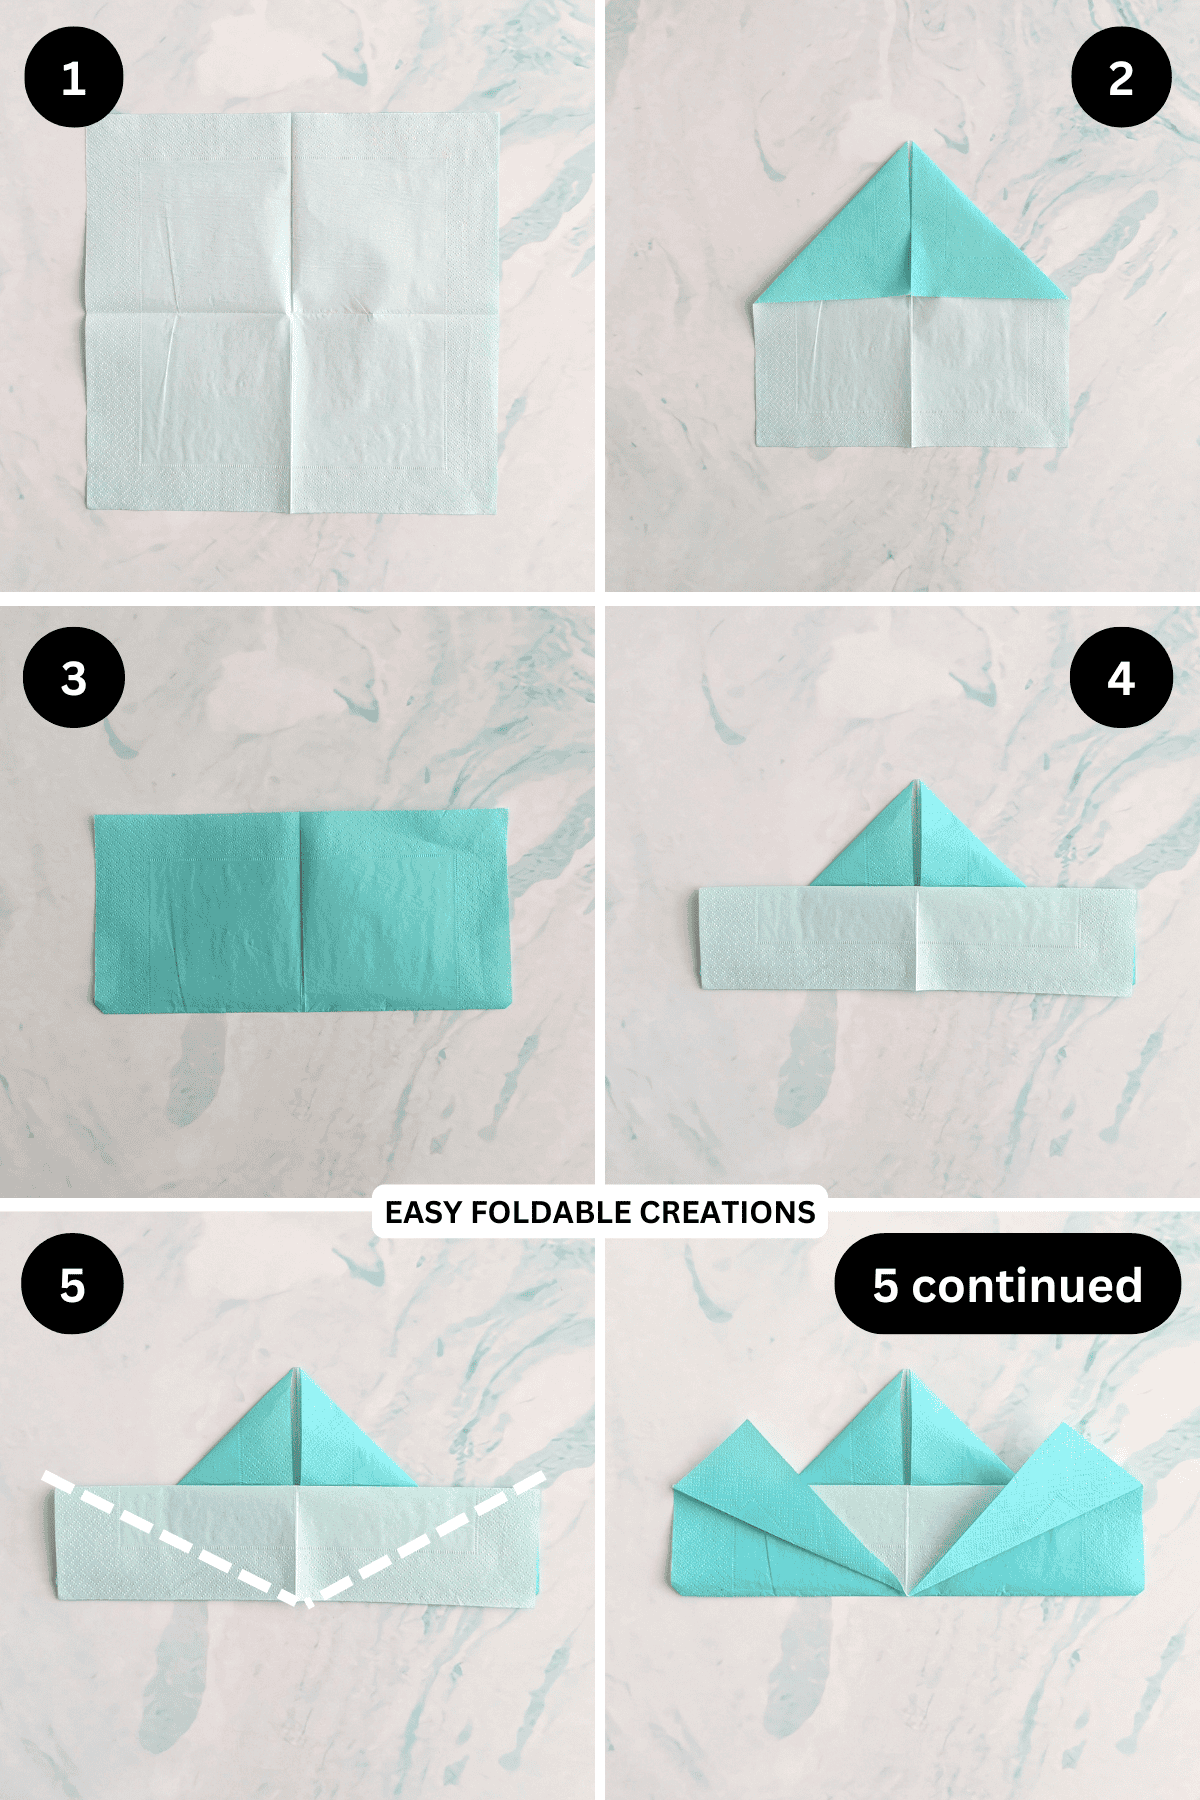
Step 1: Start by unfolding your paper napkin. Typically they come folded into quarters. Have the color you want your leaf to be facing down (if you are using single sided napkins, you might like to place another napkin on the top [color side out] before you start folding. The color facing up will be seen in the middle of your leaf).
Note: to make it easier for you to see, we have done this tutorial with a single sided napkin. This way you can tell the difference between the front and back of the napkin.
Step 2: Fold both the top left and top right corners in to meet the middle.
Step 3: Fold the bottom edge up along the existing middle crease.
Step 4: Fold the same edge back down but this time to meet the bottom edge.
Step 5: Fold the upper layer of the bottom flap (you folded down in the previous step) up along the lines shown.
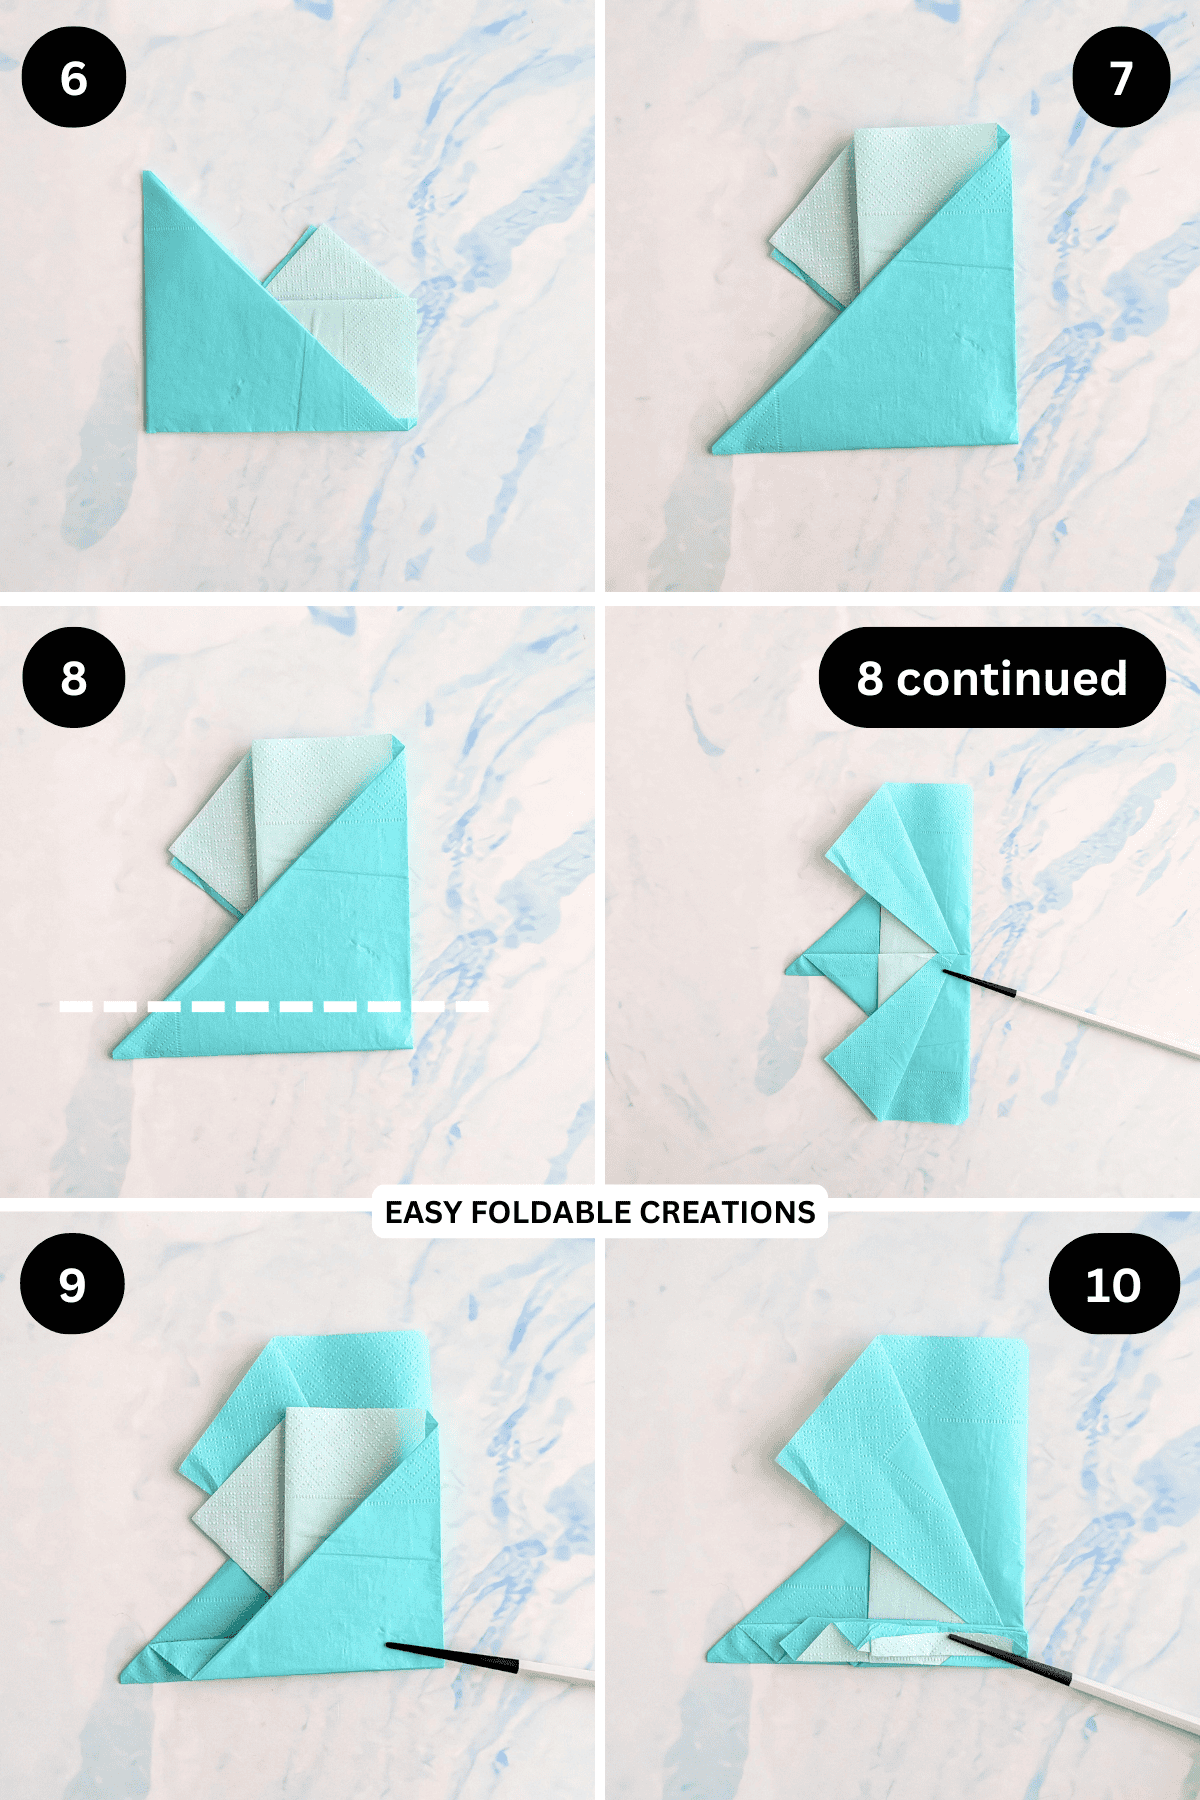
Step 6: Fold the napkin in half from left to right.
Step 7: Rotate your napkin to sit as shown.
Step 8: Fold the bottom edge down along the line shown.
Step 9: Fold the same flap up so that its folded edge matches the bottom edge of the napkin underneath.
✨ You're almost there! ✨
To unlock the final steps of the photo tutorial and complete your pattern, create a free account with Grow.me. below.
Make sure you tick the box to subscribe to our newsletter and stay up to date with the latest patterns, tips, and more!
Once you're signed up, you'll get instant access to finish your project with the photo tutorial and enjoy exclusive content in the future.
Already signed up? Hit the button below and select 'Switch to Log In' to pick up where you left off and finish your project!
Step 10: Accordion fold that same flap (fold the paper back and forth in a zigzag pattern, like an accordion). Crease well.
Step 11: Flip your napkin over and arrange it to sit as shown.
Step 12: Now, accordion fold this side, starting from the bottom.
Step 13: Gently open out your napkin, shaping the leaf. Make sure you hold the bottom firmly.
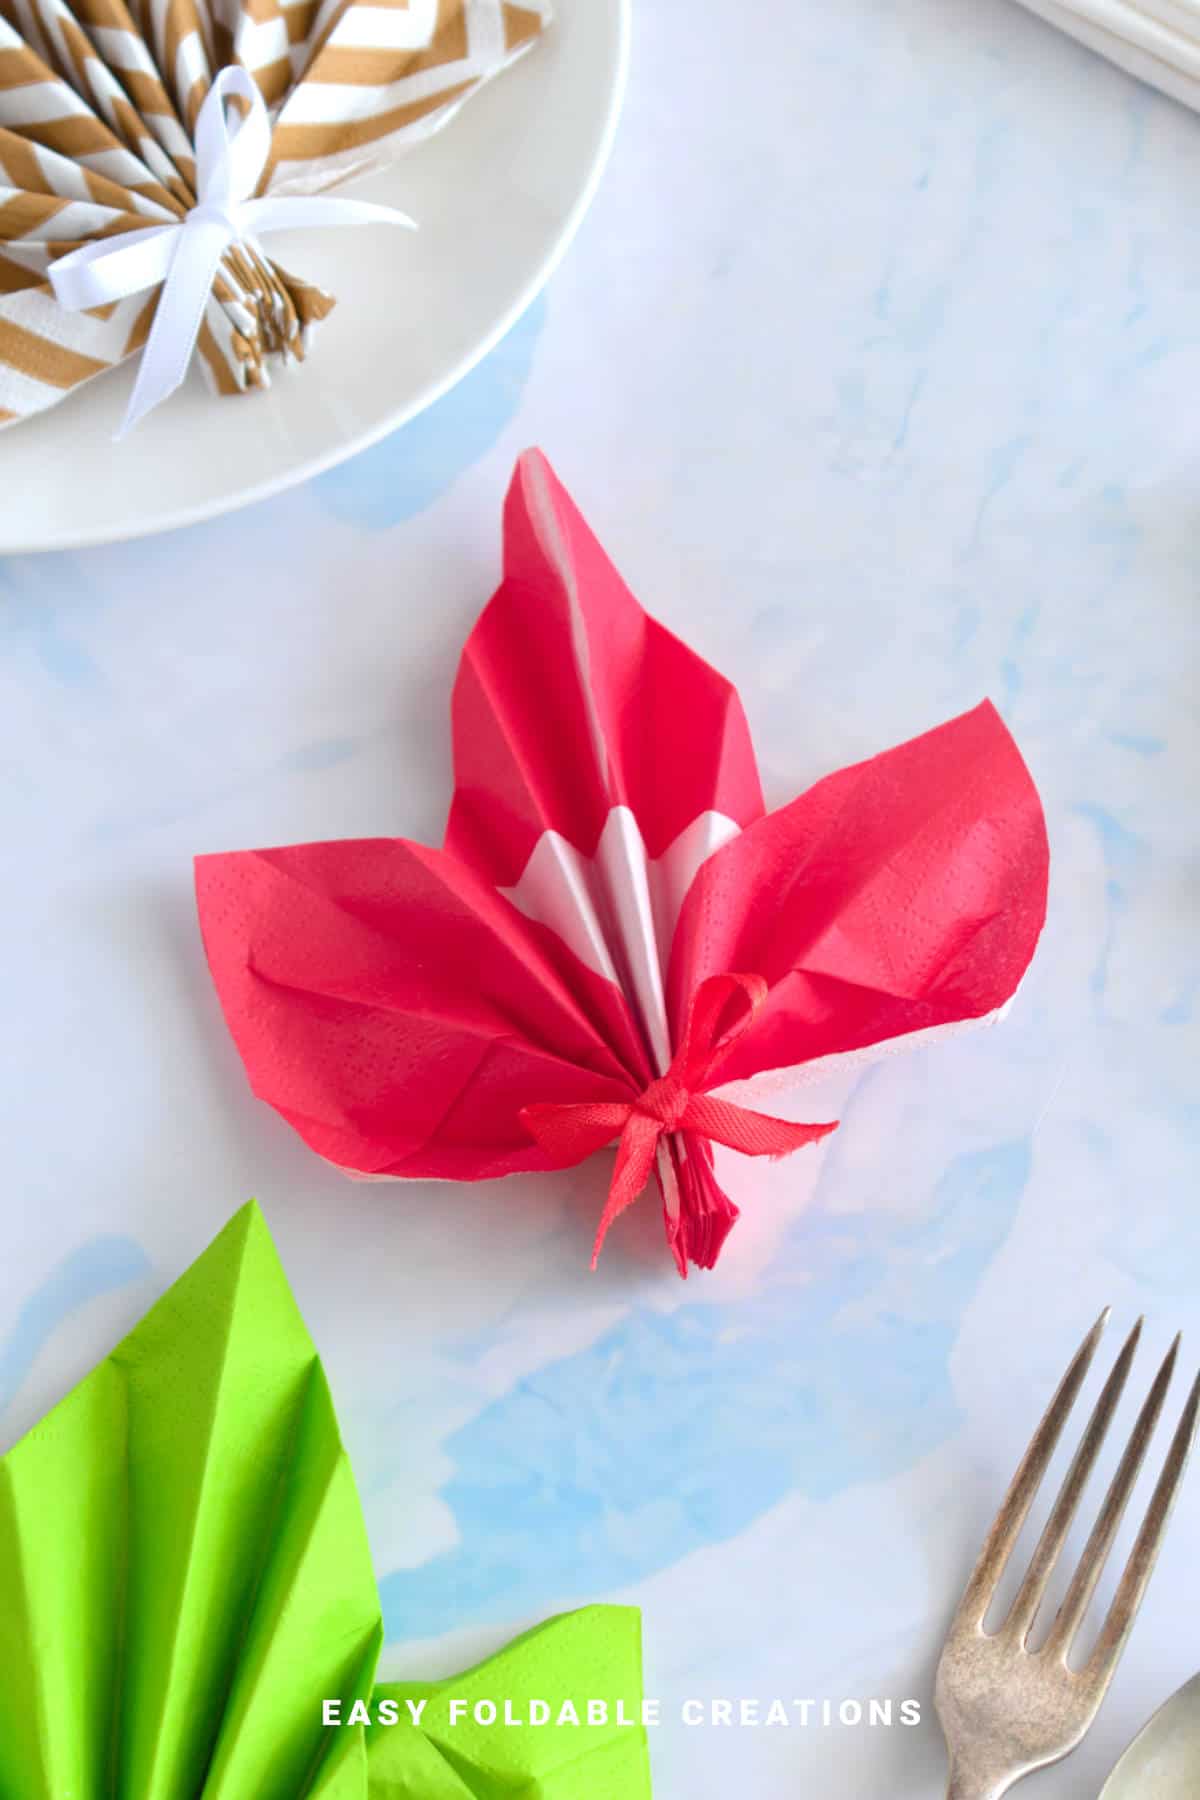
Step 14: Tie a ribbon around the bottom of the folds to hold it together. Or, you might like to use a small peg. Completed leaf napkin fold.

Tips For Success
- Use two-tone or textured napkins for a more realistic leaf effect.
- Fold ahead of time and store lightly pressed under a book to keep their shape.
- Add a small name tag or acorn on top for a place card and decorative touch.
- For Christmas, use rich reds or deep greens to give the leaves a festive feel.
Common Mistakes & How To Avoid Them
- Folds not crisp enough: Work on a hard surface and press each fold firmly.
- Lopsided leaf shape: Align edges carefully during folding for a balanced look.
Color, Paper Ideas, and Variations
- Fall-inspired: Rust orange, golden yellow, and deep red napkins to match autumn leaves.
- Christmas theme: Emerald green or crimson napkins paired with gold cutlery for festive elegance.
- Rustic style: Kraft paper napkins tied with twine for a farmhouse vibe.
- Modern chic: Monochrome napkins (white, grey, or black) for a contemporary table setting.
- Mix maple leaves with other folded napkin shapes (like pumpkins or stars) for variety on larger tables.
FAQ
Not at all. With the step by step tutorial, you'll master it in no time-even if you're new to napkin folding.
It's perfect for Thanksgiving, Christmas, autumn weddings, or any cozy fall dinner party.
Yes, you can fold them ahead and store flat in a dry place until needed.
Other Paper Crafts You Might Like To Try:
Helpful Origami Tips
If you're curious to learn more about origami, you might like to look at our basic guides on how to make some common origami folds.
Start with the valley fold and mountain fold-these are the foundation of most origami models.
Once you're comfortable, you might like to try the petal fold for 3D shapes, and explore the bird base and square base for more complex designs.
The water bomb base is also great for creating inflatable or geometric models, like this inflatable origami rabbit.
Useful Paper Craft Terms
Want to learn a little more about paper crafts and origami?
We've made this helpful printable just for you. It explains common terms and helpful tips you might come across when you are folding origami or making a paper craft project.
You can download the useful paper craft terms printable PDF here.
Stay Connected
Made this pattern? Let us know how it went in the comments below!
Pin this post - Pin now to take your paper crafting skills to the next level.
Share on Instagram or Facebook - Capture the beauty of your finished paper craft project and share it on Instagram or Facebook! Tag us @easyfoldablecreations so we can see your work!
Other Patterns You Might Like To Try:
Looking for other easy patterns like this? Try these:


Comments
No Comments